Deploying a static VPS website with basic security from scratch - Ubuntu Resolute 2026
I was debating whether or not to do this because it may give a potential threat actor the blueprint of my server configuration, but realistically I have backups and snaps and if the site is to be taken over I could just roll back with a couple of clicks and call it a day.
Ultimately though, I think it's worth doing, I cannot find many configuration guides over configuring Openresty online and the ones that do exist are rather useless (The hell do I need to show a 'hello world' in lua for? I want to display a website damnit) and the info on how to do this is scattered all over the place, requiring the average joe to have some previous experience with Linux or hosting to set it all up and if I didn't know better I'd say this is on purpose in order to have people flocking services like SquareSpace or pay a webmaster for consultation services.
Depending on your setup (Namely how much RAM your server has) You may want to skip configuring anti-DDOS measures, a firewall and Fail2Ban, everything in this article works perfectly fine with 1GB of RAM but I'm significantly over 512MB. Realistically, unless you hold some controversial opinions or have privacy concerns, you should just look up into just using a third party service to handle all of this like Cloudflare or GoDaddy.
You may also want to consider skipping making a swap file depending on the size of your website, although to be fair a basic static blog website is usually below 250MB so unless you want to host something like a forum or video hosting it's unlikely you need to worry about this.
Some assumptions I'm making beforehand:
Whenever I say 'edit' or 'create' a file assume I'm talking about nano and therefore you should use the nano command with sudo (Eg. 'sudo nano index.html', 'sudo nano nginx.conf'). This is because some servers (Most notoriously unraid and other slackware-based distros) only support doing a lot of operations with root.
This tutorial assumes you can open the terminal your server uses, whether it's by graphical interface or by ssh and it's completely blank. If you're renting one of those VPS with a CMS like Wordpress loaded and completely managed using Plesk, this guide may not be for you.
You're using Linux at home or in your office, I think I kept this universal except for the optional step regarding the generation of an ssh key to login into a server (And that's optional so not that big of a deal).
Step 1: Have your domain pointing to your website's IP
The first thing you want to do is setup your DNS records, this consists of two steps: creating a PTR record with your hosting provider and a couple of A records with your registrar. Please note the PTR is optional but some Firewalls may block access to your website if it's not configured.
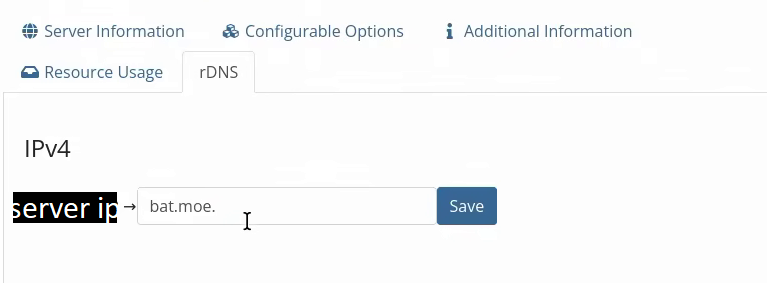
For the PTR, inside your VPS console there's usually a tab for this that's normally called DNS, PTR or similar, with the server's IP and a box to fill your domain name. If your hosting provider doesn't have this option visibly or you want to host two websites on the same VPS, you may need to contact support so they can create the record for you.
Filling out the PTR record
Next, you need to go to your registrar and fill a couple of DNS records pointing to your server's IP. You need an A record with nothing but an '@' sign and a second record with nothing but 'www'.
Filling A records
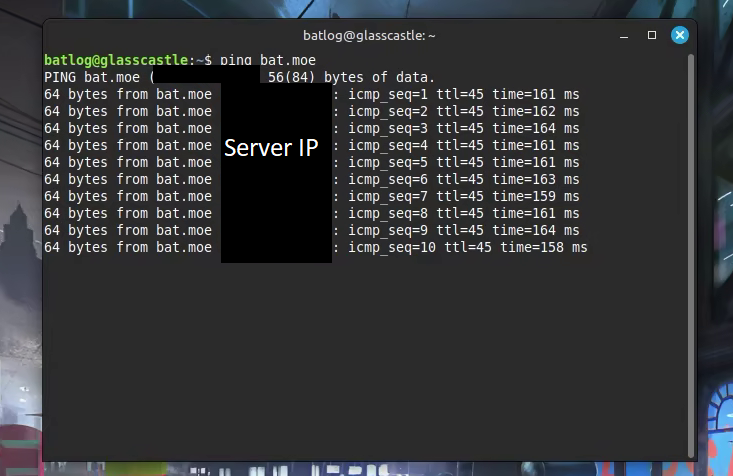
After you are done you have to wait. Wait from 2 to 8 hours for the DNS to propagate, give it some time and be patient (I've had cases where this takes a whole day). Once some time has passed, run a ping with the domain name and check if it gives you back the server's IP.
Ping giving back IP
This is honestly the only time you'll have to touch these settings unless something bad happens with the IP, bear in mind if you're using shared space to save money there's a non-zero chance that you may be sharing the IP with a guy that does something malicious and gets you blacklisted, so take that in consideration when you're looking to buy a VPS for cheap.
Step 2: Locking root login
Once that's done the next step is actually going into your server and start configuring it, the first thing you want to do is disabling the root user, unless you have someone else managing your server I highly recommend you to do this as it's the username all bots are always attempting to break into and you can become a root user by using 'sudo su'.
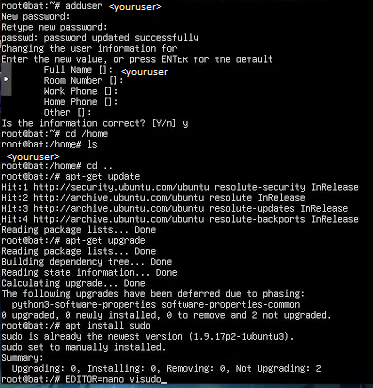
As root, create a new user to serve as your admin. This is fairly straight forwards these days and is done with a single command (Usually adduser) but it may vary depending on the distribution you're using, if you see a directory with your new user's name in the /home directory then you're good to go, if you don't however check your OS manual.
Adding a new user
Next install sudo if it's not already installed (Run a command such as 'sudo ls' to verify it's installed) and once that's installed add your user to sodoers file in 'etc/sudoers'. The most common configurations are:
ALL=(ALL:ALL) ALL - Asks for your user's password every time you run sudo
ALL=(ALL) NOPASSWD:ALL -The user can run sudo without asking for a password every time.
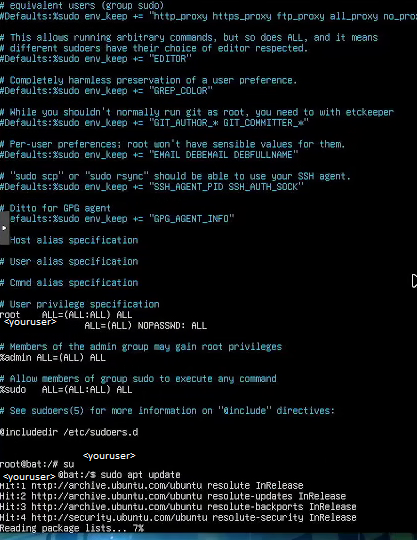
Personally, I run NOPASSWD these days, asking for a password is obviously more secure but in my experience once someone manages yo login into your admin user it's pretty much over regardless of whether it uses sudo for password or not. I recommend using 'visudo' in order to more easily edit the sudoers file without worrying about corrupting the file (If you don't have vim installed or don't know how to use it, use 'EDITOR=nano visudo' to edit the file with nano). Once you've edited the file and exited change to the user you created with su and try to run a program using sudo, if it resolves you can now move to disable root login.
Giving a user sudo privilages and running a command
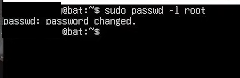
Reboot your server and enter as the user you created. Run the command 'passwd -l root'
Locking the root user
That's it, root is now locked from logging in.
(Optional) Setting up a Swap file
Chances are your VPS has a very small amount of RAM, normally from 256 MB to 1GB. So, you may want to expand it a bit, this is completely optional and can be impossible if you also have very little storage space to work with but I highly recommend it. You can check how much free space you actually have by running 'df -h'.
There are a few ways to do it but in my opinion the easiest one is making a swapfile.
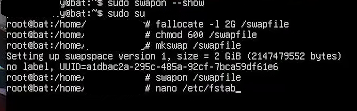
Check if there's any swap in use and if there's not change to root using sudo su, then allocate 2GB for a swap file in the root directory, change the permissions so only root can use them and turn it into a swap file as shown below:
Creating a swap file
If swapon doesn't fail, open fstab and add the following line, then save the file and exit (Be very careful adding this line as any mistakes will immediately brick your server, take a snap or backup beforehand).
/swapfile none swap sw 0 0
Reboot the server, if the server starts without any issues you're most likely fine, execute the command 'top' to check if your swap is working. If it shows MiB swap below mem then congratulations, you've just succeeded in downloading more RAM)
Top showing swap is working
Step 3: Making a test website, installing and configuring Openresty to display an http website
Before you consider taking your website live, first you need to make a website available as http (Aka the websites that modern browsers tell you not to visit and use). This is necessary, in order to make your website available as https you need a certificate and the program used on the next step requires for a website to be available on clearnet as it writes some files in the directory where the live website is in order for a certificate authority to verify you're requesting a certificate.
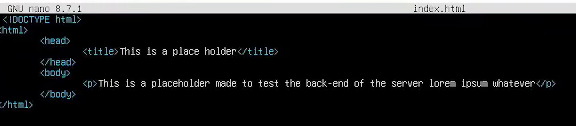
Create a directory under /var/www/ with your website's name (e.g. /var/www/example.com), create a file there called index.html, this will be your test website, my standard test website is just a header and a paragraph as shown:
<!DOCTYPE html> <html> <head> <title> This is a placeholder</title> </head> <body> <p>This is placeholder text to test the back-end of the server</p> </body> </html>
Example of a temporary website called 'index.html'
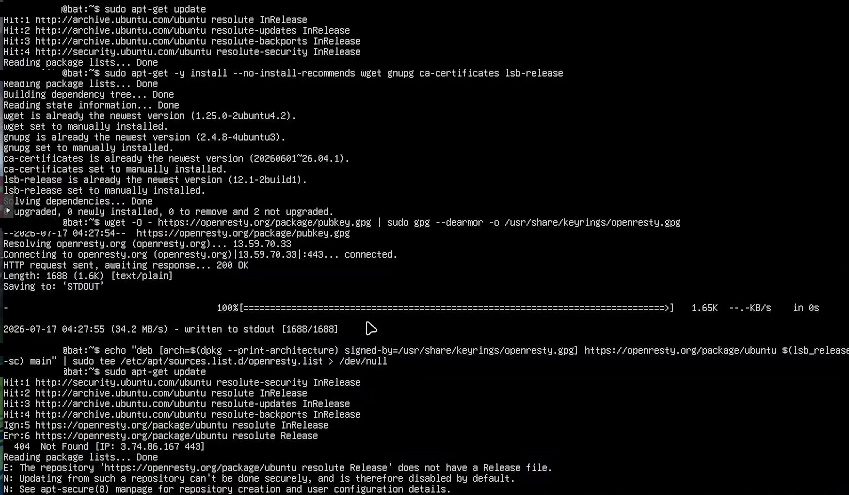
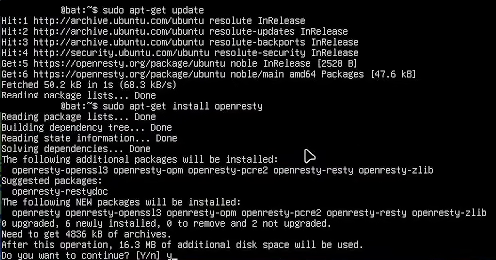
Now, in order to get openresty installed you need to go to their website and follow the instructions on their website for their pre-built packages for your respective distro, in the case of Ubuntu the commands are as follows:
Now, as seen above I got an error and the reason for that is because the openresty team doesn't release packages for ubuntu resolute (27) yet, but that's alright all it needs to work is to change the name in the 'openresty.list' from resolute to noble (Make sure to change this to resolute when they release the latest version for your distro). after that update your sources again and install openresty.
After OpenResty is installed, edit the nginx.conf file located in /usr/local/openresty/nginx/conf/nginx.conf and add the following under 'server' (Ignore all comments in blue for now, they'll become relevant in a bit, also delete the 'location' section if the program auto-generated it and finally replace example.com with your website name as shown below):
server { listen 80; server_name example.com www.example.com;
root /var/www/example.com; index index.html;
location / { try_files $uri $uri/ =404; }
}
After that, test openresty and if you get no errors reload openresty.
sudo openresty -t
sudo openresty -s reload
testing and reloading openresty, you should get used to these commands, you may end up using them -a lot-
Now open up your browser, preferably firefox as that's a browser that allows you to open non-https websites with just a warning instead of blocking them, and go to your website (Make sure to delete the 's' from https if your browser adds it automatically). If you see your test website up then congratulations, you have officially published something in the world-wide-web that's open to see for everyone.
Test website visible from a normal browser with certificate error
Step 4: Install certbot to get an ssl certificate (To get an https address)
It's honestly downhill from here. Now that you have a website up and visible for everyone, you can request a certificate for it and make your connections secure.
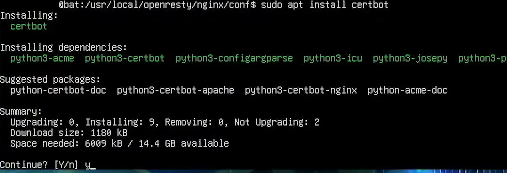
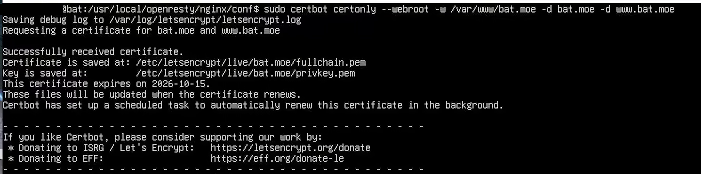
Doing so is relatively easy, install certbot and point it to your website directory, it will make a request for a certificate to an authority and if your website really is visible to everyone then it will issue you a certificate for one month (If it asks you for a mail you can skip it, it's not necessary).
Installing certbotCertbot installing a certificate correctly
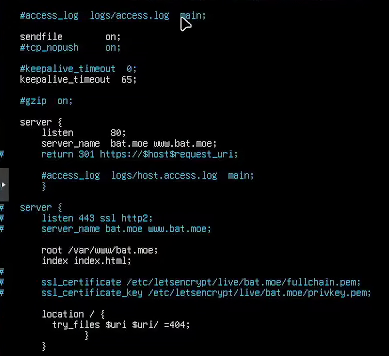
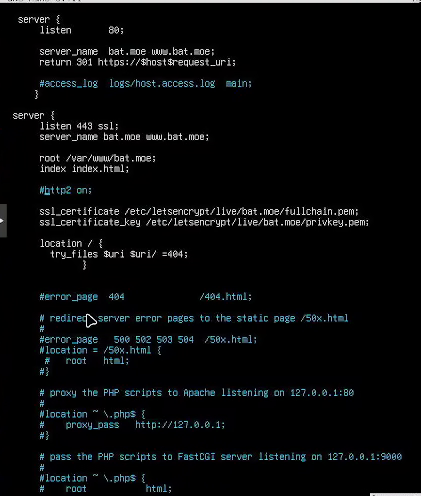
Now that you have your certificate you have to change your nginx.conf file again, what you want is for http requests to redirect as https automatically and have the https server as the only one serving a website, your conf file should look something like this:
Note: As seen on the picture I disabled http2 support because it was triggering the anti-bot measure I installed on step 7, you can leave it on if you want traffic from people with old operating systems or browsers like Dillo.
After this is done, reload nginx as you did on step 3
sudo openresty -t
sudo openresty -s reload
if you get no errors, go to your website again (Add the s to https if it doesn't load it may have been cached by your browser). If you see the website loading with no warnings from your browser, then congratulations you are now the web master of a website that's visible on any modern browser.
Test website loaded as https
Step 5: Set the certificate to auto-renew using crontab
As mentioned above the certificate only lasts one month, getting a new one is as easy as just running certbot renew and restarting openresty but the problem is you have to do this manually, which unless you're going to check on your website once a month it's just not happening, the solution is to create a 'cron job', which is aprogrammed automated task.
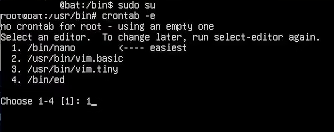
First you need to install crontab, it's usually installed and the package is called 'cron'. After you install it, switch to root and open crontab using 'crontab -e'.
Opening cron
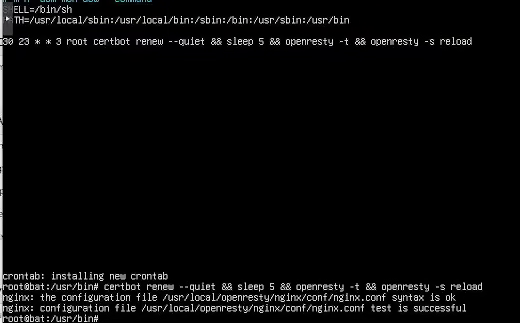
Inside cron, you need to make a task. Specify the shell that you want to use, add the paths of your binaries (This helps avoid having to specify where the executable of every program you use is and then write the task specifying how often the task is executed.
This config works to execute renewal of the certificate and reload openresty every day at 23:30. The way crontab works is that every asterisk represents a different time like this:
15 Minutes (0-59) 1 Hours (0-23) * Day of the month (1-31) * Month (1-12) * Day of the week (1-7)
For instance my Crontab seen below is made to execute every wednesday instead of every day, this is just because of (rather unfounded) paranoia that something may happen to Let's Encrypt (the Certificate authority) and I have time to react to it, however the industry standard for renewing certificates is running certbot once or twice a day. After you have programmed your task then just run the command you setup, if you get no errors or abrupt exits then you're good to go.
Crontab configured to work every Wednesday at 23:30
(Optional) Making a static website with Publii
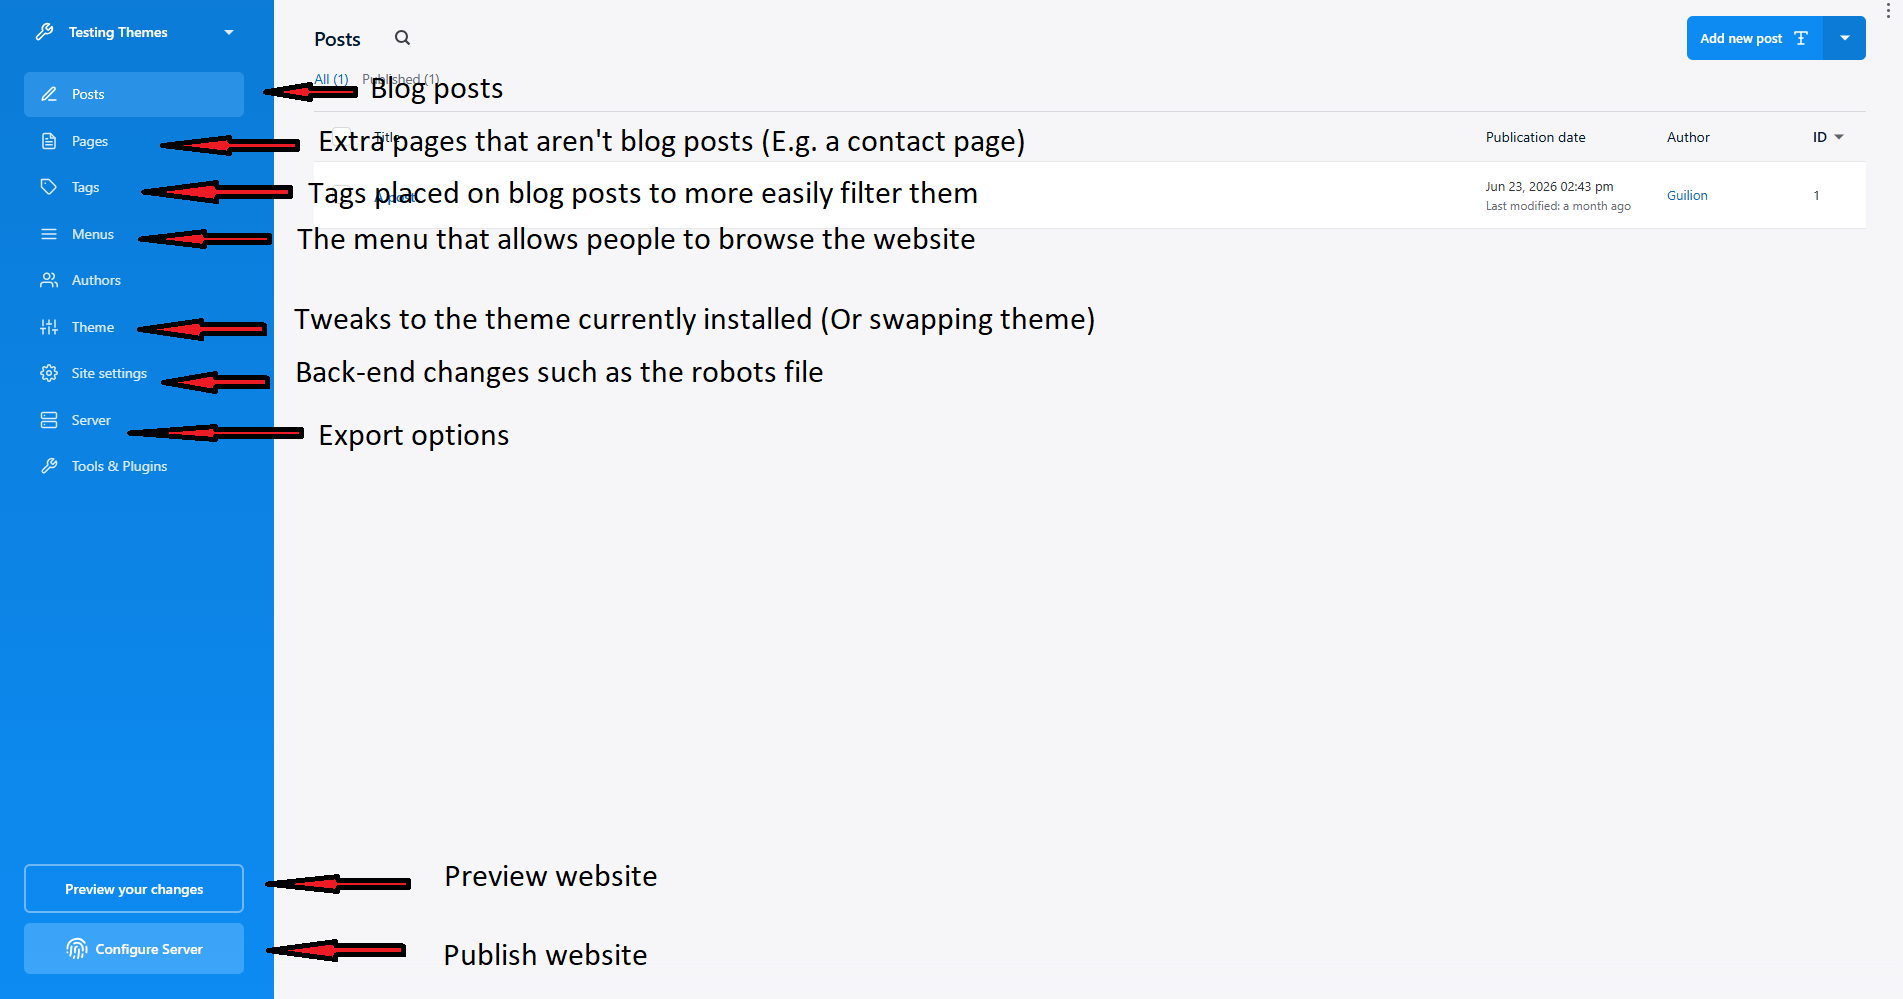
At this point if you haven't already, you should get your website files ready. I use Publii, it's not the most secure website maker out there (These days that's more-or-less defined due to how many lines of javascript a website has and Publii has more lines than other website makers like Hugo) but it's really, really fast and easy to use as long as all you want is a blog. Here is how the main interface is and what each things does:
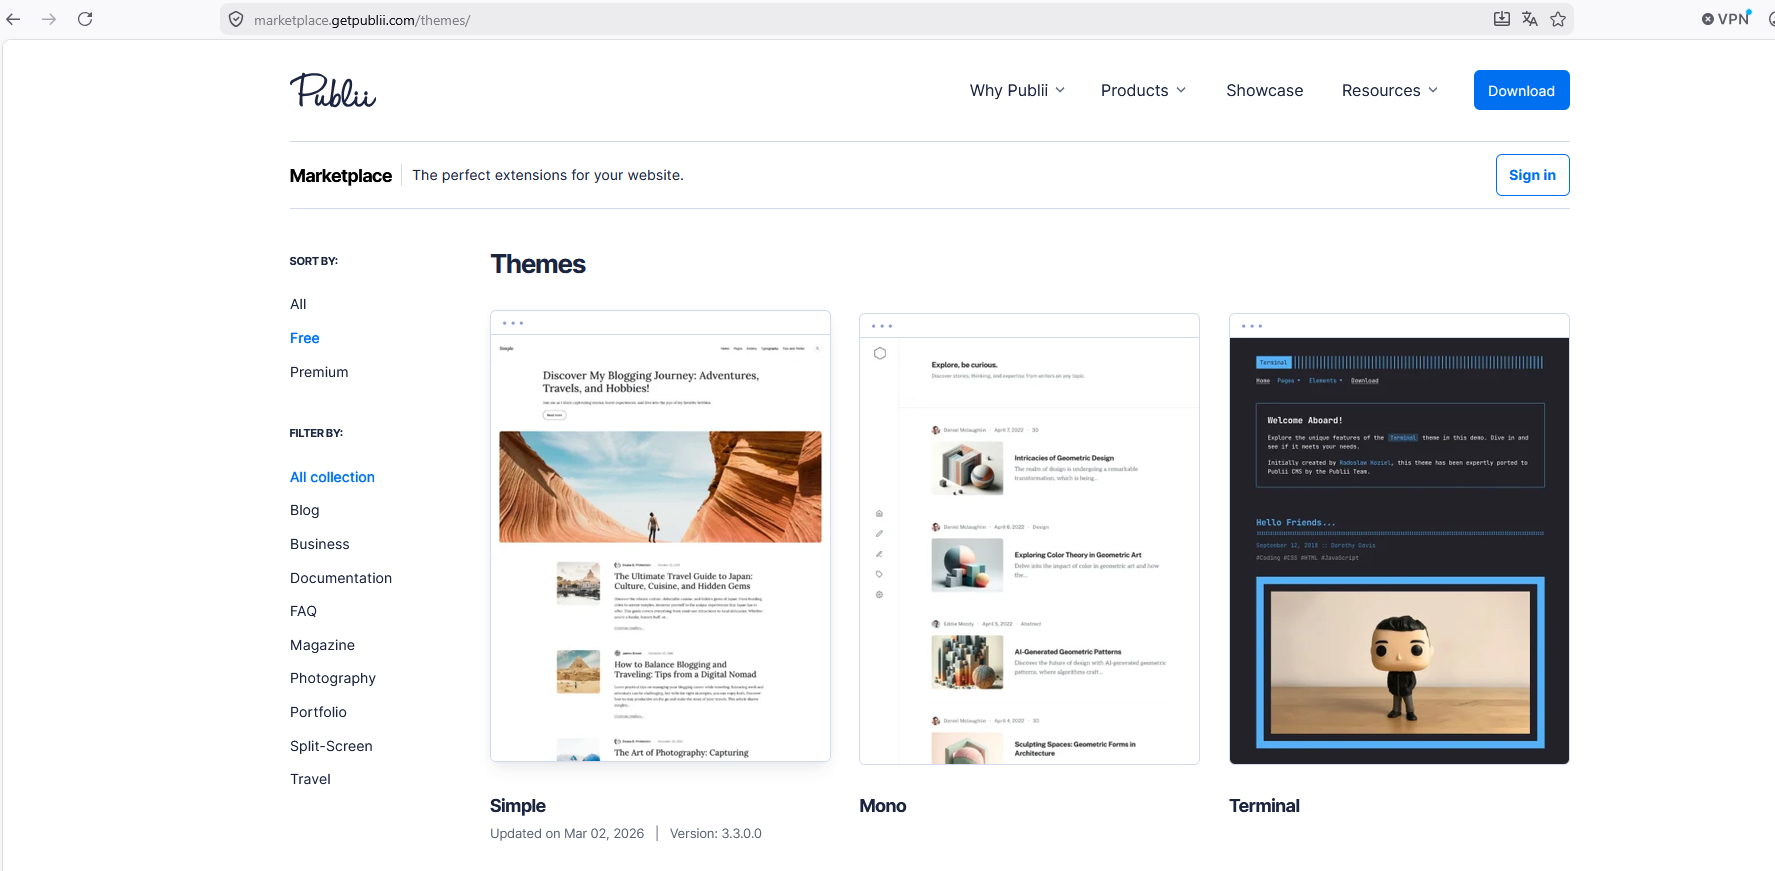
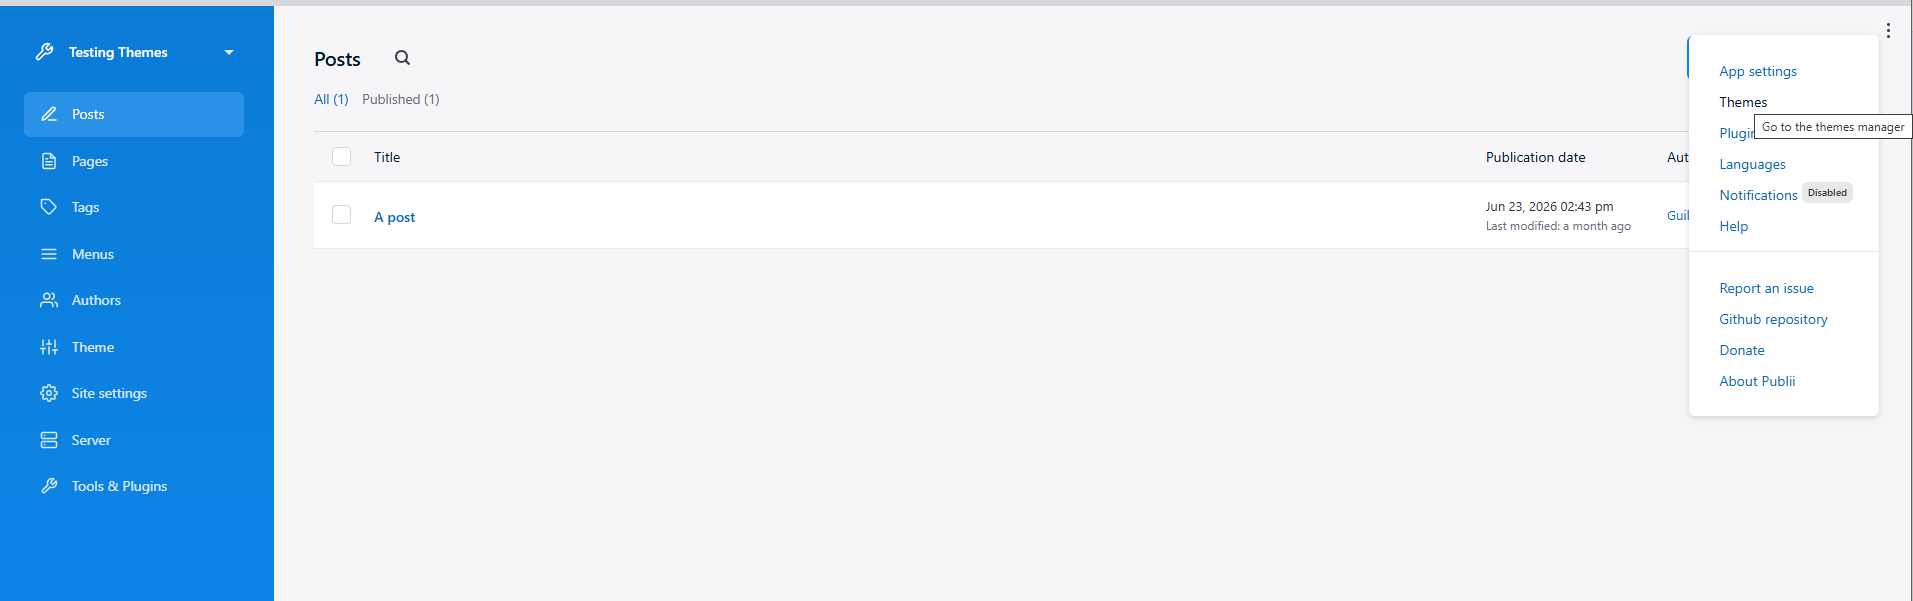
If you want a different theme than what Publii comes with you can go to their website, filter by free and pick one, as of the time of writing they have 13 free themes and they have previews so you can visualise how they look when deployed. To install a theme pick the sandwich menu at the top right and select install theme, then just pick the file downloaded from Publii.
Free themes in Publii's websiteThe menu to install themesInstalling a theme
After that you can just tweak the theme to your liking and even edit the source code of the theme to better swit your needs.
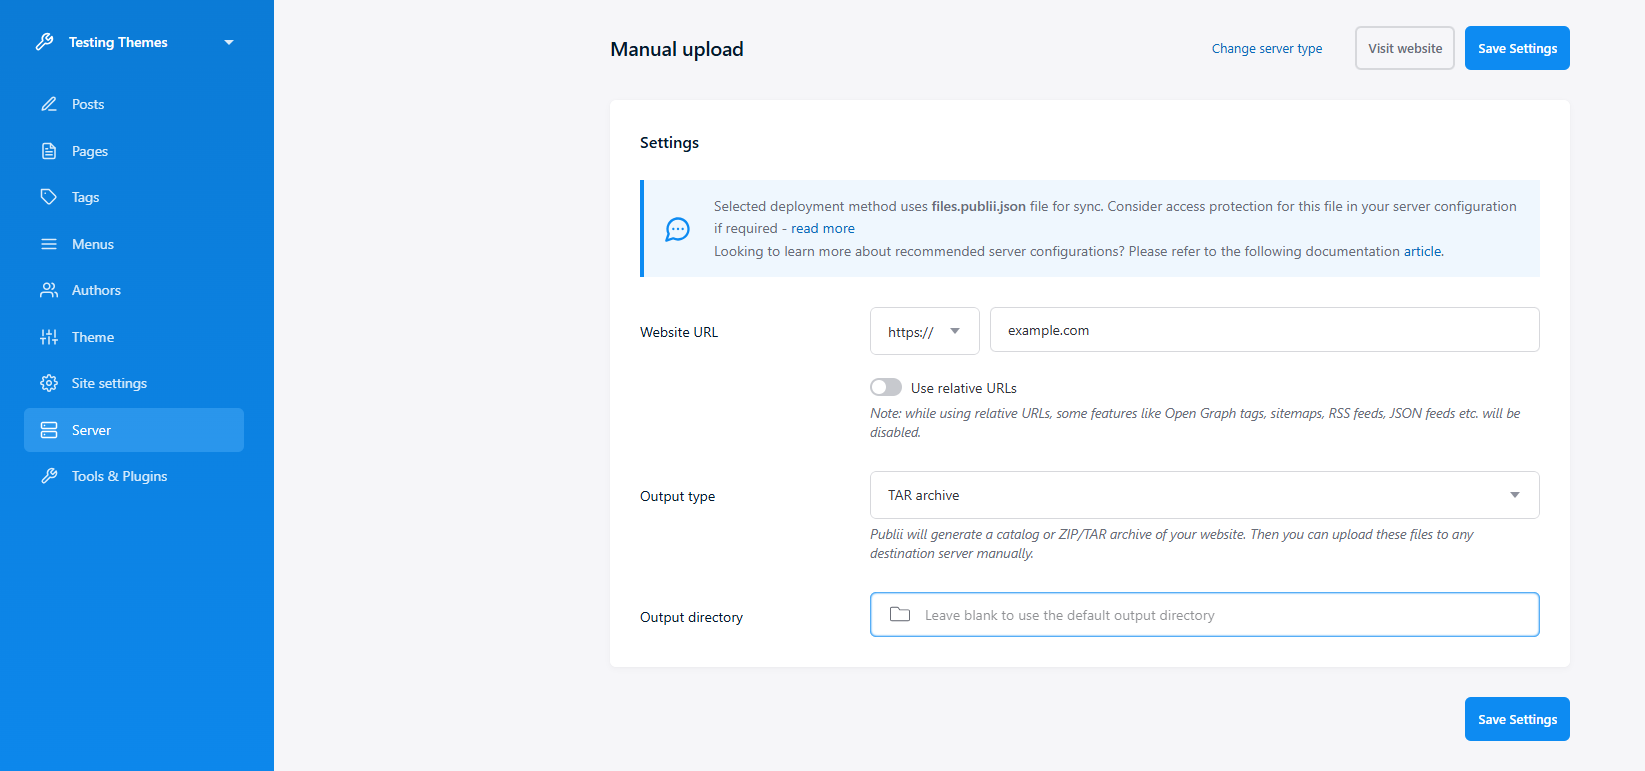
Now, when it comes to actually publishing the website I just export the website as a tar file to upload it manually, this is solely because Publii gives out the most unhelpful errors when it fails on publishing a website and honestly I don't have the patience to trouble-shoot it.
Export options.
Step 6: Uploading the website
There are several ways to do this (Hell, depending on your VPS provider they may have a system to upload files to the your server directly). However my favorite method is SFPS, I already have SSH enabled anyways so why not.
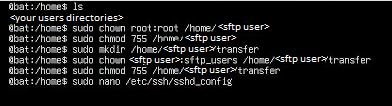
Start by creating a group for your sftp user, adding that user to the group and setting a password for your user.
Next, check your new user has a home directory generated like with your main user, you want to lock that user from writing anywhere other than a specific directory dedicated only to transfer files (I like to do this in order to keep control of the website version and rollback easily if necessary).
Locking the sftp user from writing anywhere other than a directory for uploads
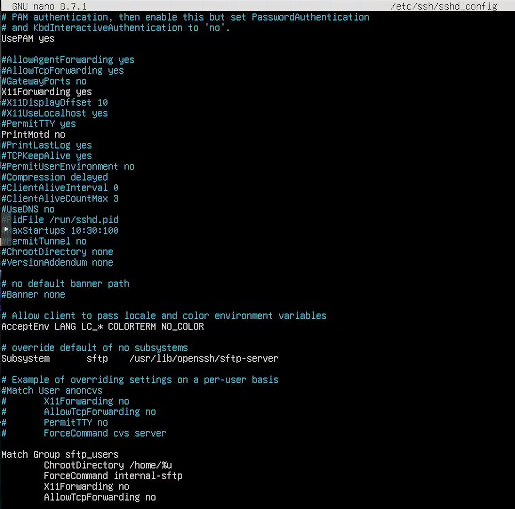
Afterwards, edit the file at /etc/ssh/sshd_config and add the following lines at the very end of the file:
Match Group sftp_users
    ChrootDirectory /home/%u
    ForceCommand internal-sftp
    X11Forwarding no
    AllowTcpForwarding no
Allowing users in the group sftp_users to use sftp over ssh
YOU MAY ALSO WANT TO CHANGE THE SSH LOGIN PORT TO HELP WITH THE BOT PROBLEM IN STEP 9.I just don't do it due ti previous bad experiences of locking myself out when using a server managed by a third party.
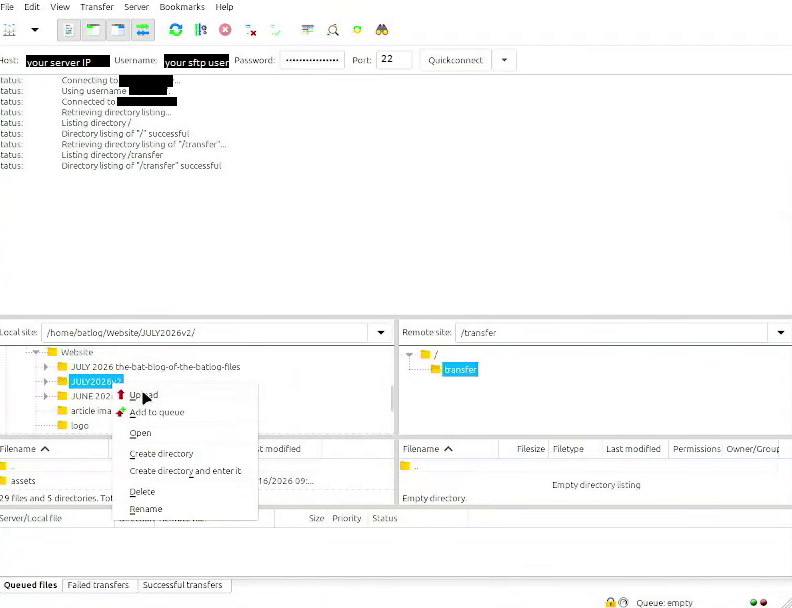
Reboot your server, you're pretty much ready to transfer your files with a ftp client, for this I like Filezilla, it's very easy to use. Just decompress your website in a directory in your PC, connect to the port 22 of your server, select the uploads directory in your server and just click transfer, afterwards go do something else for about half an hour.
Uploading files with Filezilla
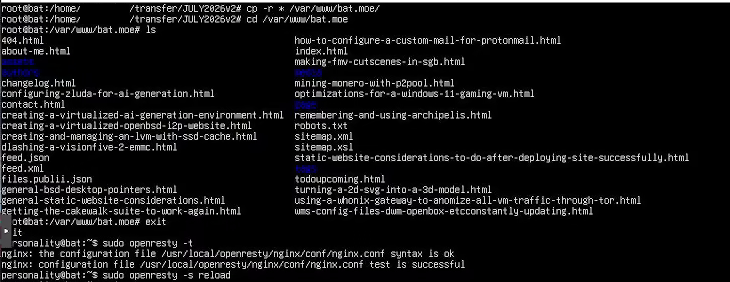
Once it finishes transferring, delete your temporary website on /var/www/ and copy your website into it. Then reset openresty.
Copying the website to /var/www and reloading openresty
Open a browser and head to your website, if it loads you have successfully uploaded your blog or website online and it will stay there for as long as you pay for the domain and hosting.
Static website successfully deployed
IF YOU HAVE LIMITED SERVER RESOURCES, STOP HERE. OTHERWISE YOU MAY END UP FILLING YOUR MEMORY AND YOUR WEBSITE WILL BECOME UNRESPONSIVE.
Step 7: Installing an anti-DDoS script
Now that the site is up, it's time to harden it a bit. First I want some script for DDOS attacks and to make old hijacked hardware completely unable to access the website (This doesn't affect old computers running a modern OS like Linux or BSD). This is the whole reason why I picked openresty instead of just nginx, as mitigating this is very easy using the anti-DDOS script available from github..
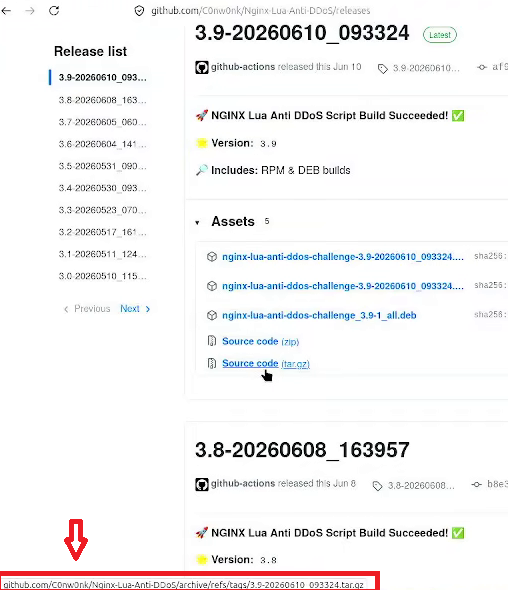
Go to Github and get the link to the latest version, just hover your mouse over it to get it.
take note of the link for the latest version.
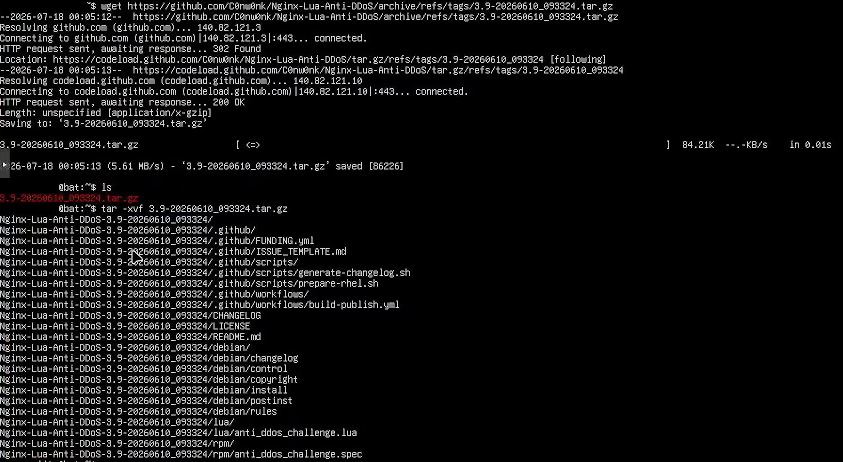
Now that you have that down, go to your server and download it using wget and decompress it using 'tar -xvf'.
Downloading C0nw0nk's anti-DDOS lua's script
Copy the script named 'anti_ddos_challenge.lua' in the lua directory to /usr/local/openresty/nginx/conf/
Copying the lua script to nginx script
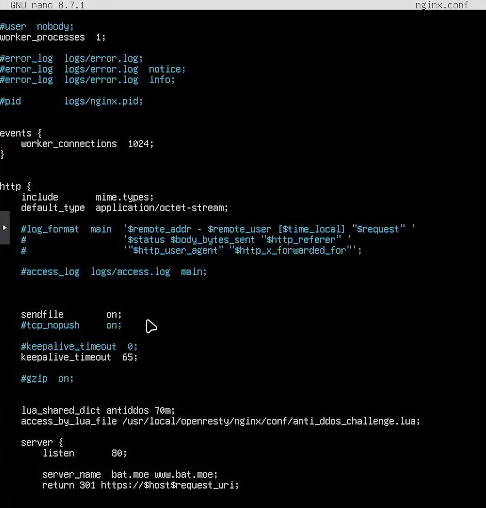
Open your nginx.conf line and add the following line (THe instructions by the author don't say to use the full path but I couldn't get it to work otherwise). Then test the config and reload openresty as per usual. Make sure to add it before the 'server{}' block so it affects all websites in the server.
You can check if it's working by going into /usr/local/openresty/nginx/logs and using 'cat' to read 'access.log' if you don't see anything after the activation give it a couple of hours it will inevitably catch something, and if not enable http2 in the https block where your website is since that apparently interferes with this script and triggers a response when visiting the website from a browser as seen below.
The Anti-DDOS working by denying an http2 request
Step 8: Configuring a Firewall
For the next part you may want a firewall. A few servers come with one but it's usually turned off for whatever reason. I'm gonna install ufw since that's a firewall that barely uses any resources and is packaged almost anywhere.
Always take a snapshot or backup if you can before messing around with firewall settings, you can easily brick your server or lock yourself out if you commit even a little mistake.
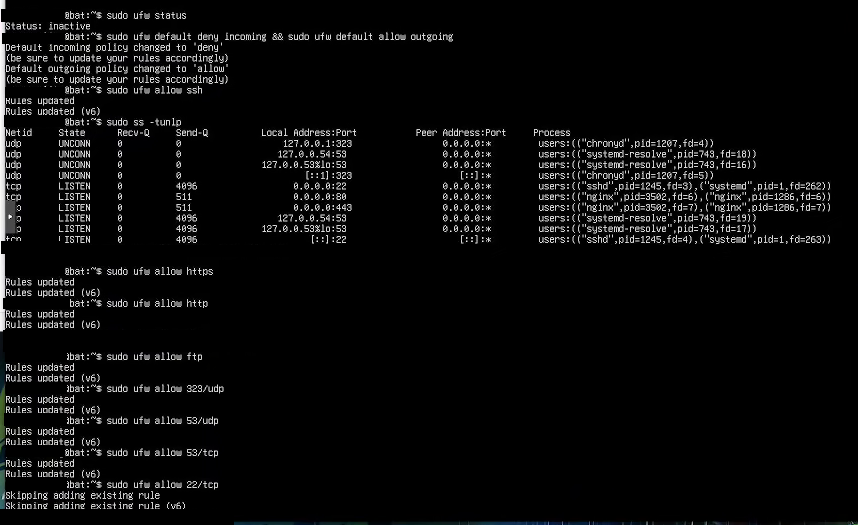
First check if it's running and if it's doing anything with 'ufw status', if it is chances are your VPS provider pre-configured it and you really don't have to do anything. If it's not you must enable it and deny all incoming traffic and accept all outgoing traffic. Then enable ssh, http, ftp and https immediately after to avoid locking yourself or your visitors out (Please note ufw doesn't have an option to whitelist sftp because it comes with ssh).
Afterwards what I like to do is check which ports are currently being used and by what and whitelist them all, this can be done with 'ss -tunlp'. Then I go through a process that can be rather time consuming of whitelisting every single udp and tcp port listed if they are not doing anything weird or suspicious (E.g. marketing telemetry, Ubuntu did this with Amazon a few years ago and people seem to have forgotten about it), my server only had 10 ports so it didn't take me that long.
ss -tunlp
ufw allow <port number>/udp
ufw allow <port number>/tcp
Whitelisting ports one by one
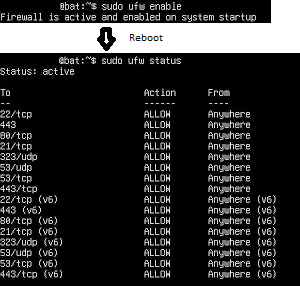
Afterwards use 'ufw enable' and reboot your server. if you can access it without issues then chances are you did everything correctly, just run ufw status to verify your rules are in place and the firewall is working.
Firewall enabled with the rules customized as per the ports that were open before configuration
Make sure to load up your website to verify it remains visible to everyone (Use a VPN if you can)
Step 9: Install and configure Fail2Ban to stop ssh bots
This is a problem that I don't think people are even aware of but most hackers these days don't really do a whole lot of hacking themselves unless they're gunning for a specific website for personal or financial reasons. Instead they deploy bots, often hundreds of them, and just have them scan ports for vulnerabilities and try random users and passwords to try and login on any server they come across. This is for the most part just annoying as long as you don't use common usernames and passwords but it can seriously affect server performance and mess with traffic statistics. Honestly? I hate them and I don't like them constantly trying to login on random ports all the time.
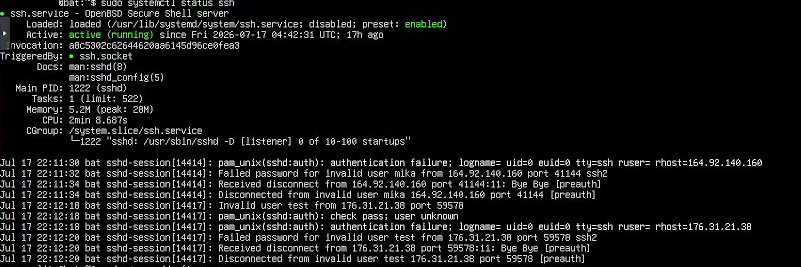
Sample of multiple bots from different IP's trying to login in the span of 1 minute. Who uses 'mika' for a user on a server anyways? 🤨
You cannot really get rid of them as most bots run on legitimate but hijacked servers, computers and routers and complaining to data centres or ISPs only gets them to laugh in your face. But what you can do is deter them by banning them.
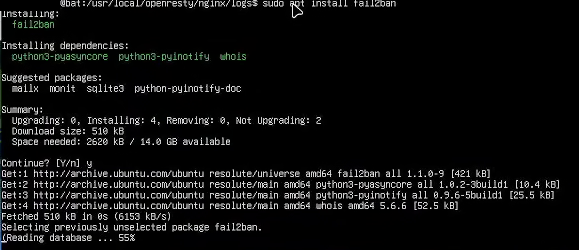
This one is pretty straight forward, first you have to install a package named fail2ban.
Installing fail2ban
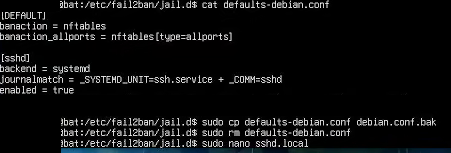
Once that's done, go to the directory /etc/fail2ban/jail.d/ and check if there's something there, if it contains anything make a backup of the file and delete the original. Afterwards make a file called 'sshd.local'.
Deleting a configuration file in /etc/fail2ban/jail.d/
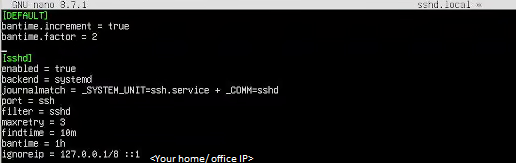
Afterwards populate your sshd.local file with the following, replace the IP with your home or office, you can get it from a website like what's my IP. Bear in mind residential IP's are often random and reset when there's an internet outage, so if you have this issue you may want to use a more permanent IP like a VPN you own or talk with your ISP to rent you a permanent IP:
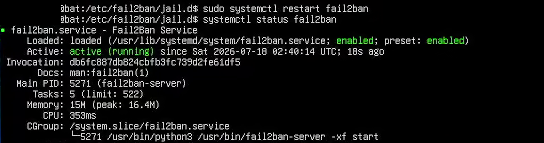
In my file I have [bantime.increment] and [bantime.factor] (There's also [bantime.maxtime] which I don't use), depending on your config you may or may not want to consider using these but I use them because otherwise the logs fill up quite a bit. After you're done, save your file, reset fail2ban and check if it's running with systemctl.
systemctl restart fail2ban
systemctl status fail2ban
Restarting fail2ban after changing the config
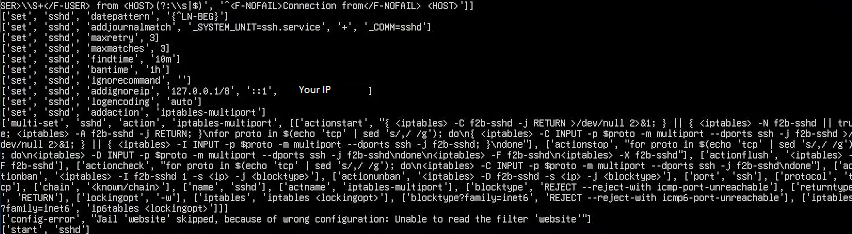
You can verify if your config was applied correctly by using 'fail2ban-client -d', this will give you a huge log and your config should be among the last lines.
Fail2Ban log showing the correct config
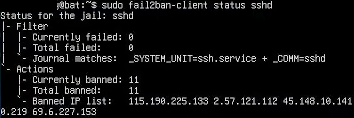
After you're certain it's working you can check how many bots have been banned while you were ogling at the logs, unlike the anti-ddos protection which may take a while to catch someone, here it's almost instantaneous. This problem is that bad.
Fail2Ban banning 11 IP's in a very short period of time.
Optional: Automatic upgrades and reboots
This one is done with CRON and depending on your situation you may or may not want to do it, I don't do it because my hosting provider does it and their config is not only weird but it breaks easily when upgrades to systemd happen (Which given how monolithic that POS is, it just happens ALL THE TIME).
This will update the server at 3 AM every day and reboot the server so the upgrades take effect every day at 4 AM, adjust accordingly and make sure to also program automatic snaps or backups with your VPS provider before your update times in case your server breaks.
Optional: Generate ssh key for login
This is another one I don't do because although more secure in theory, the damn module gets exploited all the fucking time. No joke, while I was configuring my server from scratch again after nuking it in July 2026 I was considering on implementing this but I found a critical vulnerability was found just a week beforehand.
CVE-2026-60002 2026-07-08 ssh in OpenSSH before 10.4 can have a use-after-free when a server changes its host key during a key re-exchange. (This outcome occurs only on the client side.)
(FFS dude)
But I digress. This is considered to be a best practice by just about everyone and I shall therefore cover it.
MAKE A SNAPSHOT OR A BACKUP BEFORE CHANGING THIS AS YOU MAY LOCK YOURSELF OUT.
If you want to login using a key in your home/office Linux computer install ssh (Assuming it wasn't installed as a Filezilla requirement) and do type the following commands from your home directory (add a custom name and password when prompted for it):
mkdir .ssh
cd .ssh
ssh-keygen -t rsa -b 4096
This will generate a file with a .pub extension in the .ssh directory, now you have to copy that to your server, you can use cat to see the content of the file and type it manually in your server but realistically you may want to copy it using scp:
That should get the key into your server in the home folder of your user. From here all you have to do is create a file and copy the contents of the key into it like this:
From here edit /etc/ssh/sshd_config, find these lines and change these values (Make sure they don't have a '#' beforehand):
PubkeyAuthentication yes
PasswordAuthentication No
Restart sshd with systemctl and if you can login into your server using the password of your pubkey, then you're done.
systemctl restart sshd
If you cannot log back in, you may need to specify the directory where your key is and the port you're using in your ssh client.
ssh -i .ssh/<keyname> <yourserverAdminusername>@<yourserverip> -p <port_number in sshd_config>
Addendum 1: Deleting EXIF metadata from images and why you should do it
This is a mistake I've seen bloggers constantly do where they don't erase the metadata from their pictures, which can be used to track down a person very easily as any photo taken with a modern phone that has location enabled contains A LOT of information of the person that took it.
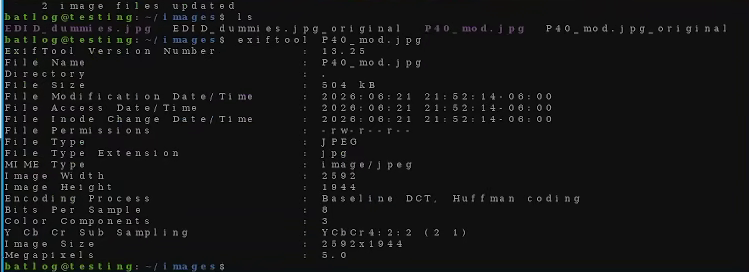
This one is rather easy, most people do it in drawing programs (Just opening a file, adding a pixel or changing it from png to jpg) but I like to do them in bulk using exif tool to save time.
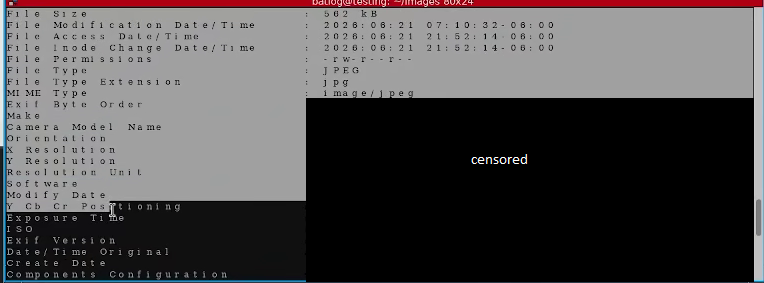
Using exif tool in two images at the same timeResult of data of the images
I know this looks like a lot of info but it really is not compared to the exif data of the original file which collects everything from location to phone manufacturing to a dozen other things.
Please bear in mind I also use a rather old phone to take photos to try and keep anonymity, this is because despite how Google tells you that there totally isn't any glowieware embedded into every photo you take and the only info is the EXIF metadata:
They in fact do, via two technologies called Sensor Pattern Noise (PRNU) and CCD watermarking, both of which are embedded into just about every modern phone and camera and can be used to track down the device that originally took the photo and by extension, you. This takes a few hours for private investigators and black hats with contacts to obtain and it only takes minutes for law enforcement to obtain.
I recommend buying an old used phone (Before android 4 or even a Firefox phone or something) with cash and use that to take pictures you intend to upload to the internet, most people have one in a drawer somewhere so most of the time you just gotta ask.