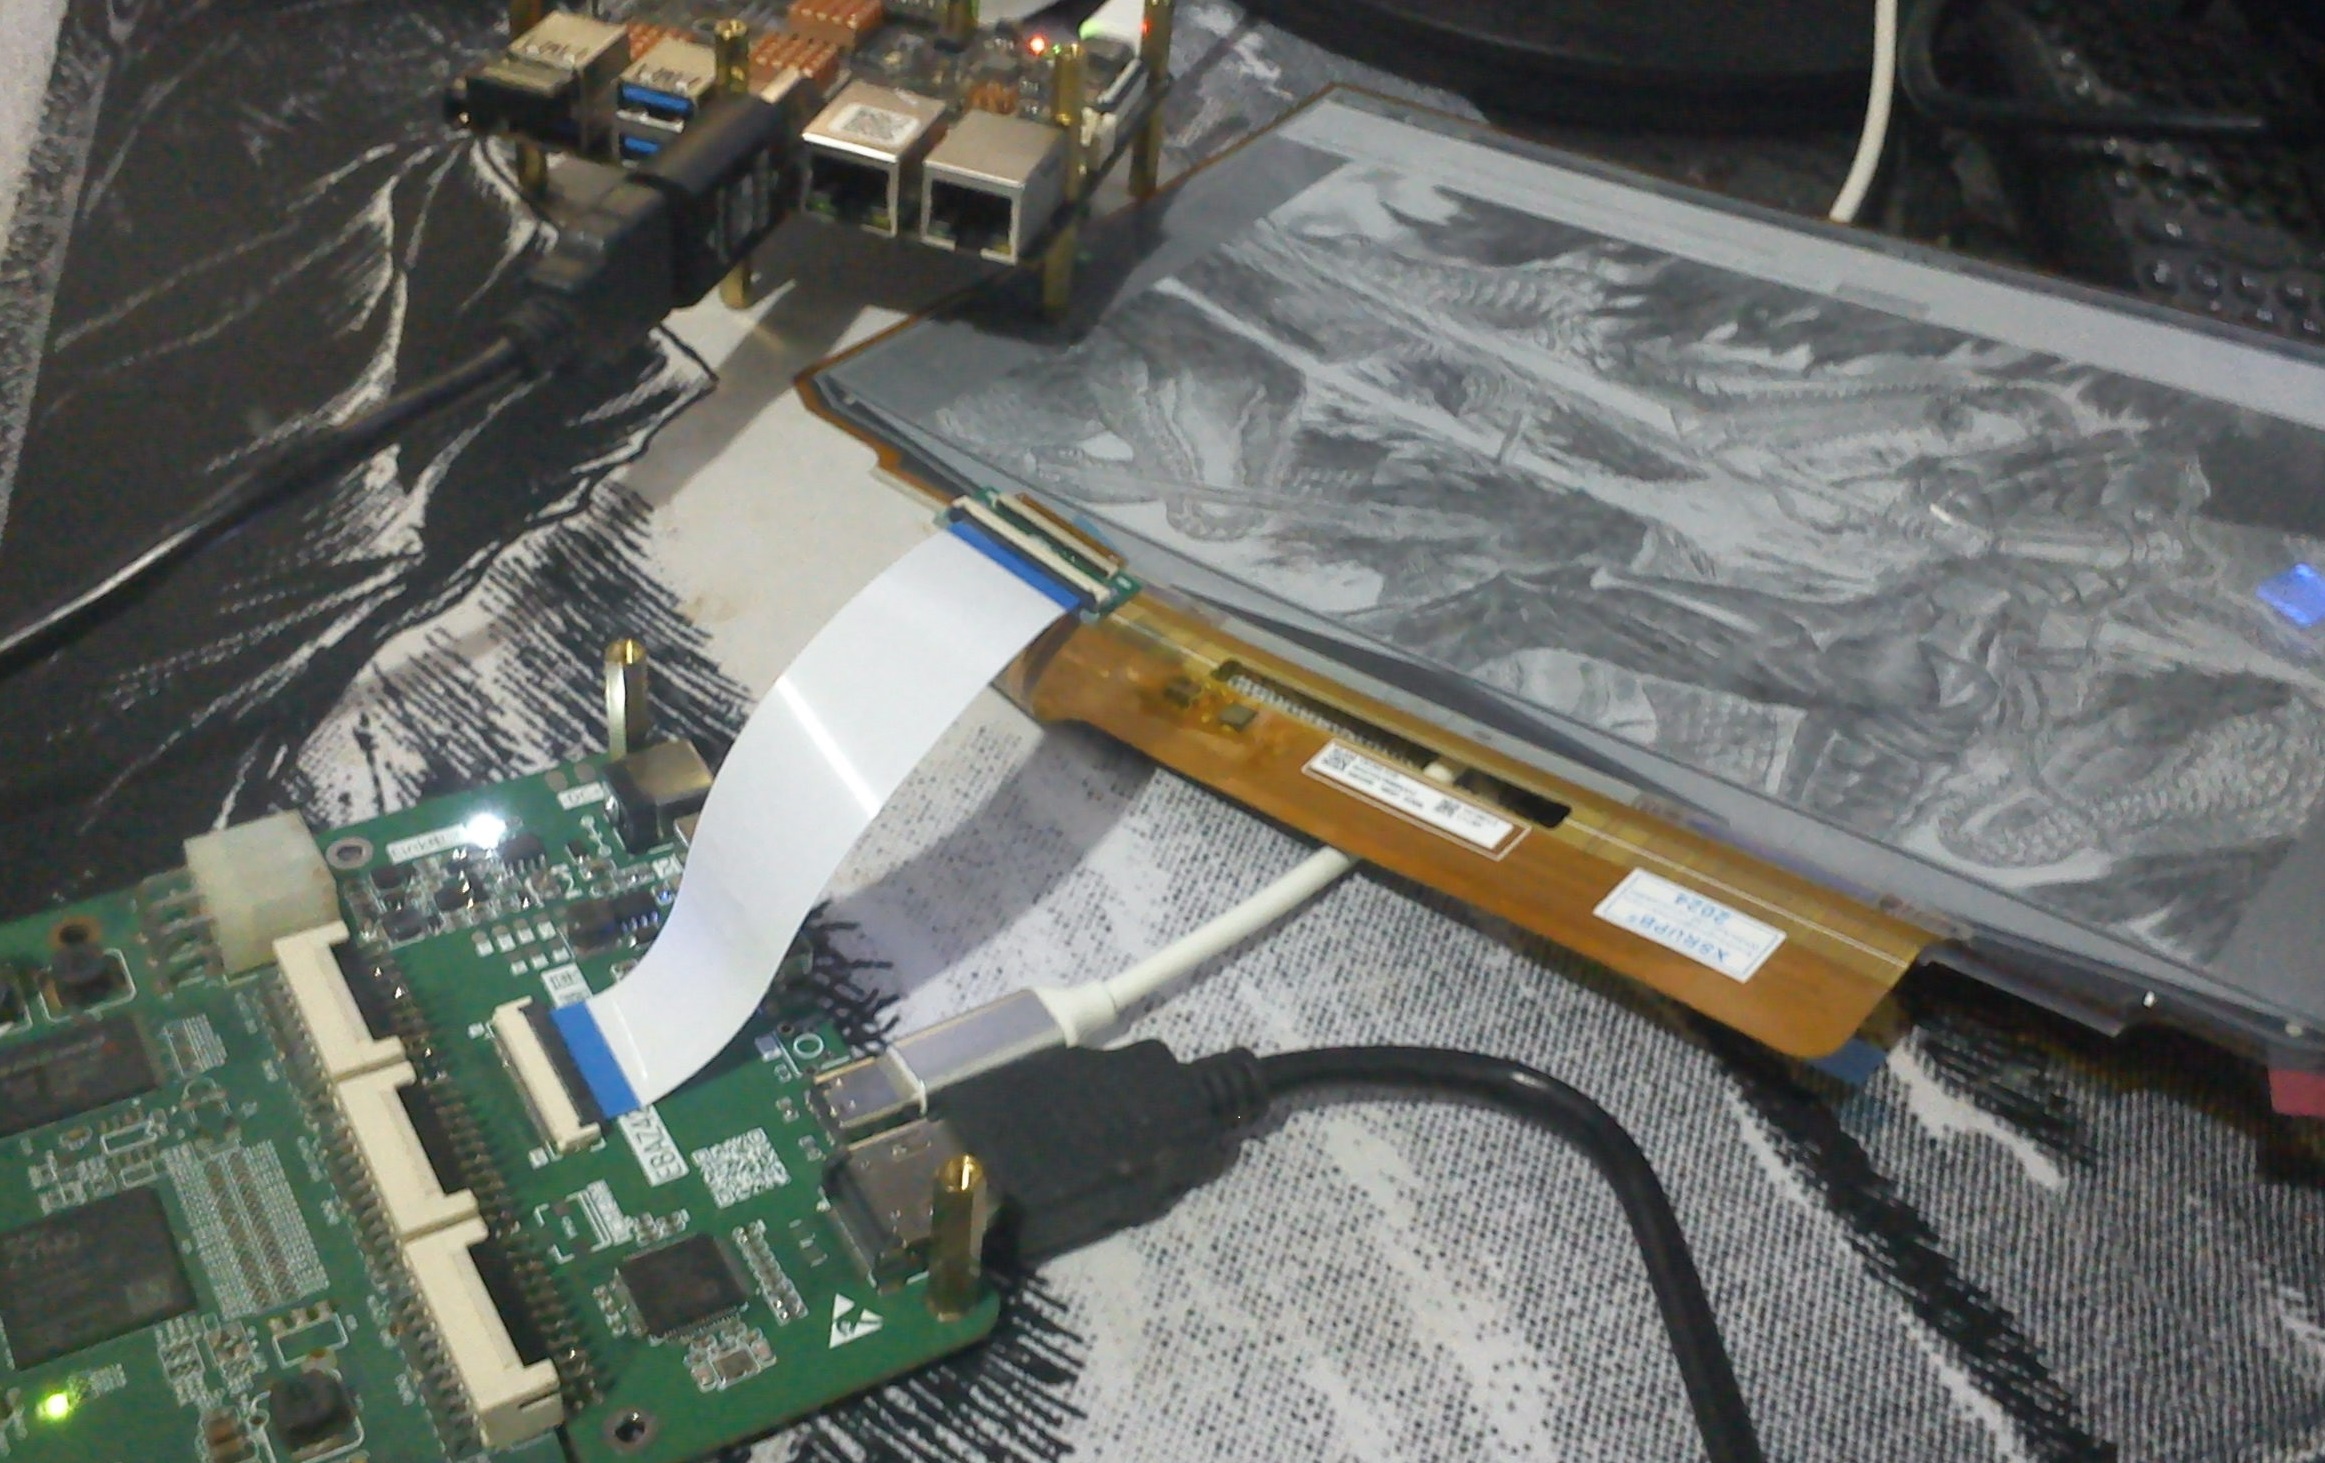
<?xml version="1.0" encoding="utf-8"?>
<feed xmlns="http://www.w3.org/2005/Atom" xmlns:media="http://search.yahoo.com/mrss/">
    <title>The Bat-Blog of the Batlog 🦇</title>
    <link href="https://bat.moe/feed.xml" rel="self" />
    <link href="https://bat.moe" />
    <updated>2026-07-16T13:08:52-06:00</updated>
    <author>
        <name>Batlog</name>
    </author>
    <id>https://bat.moe</id>

    <entry>
        <title>Turning a 2D SVG into a 3D model</title>
        <author>
            <name>Batlog</name>
        </author>
        <link href="https://bat.moe/turning-a-2d-svg-into-a-3d-model.html"/>
        <id>https://bat.moe/turning-a-2d-svg-into-a-3d-model.html</id>
        <media:content url="https://bat.moe/media/posts/22/2dsvgto3dbg.png" medium="image" />
            <category term="Design"/>

        <updated>2026-06-30T11:26:00-06:00</updated>
            <summary type="html">
                <![CDATA[
                        <img src="https://bat.moe/media/posts/22/2dsvgto3dbg.png" alt="" />
                    After successfully deploying my website (The original version can be found in&hellip;
                ]]>
            </summary>
        <content type="html">
            <![CDATA[
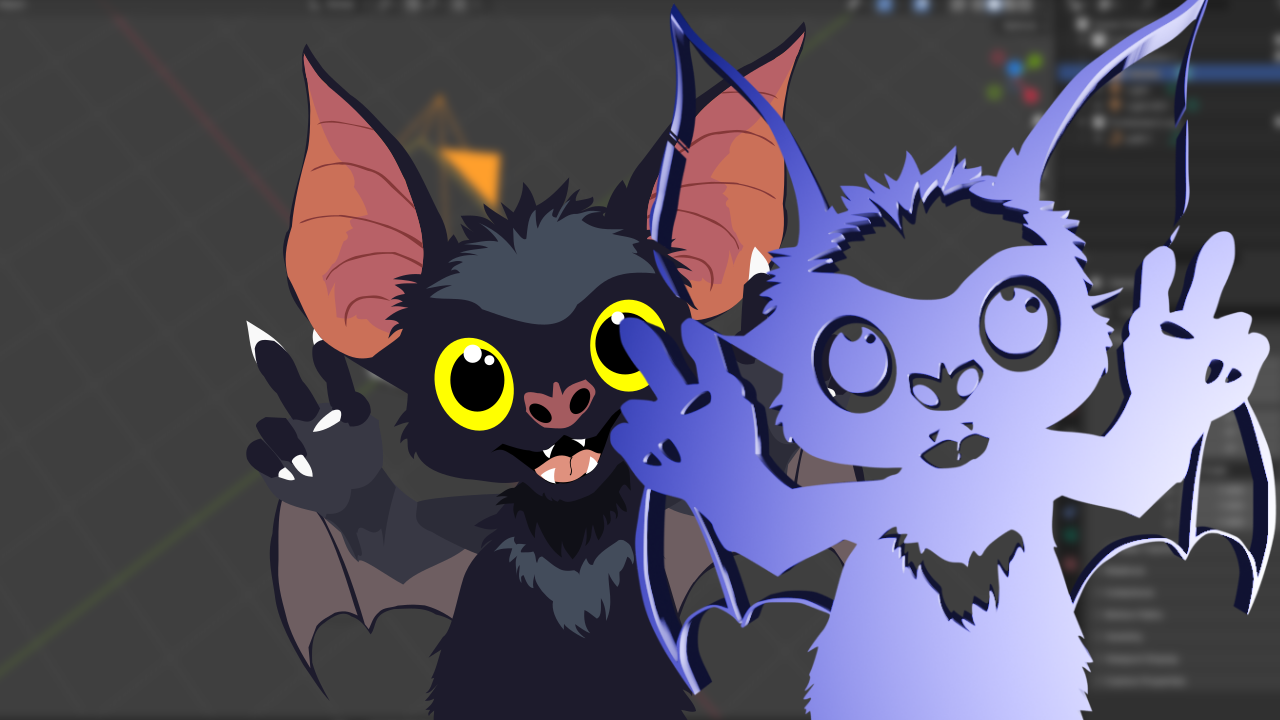
                    <p><img src="https://bat.moe/media/posts/22/2dsvgto3dbg.png" class="type:primaryImage" alt="" /></p>
                <p>After successfully deploying my website (The original version can be found in the Wayback Machine) I felt like working for a bit on the image and iconography of it, starting with a logo for both the website and my projects.</p>
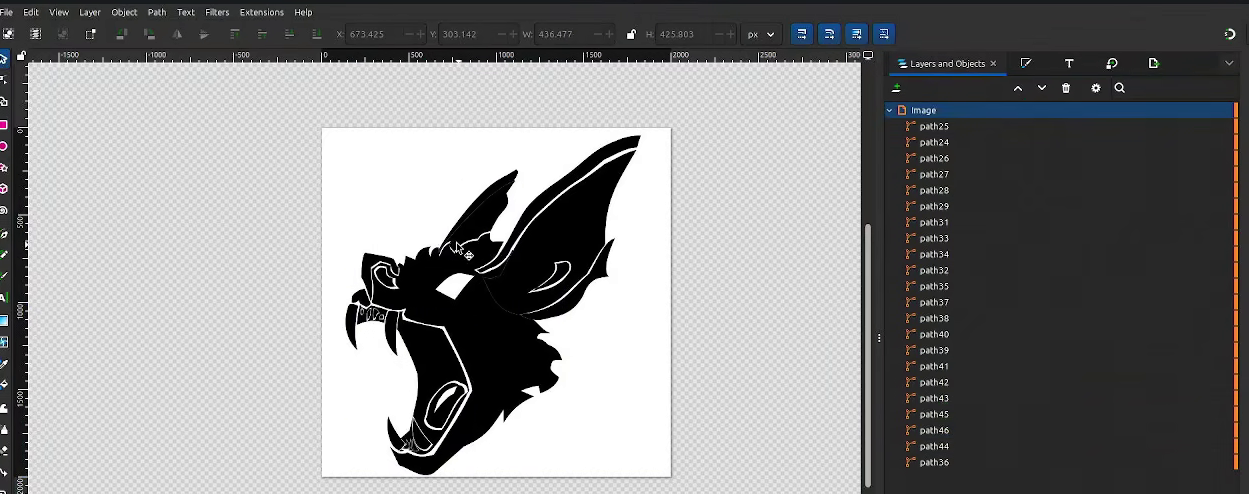
<p>After messing around with inkscape for a few hours, this is what I came up with:<figure class="post__image"><img loading="lazy"  src="https://bat.moe/media/posts/22/1.png" alt="logo with layers" width="1249" height="494" sizes="(min-width: 760px) 660px, calc(93.18vw - 30px)" srcset="https://bat.moe/media/posts/22/responsive/1-xs.png 320w ,https://bat.moe/media/posts/22/responsive/1-sm.png 480w ,https://bat.moe/media/posts/22/responsive/1-md.png 768w ,https://bat.moe/media/posts/22/responsive/1-xl.png 1024w"></figure>
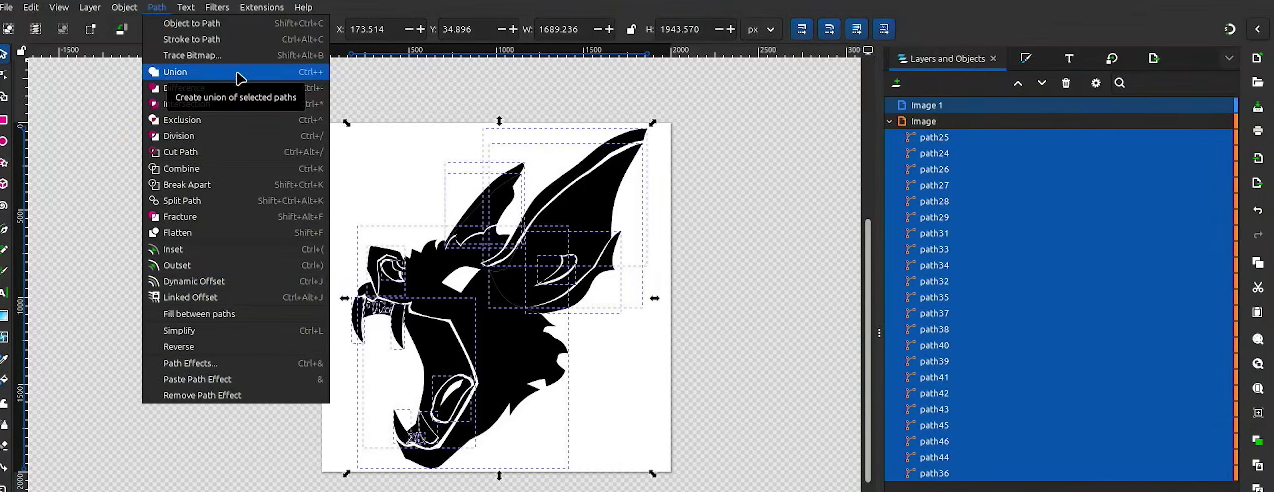
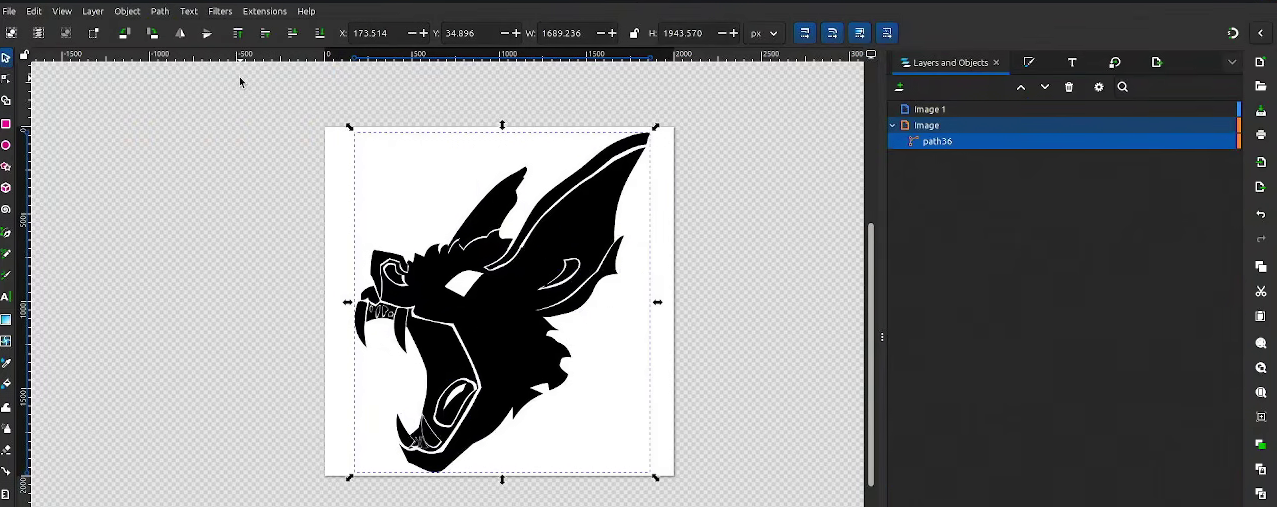
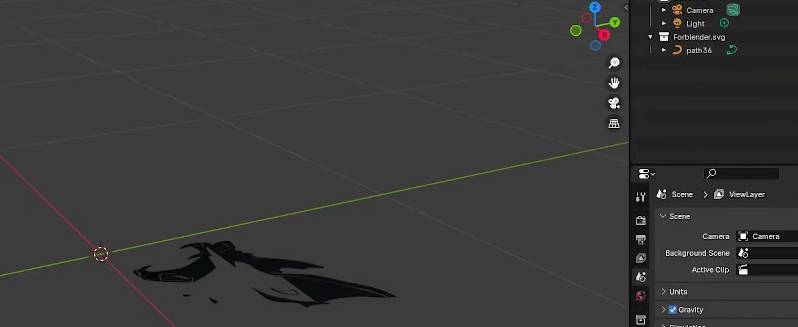
<p>Before importing it into blender though, I merged all layers into a single layer. This is because Blender will have every path imported as an individual layer and that means I'd have to work with about 20 layers individually. However Blender didn't like me doing this and just gave me a broken path for my trouble.</p>
<div class="gallery-wrapper"><div class="gallery" data-is-empty="false" data-translation="Add images" data-columns="3">
<figure class="gallery__item"><a href="https://bat.moe/media/posts/22/gallery/2.png" data-size="1274x492"><img loading="lazy" src="https://bat.moe/media/posts/22/gallery/2-thumbnail.png" alt="1.1" width="768" height="297"></a>
<figcaption>Merging all layers</figcaption>
</figure>
<figure class="gallery__item"><a href="https://bat.moe/media/posts/22/gallery/3.png" data-size="1277x507"><img loading="lazy" src="https://bat.moe/media/posts/22/gallery/3-thumbnail.png" alt="1.2" width="768" height="305"></a>
<figcaption>All layers merged</figcaption>
</figure>
<figure class="gallery__item"><a href="https://bat.moe/media/posts/22/gallery/4.png" data-size="798x327"><img loading="lazy" src="https://bat.moe/media/posts/22/gallery/4-thumbnail.png" alt="1.3" width="768" height="315"></a>
<figcaption>Import fail</figcaption>
</figure>
</div></div>
<p> </p>
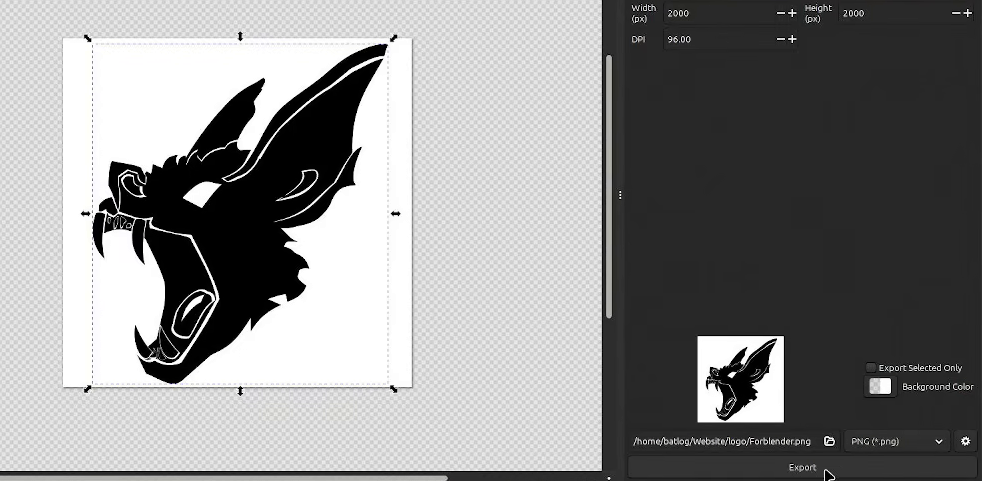
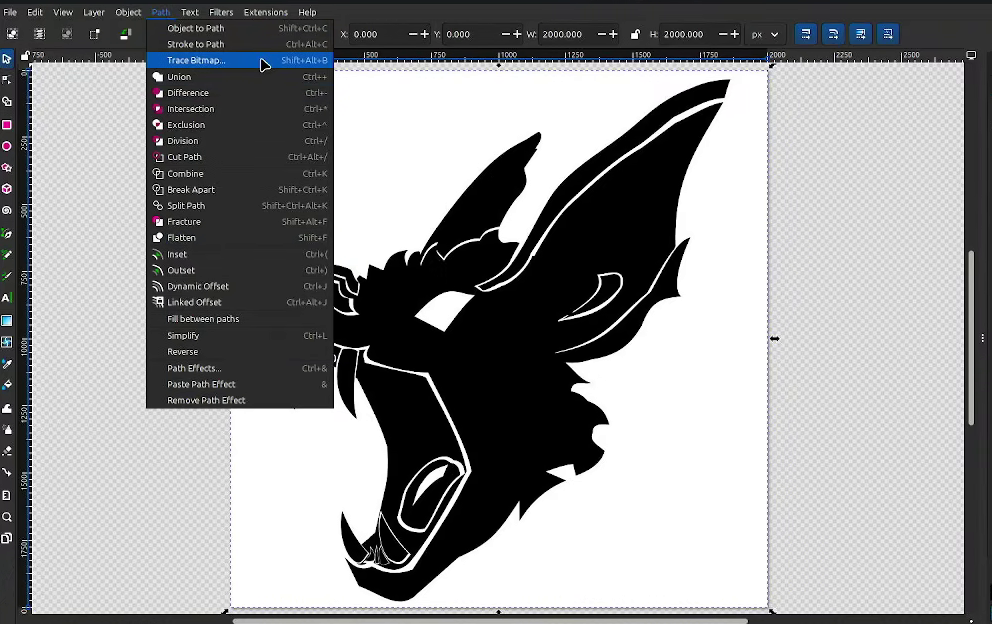
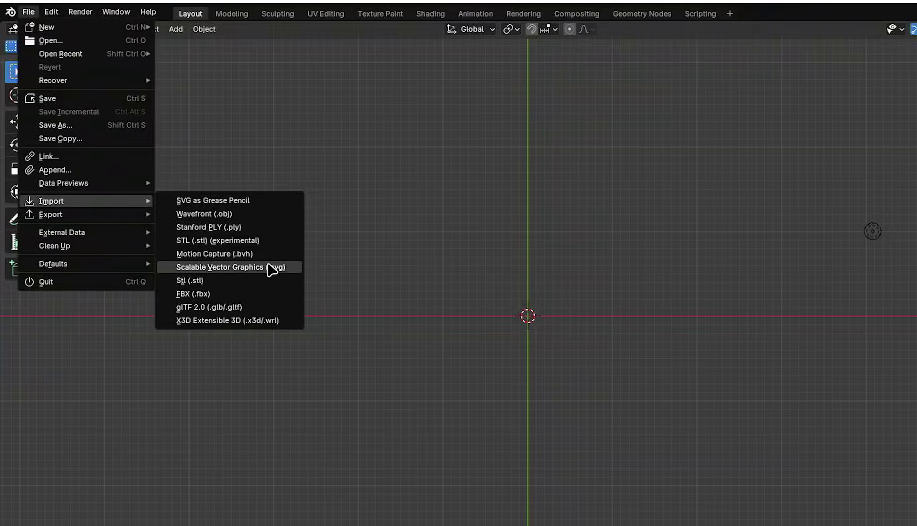
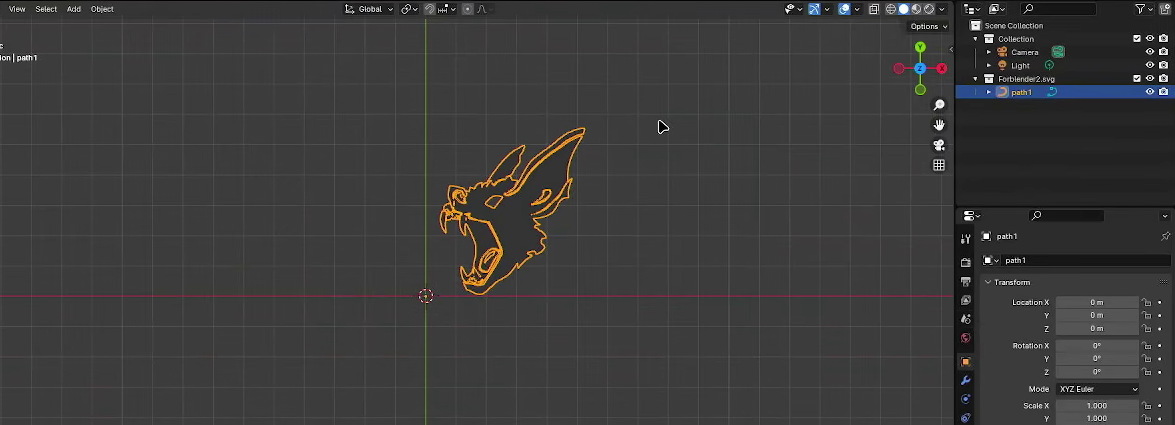
<p>I poked around inkscape for a bit thinking how to fix it and what ended up doing it was exporting the image as a png, opening it in a new file and using the trace bitmap tool, then importing it into blender.</p>
<div class="gallery-wrapper"><div class="gallery" data-is-empty="false" data-translation="Add images" data-columns="4">
<figure class="gallery__item"><a href="https://bat.moe/media/posts/22/gallery/5.png" data-size="982x481"><img loading="lazy" src="https://bat.moe/media/posts/22/gallery/5-thumbnail.png" alt="1.4" width="768" height="376"></a>
<figcaption>Exporting to png</figcaption>
</figure>
<figure class="gallery__item"><a href="https://bat.moe/media/posts/22/gallery/6.png" data-size="992x624"><img loading="lazy" src="https://bat.moe/media/posts/22/gallery/6-thumbnail.png" alt="1.5" width="768" height="483"></a>
<figcaption>Using the trace bitmap over the PNG</figcaption>
</figure>
<figure class="gallery__item"><a href="https://bat.moe/media/posts/22/gallery/7.png" data-size="917x526"><img loading="lazy" src="https://bat.moe/media/posts/22/gallery/7-thumbnail.png" alt="1.6" width="768" height="441"></a>
<figcaption>Importing SVG</figcaption>
</figure>
<figure class="gallery__item"><a href="https://bat.moe/media/posts/22/gallery/7.5.png" data-size="1175x425"><img loading="lazy" src="https://bat.moe/media/posts/22/gallery/7.5-thumbnail.png" alt="1.7" width="768" height="278"></a>
<figcaption>SVG Imported as path</figcaption>
</figure>
</div></div>
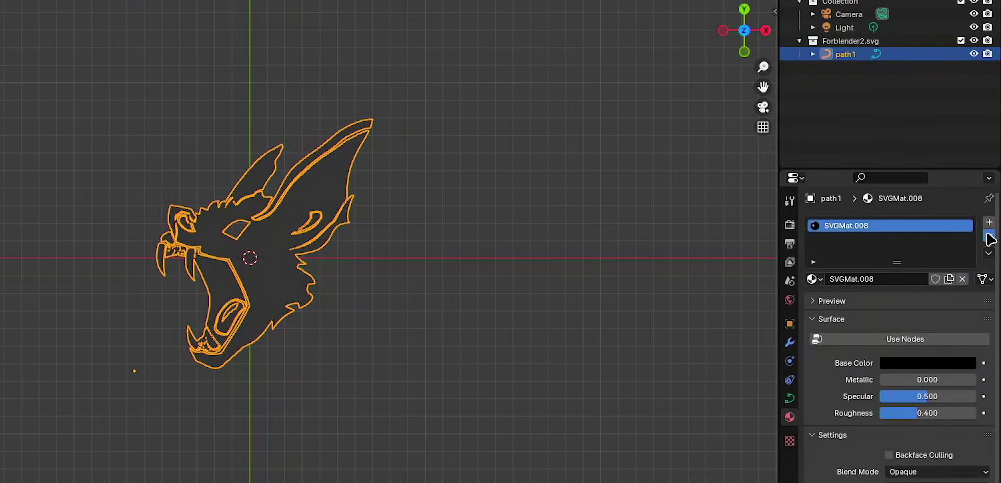
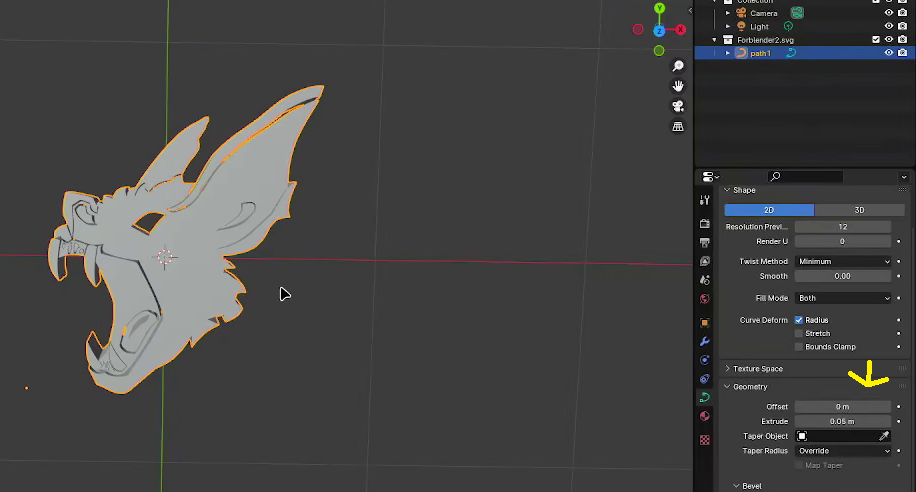
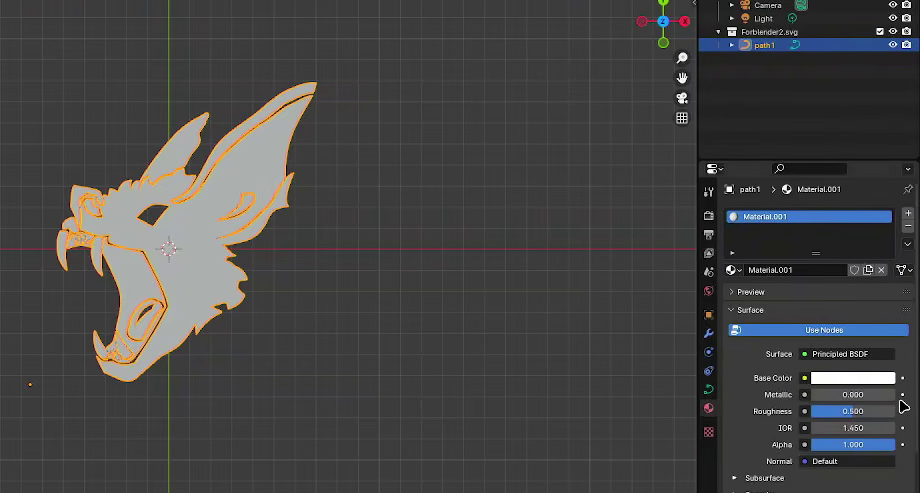
<p>Next I removed the material that was imported and just extruded the path.</p>
<div class="gallery-wrapper"><div class="gallery" data-is-empty="false" data-translation="Add images" data-columns="2">
<figure class="gallery__item"><a href="https://bat.moe/media/posts/22/gallery/8.png" data-size="1001x483"><img loading="lazy" src="https://bat.moe/media/posts/22/gallery/8-thumbnail.png" alt="1.8" width="768" height="371"></a>
<figcaption>Removing imported material</figcaption>
</figure>
<figure class="gallery__item"><a href="https://bat.moe/media/posts/22/gallery/9.png" data-size="916x492"><img loading="lazy" src="https://bat.moe/media/posts/22/gallery/9-thumbnail.png" alt="1.9" width="768" height="413"></a>
<figcaption>Extruding</figcaption>
</figure>
</div></div>
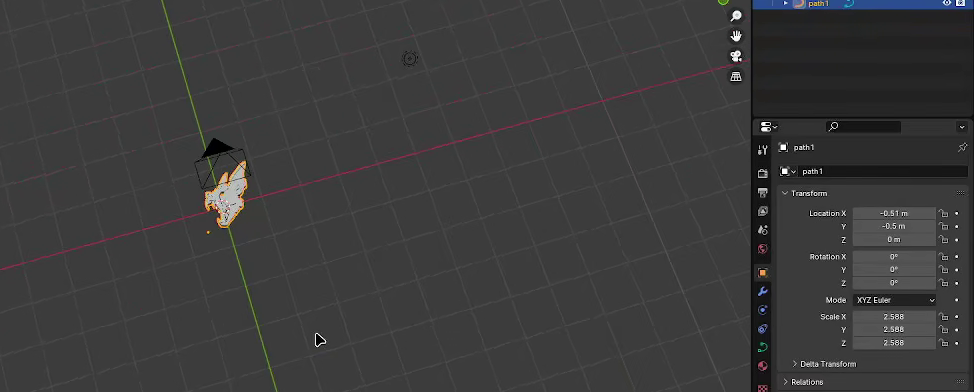
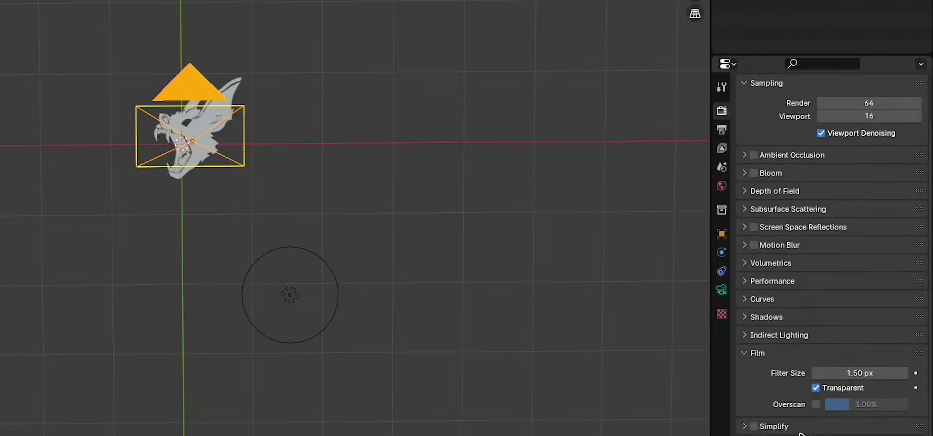
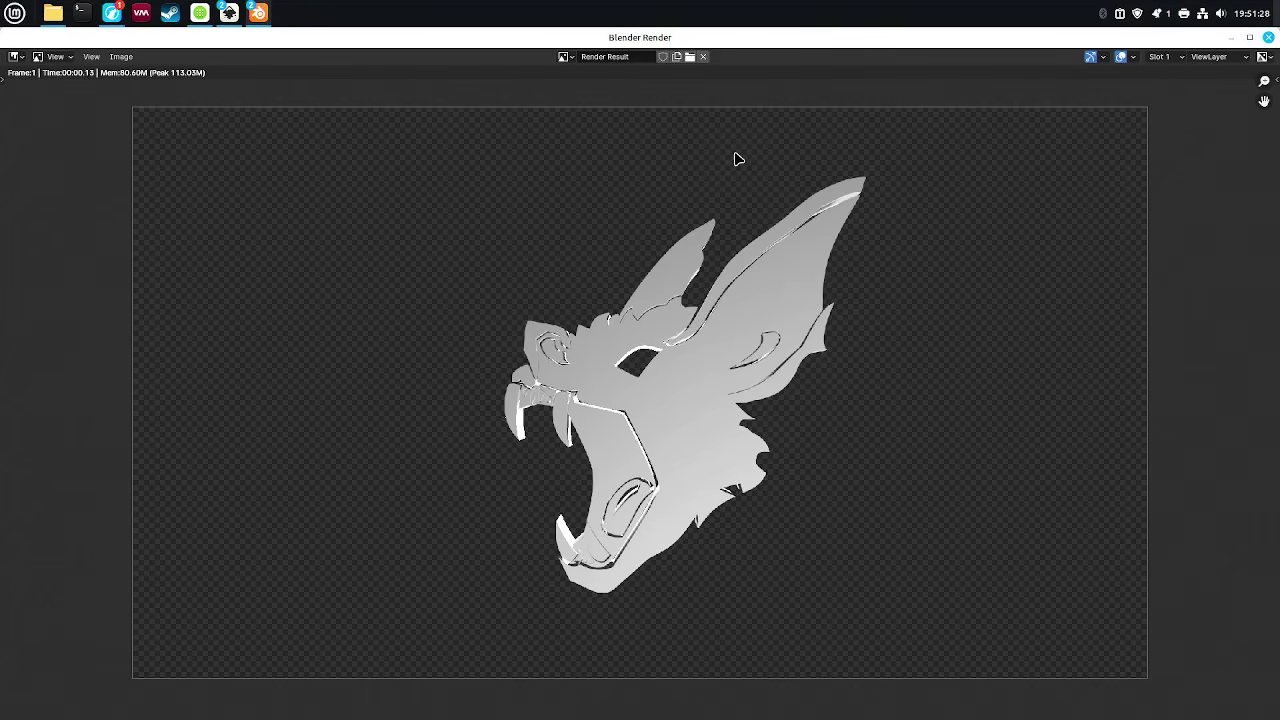
<p>From here I brought the camera to origin, pointed it down, added a metallic material to the path, erased the background and from then on it was a matter of messing around with the composition until it looked the way I liked it.</p>
<div class="gallery-wrapper"><div class="gallery" data-is-empty="false" data-translation="Add images" data-columns="4">
<figure class="gallery__item"><a href="https://bat.moe/media/posts/22/gallery/10.png" data-size="974x392"><img loading="lazy" src="https://bat.moe/media/posts/22/gallery/10-thumbnail.png" alt="1.8" width="768" height="309"></a>
<figcaption>Aligning the camera</figcaption>
</figure>
<figure class="gallery__item"><a href="https://bat.moe/media/posts/22/gallery/11.png" data-size="920x493"><img loading="lazy" src="https://bat.moe/media/posts/22/gallery/11-thumbnail.png" alt="1.9" width="768" height="412"></a>
<figcaption>Creating a metallic material</figcaption>
</figure>
<figure class="gallery__item"><a href="https://bat.moe/media/posts/22/gallery/12.png" data-size="933x436"><img loading="lazy" src="https://bat.moe/media/posts/22/gallery/12-thumbnail.png" alt="1.10 " width="768" height="359"></a>
<figcaption>Erasing the background</figcaption>
</figure>
<figure class="gallery__item"><a href="https://bat.moe/media/posts/22/gallery/13.png" data-size="1280x720"><img loading="lazy" src="https://bat.moe/media/posts/22/gallery/13-thumbnail.png" alt="1.11" width="768" height="432"></a>
<figcaption>Final Render</figcaption>
</figure>
</div></div>
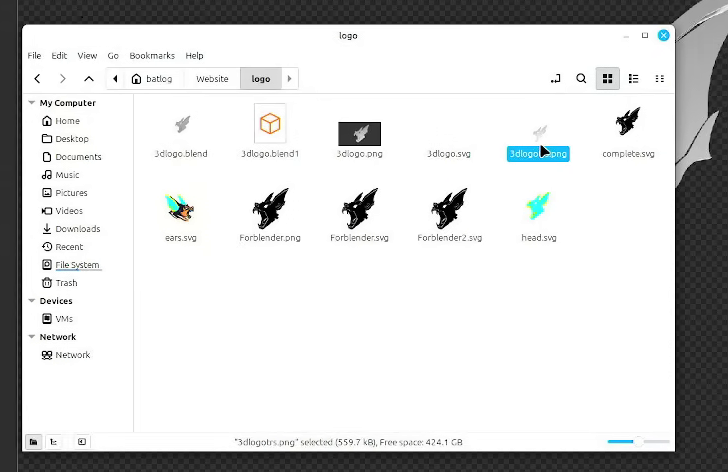
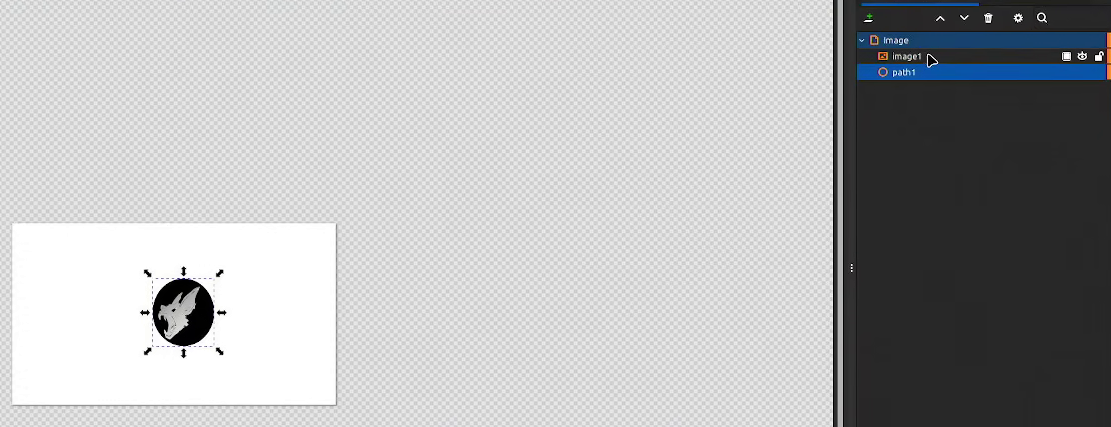
<p>From here everything was very straight forward, I just opened the png I had just taken in inkscape and drew a circle under it</p>
<div class="gallery-wrapper"><div class="gallery" data-is-empty="false" data-translation="Add images" data-columns="3">
<figure class="gallery__item"><a href="https://bat.moe/media/posts/22/gallery/14.png" data-size="728x472"><img loading="lazy" src="https://bat.moe/media/posts/22/gallery/14-thumbnail.png" alt="1.12" width="728" height="472"></a>
<figcaption>Resulting PNG</figcaption>
</figure>
<figure class="gallery__item"><a href="https://bat.moe/media/posts/22/gallery/15.png" data-size="1111x427"><img loading="lazy" src="https://bat.moe/media/posts/22/gallery/15-thumbnail.png" alt="1.13" width="768" height="295"></a>
<figcaption>Drawing a circle</figcaption>
</figure>
</div></div>
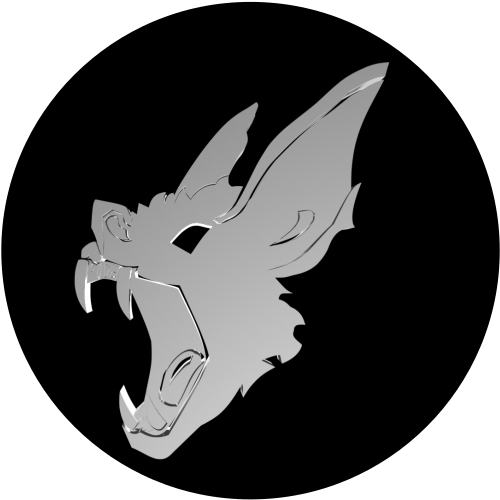
<p>This is the Finished result:</p>
<figure class="post__image"><img loading="lazy"  src="https://bat.moe/media/posts/22/3dcircle.png" alt="final logo" width="337" height="337" sizes="(min-width: 760px) 660px, calc(93.18vw - 30px)" srcset="https://bat.moe/media/posts/22/responsive/3dcircle-xs.png 320w ,https://bat.moe/media/posts/22/responsive/3dcircle-sm.png 480w ,https://bat.moe/media/posts/22/responsive/3dcircle-md.png 768w ,https://bat.moe/media/posts/22/responsive/3dcircle-xl.png 1024w"></figure>
<p>Honestly I'm rather satisfied with it, it scales very well and I can use the standard logo for the website and my projects, such as in this post's signature</p>
<p> </p>
<p> </p>
<h3><figure class="post__image"><img loading="lazy"  src="file:///C:/Users/Admin/Documents/Publii/sites/the-bat-blog-of-the-batlog/input/media/posts/16/logowhite.png" alt="" width="200" height="200" sizes="(min-width: 760px) 660px, calc(93.18vw - 30px)" srcset="file:///C:/Users/Admin/Documents/Publii/sites/the-bat-blog-of-the-batlog/input/media/posts/16/responsive/logowhite-xs.png 320w ,file:///C:/Users/Admin/Documents/Publii/sites/the-bat-blog-of-the-batlog/input/media/posts/16/responsive/logowhite-sm.png 480w ,file:///C:/Users/Admin/Documents/Publii/sites/the-bat-blog-of-the-batlog/input/media/posts/16/responsive/logowhite-md.png 768w ,file:///C:/Users/Admin/Documents/Publii/sites/the-bat-blog-of-the-batlog/input/media/posts/16/responsive/logowhite-xl.png 1024w"></figure> <span style="color: #ecf0f1;"> <a href="https://bat.moe/about-me.html" style="color: #ecf0f1;">-Batlog</a></span></h3>
<p> </p>
<hr>
<pre>If you enjoyed this article or if it was of any use to you, please consider donating some crypto. All funds go towards paying for the hosting.<br><br>Monero/XMR:<br>88MC6ksaVyLbtH9fT4owLSPX16vYD9cf6YELmXjaNWWd71R6iwfFV6DJtp7BXR5c6vWnxLEEGyu1tfwXwTqDM1CUCqDGeRY<br><br>Bitcoin/BTC: <br>bc1qzw9g97ffhllwukhagkvn5g0u9d8rhjv86xhf8h<br><br>Ethereum/ETH:<br>0xf948ab59E492865Fb5200A97F0F4F2f31F7b443f<br><br>Litecoin/LTC:<br>ltc1qqfv05jpyh8yvzyetmf7n5ve500jl656yxpc8y4<br><br>Doge:<br>DT5iG6GxoyZtHSSmaZHHV63NpEoH5yuixg</pre>
<p> </p>
<p> </p>
<p> </p>
            ]]>
        </content>
    </entry>
    <entry>
        <title>Preserving Google Coral (Google&#x27;s small AI Chip)</title>
        <author>
            <name>Batlog</name>
        </author>
        <link href="https://bat.moe/configuring-zluda-for-ai-generation.html"/>
        <id>https://bat.moe/configuring-zluda-for-ai-generation.html</id>
        <media:content url="https://bat.moe/media/posts/16/coralainobg.png" medium="image" />
            <category term="Oddware"/>
            <category term="Linux"/>
            <category term="AI"/>

        <updated>2026-06-28T14:17:00-06:00</updated>
            <summary type="html">
                <![CDATA[
                        <img src="https://bat.moe/media/posts/16/coralainobg.png" alt="" />
                    Preserving Google Coral (Google's small AI Chip) I'm writing this article to&hellip;
                ]]>
            </summary>
        <content type="html">
            <![CDATA[
                    <p><img src="https://bat.moe/media/posts/16/coralainobg.png" class="type:primaryImage" alt="" /></p>
                <h1 class="align-center"><span style="color: #3598db;">Preserving Google Coral (Google's small AI Chip)</span></h1>
<p>I'm writing this article to document basically everything I know about Google Coral, including how to configure a chip, because on April 19 2026 Google has archived all github repos associated with it and I get the feeling they'll shut down the apt repository any day now (It already gives a deprecated key warning). My objective is to simply make a virtual machine that acts as a preservation device, where I can just copy it into any machine and start working with the chip immediately because who knows, it may prove useful at some point in the future.</p>
<p>The problem with getting Coral to work in the #CurrentYear of our Lord 2026™ is twofold: The drivers will fail to load most of the time on ver. 6 of the Linux Kernel (ANY 6.x kernel version) and the fact that Google released the chips and never updated the code or anything, making it require a Python version older than 9 (The whole software stack is actually made for Python 8 which is what I used here) and having at least one pip package completely unusable in modern system, I struggled with this for a while (Probably compounded with trying to run it in a virtualized environment instead of bare-metal?) but I eventually got it to run.</p>
<p>Originally I had intended to put this off for a while because I remember it was a PITA to setup but me starting development of this blog also coincided with the deadline 10 days before Ubuntu ended all support for Jammy, which is the last non-RHEL-based Linux distro that I could think of that still supported the Linux kernel 5.x and apt so instead it went to the front of my priorities as this was the last time I could get a virtual machine to work with the chip in the future without major headaches.</p>
<p><strong>I'll keep this guide as descriptive as possible (Including things that I usually don't find necessary to document like adding a repository or running apt install) because honestly? The way Google is treating this project makes me think this may end up as the only surviving guide on how to configure it given enough time.</strong></p>
<h3><span style="color: #3598db;">What is/Was a Google Coral TPU</span> </h3>
<p>Coral TPU's (Tensor Processing Units) are a set of devices that Google released in 2019 in order to allow developers to run AI models for small devices.</p>
<p>Coral TPU's came in three form factors:</p>
<ul>
<li>A USB dongle: Probably the most common as most Youtube videos I've seen featuring coral use these. They were commonly used with SBC's or raspberry Pis.</li>
<li>Different M.2 models: Keyed for PCIe or to be insterted in the slot where the wifi network card usually goes.</li>
<li> A dev board: A fully-featured SBC that had a Coral TPU embedded into it, despite having some of the worst specs I've seen for a SBC I've always seen it for up to 3x times the cost of a raspberry pi, it's the rarest model and I've never seen one in action (Not like I'd really want to though). </li>
</ul>
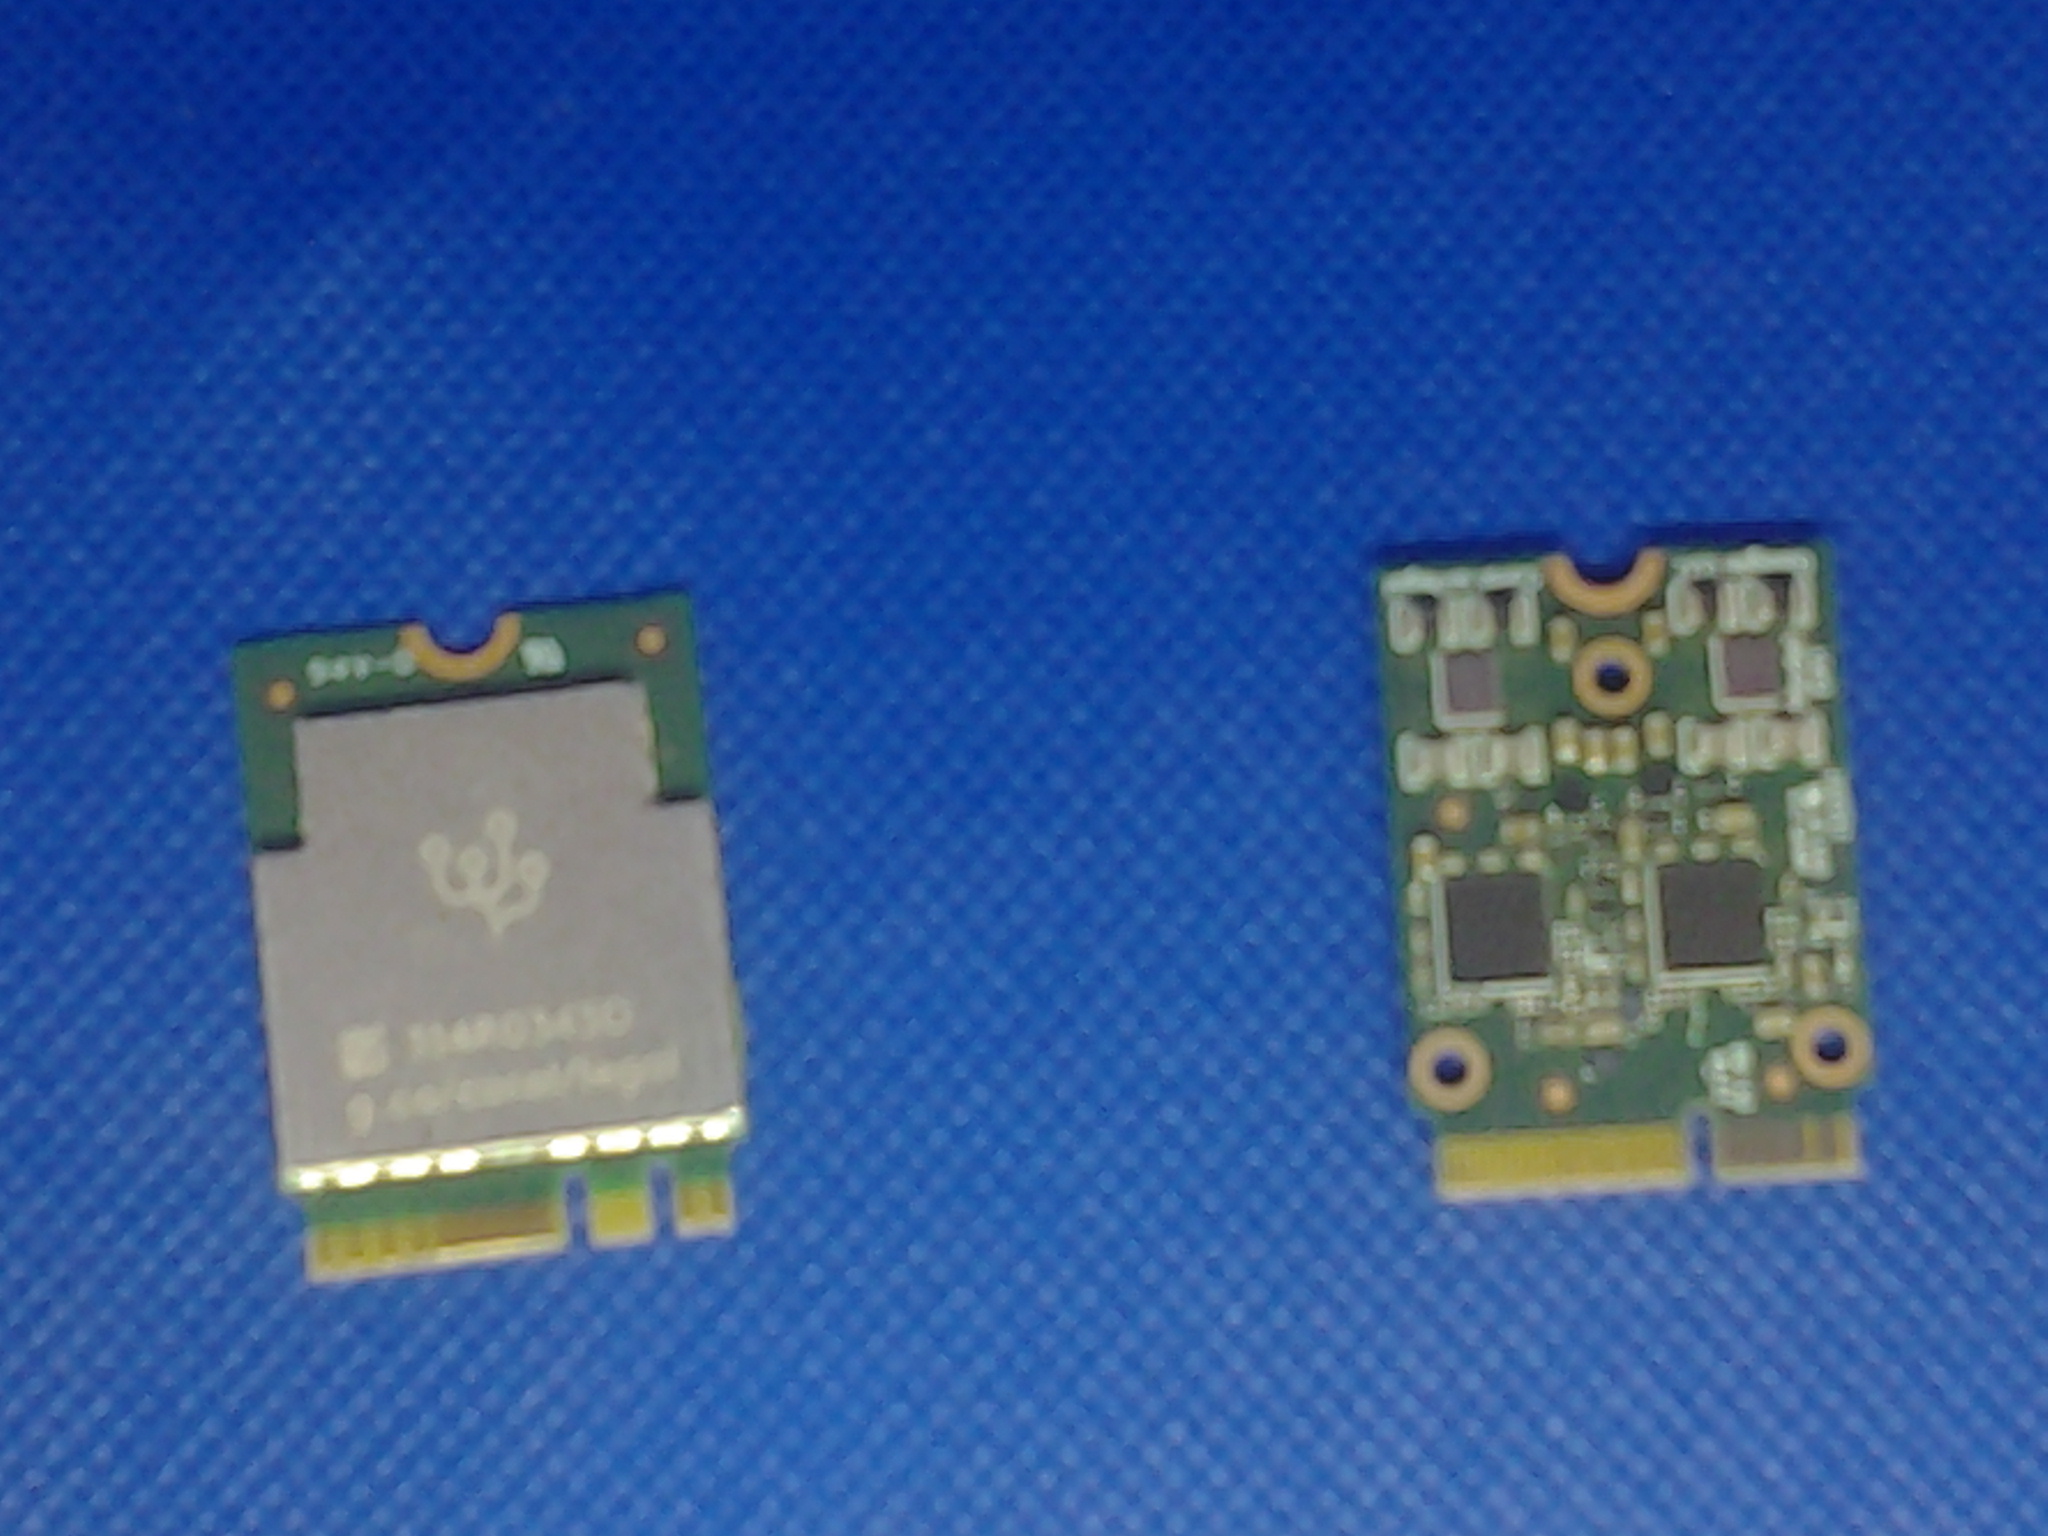
<figure class="post__image"><img loading="lazy" src="https://bat.moe/media/posts/16/20260704_125338.jpg" alt="coraltpuslowres" width="720" height="540" sizes="(min-width: 760px) 660px, calc(93.18vw - 30px)" srcset="https://bat.moe/media/posts/16/responsive/20260704_125338-xs.jpg 320w ,https://bat.moe/media/posts/16/responsive/20260704_125338-sm.jpg 480w ,https://bat.moe/media/posts/16/responsive/20260704_125338-md.jpg 768w ,https://bat.moe/media/posts/16/responsive/20260704_125338-xl.jpg 1024w">
<figcaption>Coral TPU's I own</figcaption>
</figure>
<p>I own two M.2 versions and I'm gonna use the one keyed in E over a x1 PCI adapter. This one is probably the most powerful Coral TPU ever released as it actually had two TPU's embedded in the same board and as such allowed you to run two models at once, not like it made a world of difference given that the models that the Coral TPU's were rather... bad by today's standards?</p>
<p>I think the main problem with Coral TPUs is that the models that Coral could run were limited, you won't find any Large Language Models here and I only ever saw it being used for facial and image recognition or for simple automation using a camera (E.g. the system that Flippy over at White Castle uses to handle fryers). This is by design as the intent of Coral was making a chip that could allow for automation with a very small power footprint and without requiring an internet connection. Unlike the intent though, the thing the chips ended up being used with the most were CCTV systems, ESPECIALLY Frigate, to the point where most of the trouble-shooting you find online for a Coral TPU eventually points you to the Frigate community where some people are continuing to use the chips to this day.</p>
<p>The most complex thing I ever saw a Coral TPU being used for was surprisingly (Or maybe unsurprisingly...) cheating in videogames, specifically botting. both of them were private developments that I don't think were ever made public but both worked the same way, basically you would setup a computer with the TPU and a capture card to send the keyboard and mouse inputs where the game was actually running and basically make an undetectable bot that would farm things for you, one of the developments was for Runescape and another for CS:GO but I honestly don't know if either development went anywhere or if the devs changed their hardware for something more capable at one point.</p>
<h3><span style="color: #3598db;">Creating an environment for preservation purposes</span></h3>
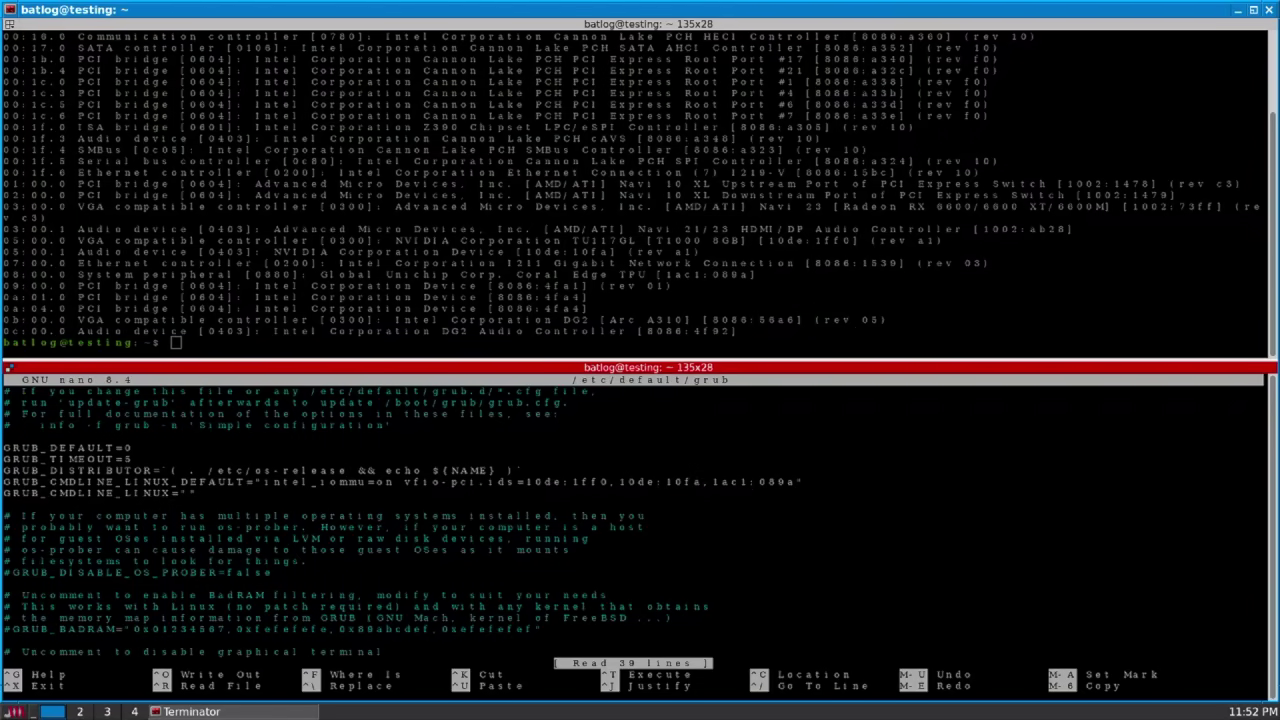
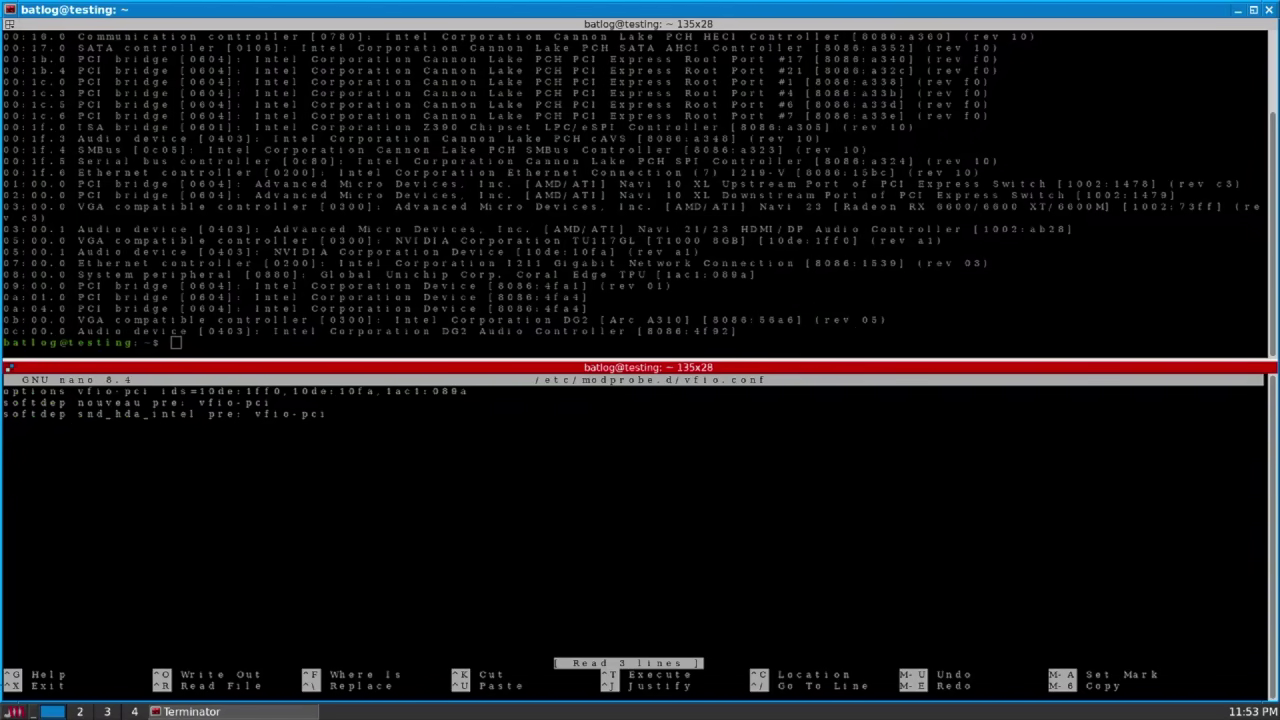
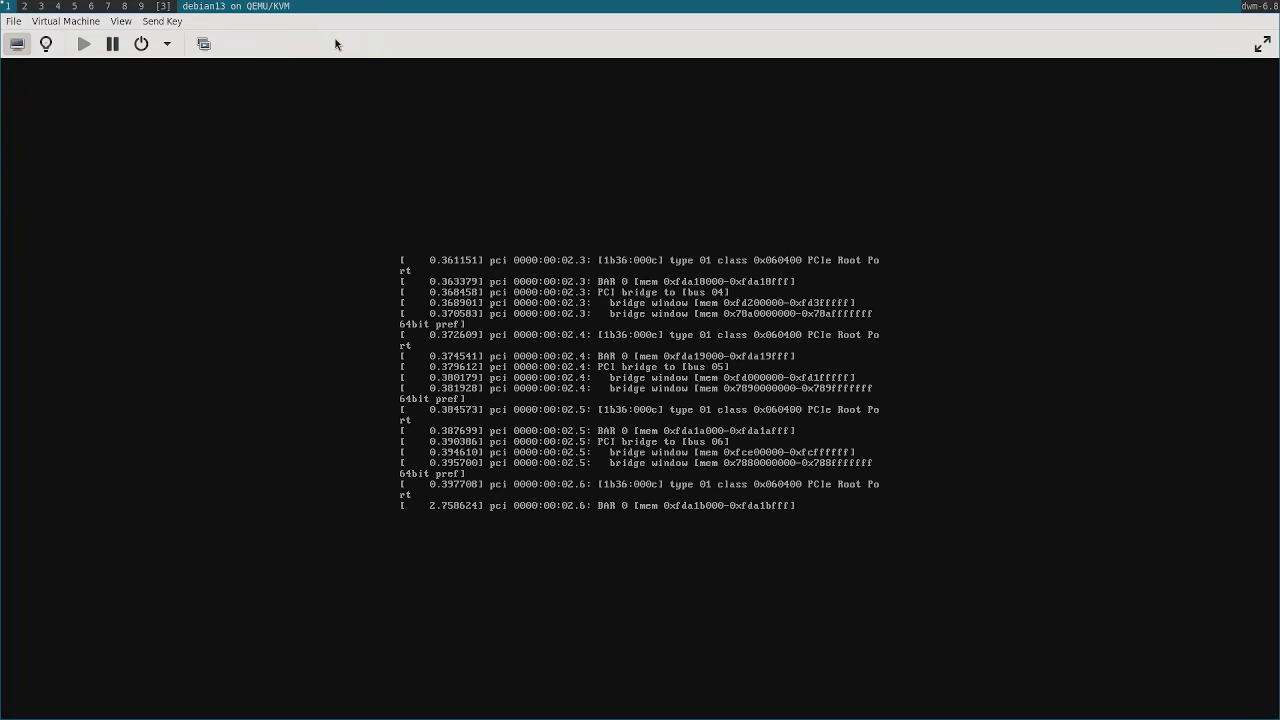
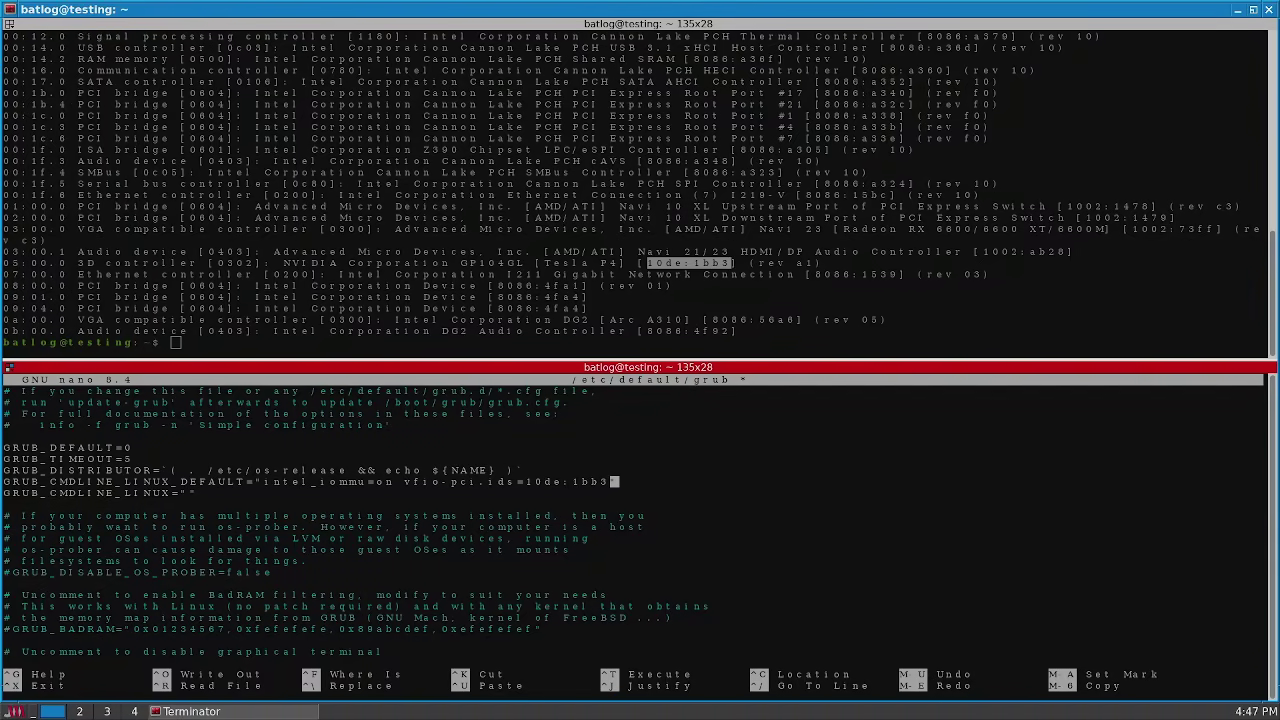
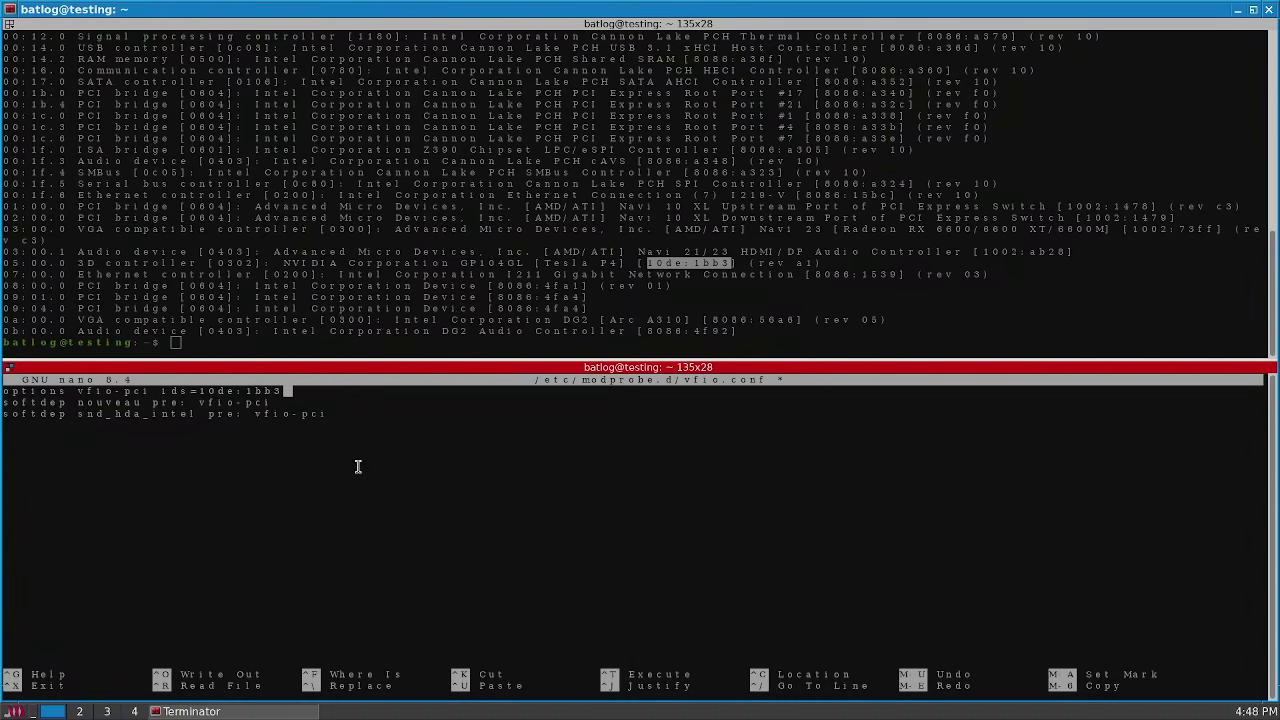
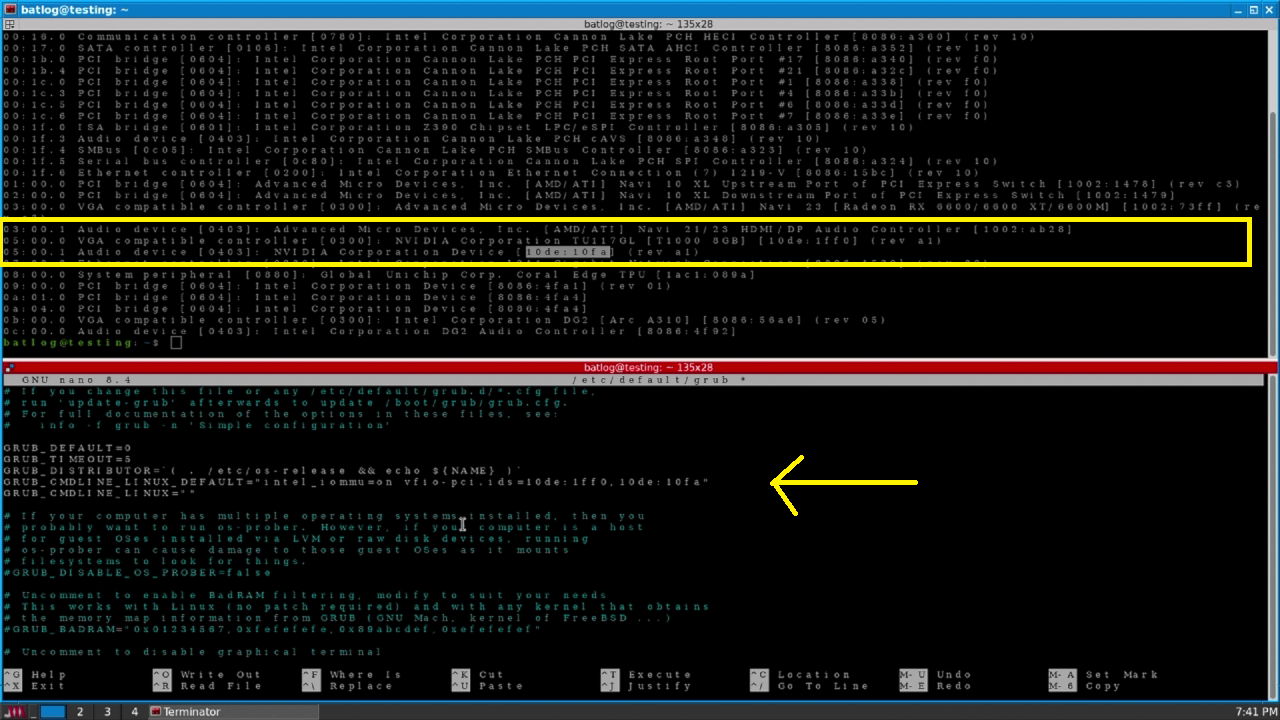
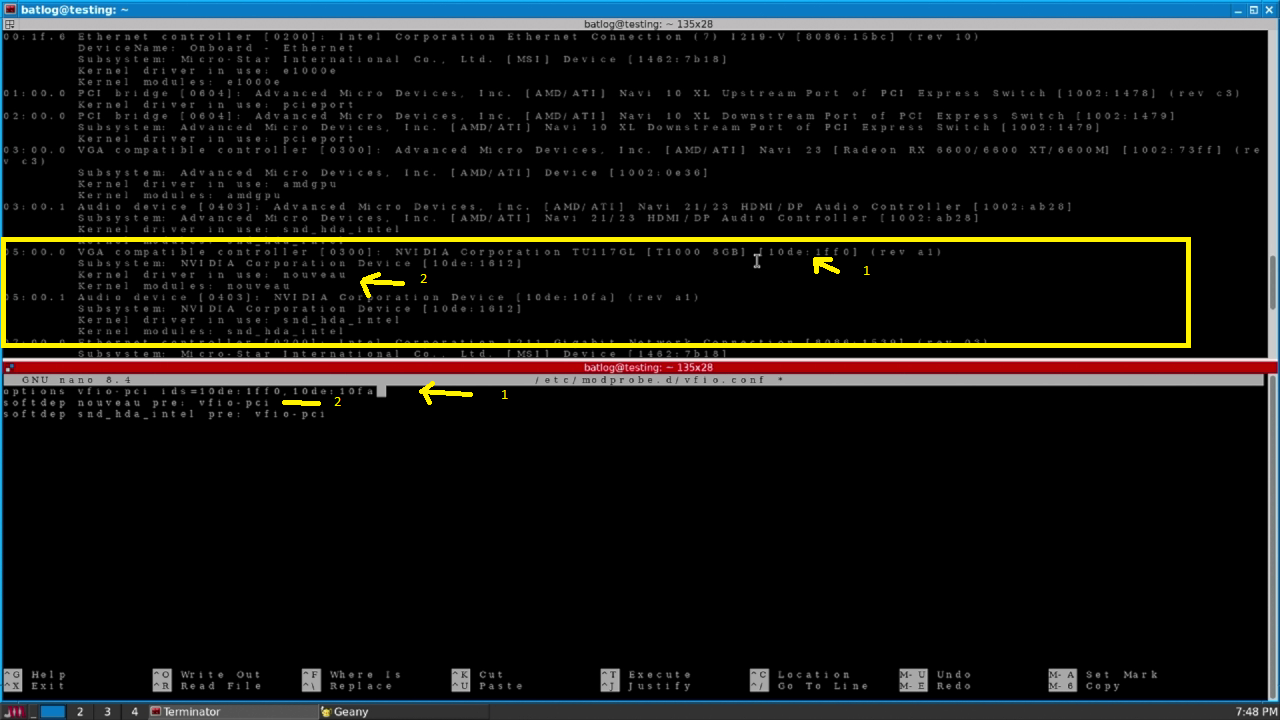
<p>First I loaded the chip with vfio drivers in order to pass it  to a VM, I already went over that in my Virtual AI environment and Windows 11 VM gaming setup so I'll just summarise it. I added the device identifiers of the TPU into GRUB and modprobe.d.</p>
<div class="gallery-wrapper"><div class="gallery" data-is-empty="false" data-translation="Add images" data-columns="3">
<figure class="gallery__item"><a href="https://bat.moe/media/posts/16/gallery/1.png" data-size="1280x720"><img loading="lazy" src="https://bat.moe/media/posts/16/gallery/1-thumbnail.png" alt="1.1" width="768" height="432"></a>
<figcaption>Adding device values to GRUB</figcaption>
</figure>
<figure class="gallery__item"><a href="https://bat.moe/media/posts/16/gallery/2.png" data-size="1280x720"><img loading="lazy" src="https://bat.moe/media/posts/16/gallery/2-thumbnail.png" alt="1.2" width="768" height="432"></a>
<figcaption>Adding device values to modprobe</figcaption>
</figure>
</div></div>
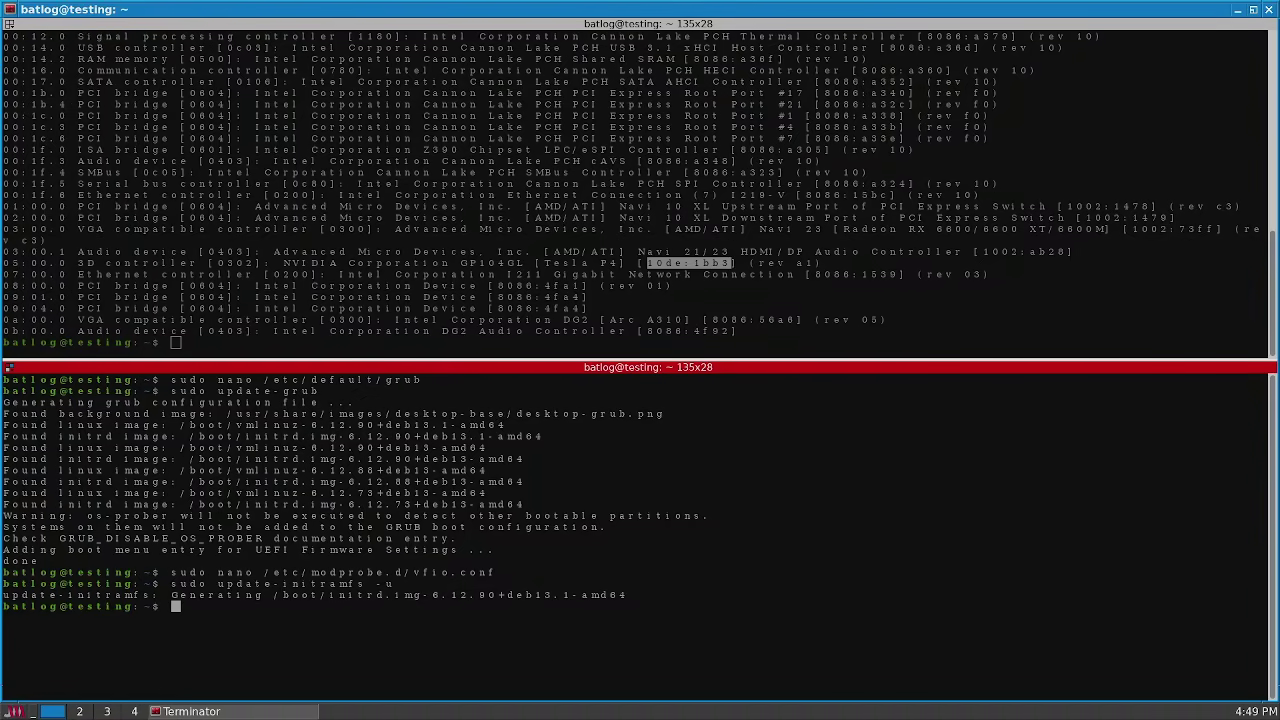
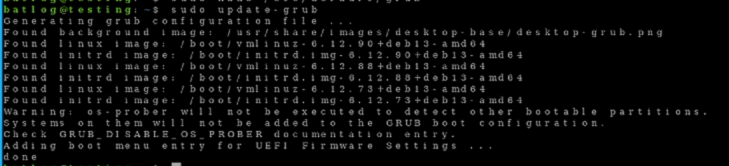
<p>Updated both of them:</p>
<p><code>sudo update-grub &amp;&amp; sudo update-initramfs -u</code></p>
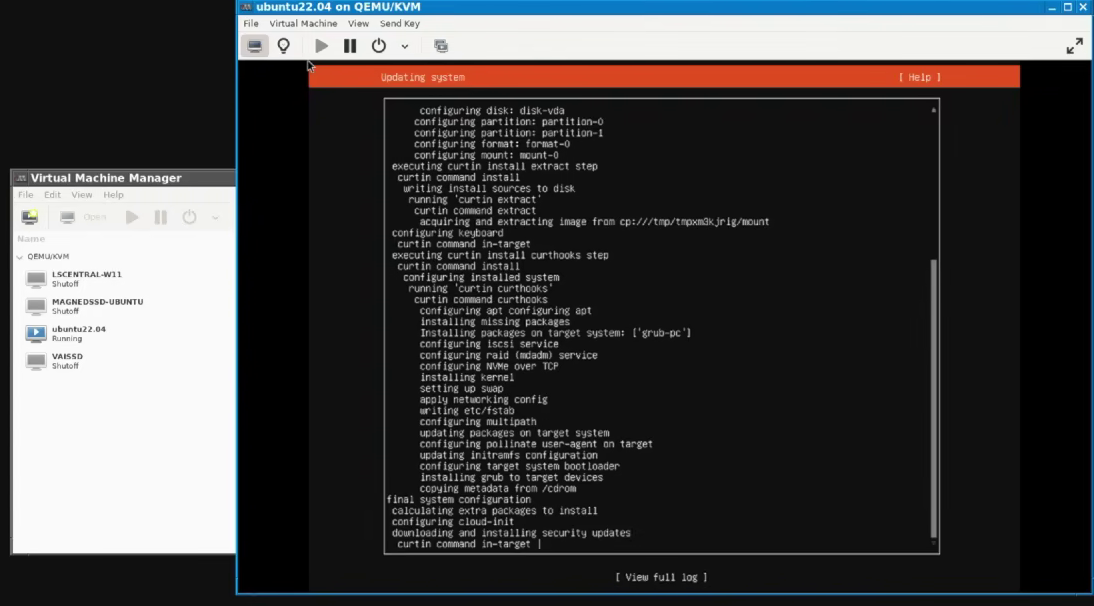
<p>And after a reboot I made a minimal Ubuntu Jammy VM (Server edition, No gui) , there really was nothing special about it.</p>
<figure class="post__image"><img loading="lazy"  src="https://bat.moe/media/posts/16/3-2.png" alt="ubuntuJammyinstall" width="1094" height="606" sizes="(min-width: 760px) 660px, calc(93.18vw - 30px)" srcset="https://bat.moe/media/posts/16/responsive/3-2-xs.png 320w ,https://bat.moe/media/posts/16/responsive/3-2-sm.png 480w ,https://bat.moe/media/posts/16/responsive/3-2-md.png 768w ,https://bat.moe/media/posts/16/responsive/3-2-xl.png 1024w"></figure>
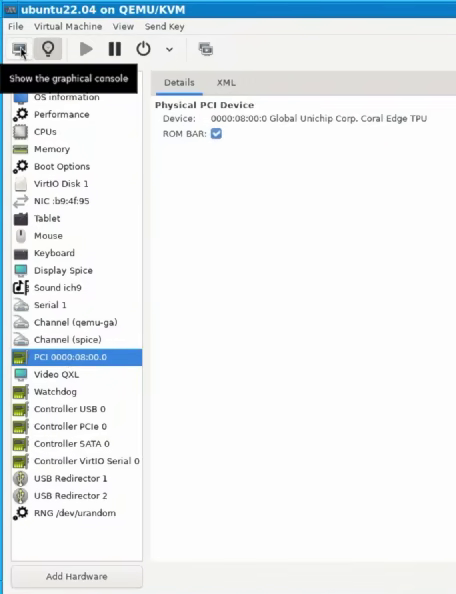
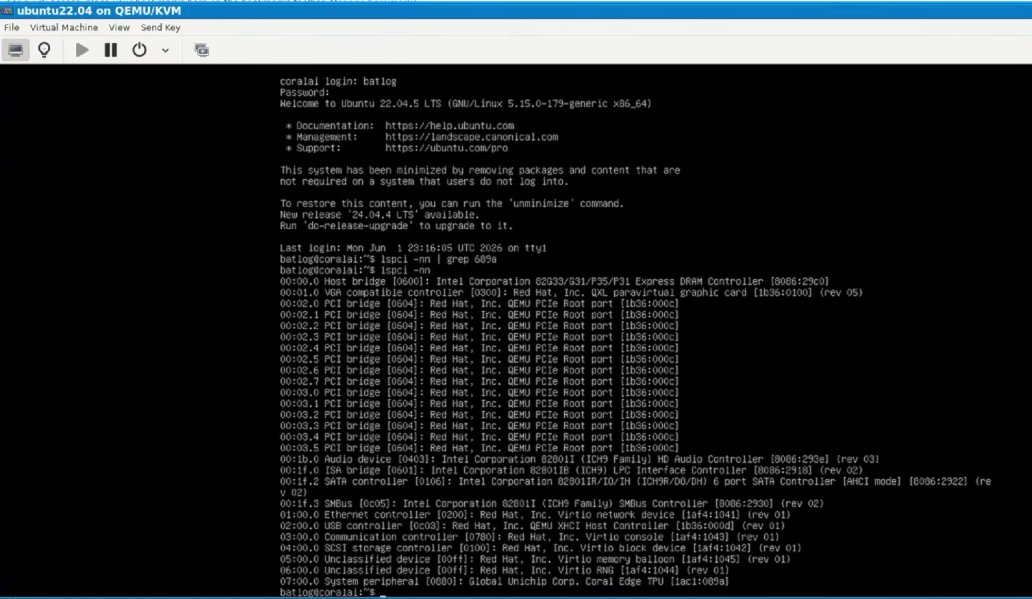
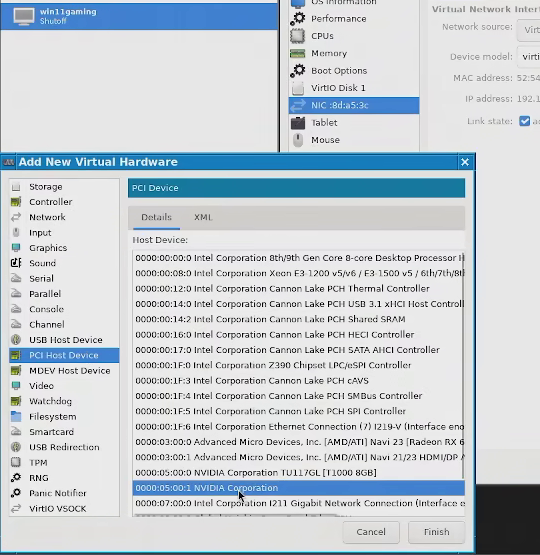
<p>After I created the VM: I logged in, checked everything was working correctly, shut down the VM attached the TPU, fired the VM again and ran lspci to check the TPU was loaded correctly.</p>
<div class="gallery-wrapper"><div class="gallery" data-is-empty="false" data-translation="Add images" data-columns="2">
<figure class="gallery__item"><a href="https://bat.moe/media/posts/16/gallery/4.png" data-size="456x594"><img loading="lazy" src="https://bat.moe/media/posts/16/gallery/4-thumbnail.png" alt="1.3" width="456" height="594"></a>
<figcaption>Attaching the TPU</figcaption>
</figure>
<figure class="gallery__item"><a href="https://bat.moe/media/posts/16/gallery/5.png" data-size="1032x599"><img loading="lazy" src="https://bat.moe/media/posts/16/gallery/5-thumbnail.png" alt="1.4" width="768" height="446"></a>
<figcaption>Checking the TPU is loaded</figcaption>
</figure>
</div></div>
<p>At this point I just proceeded with the installation as per Google's instructions.</p>
<h3><span style="color: #3598db;">Installing everything and running the sample model</span></h3>
<p>The installation went <em>mostly </em>according to Google's instructions except for a few hiccups due to the lack of care and maintenance. I'll document the process and troubleshooting I did.</p>
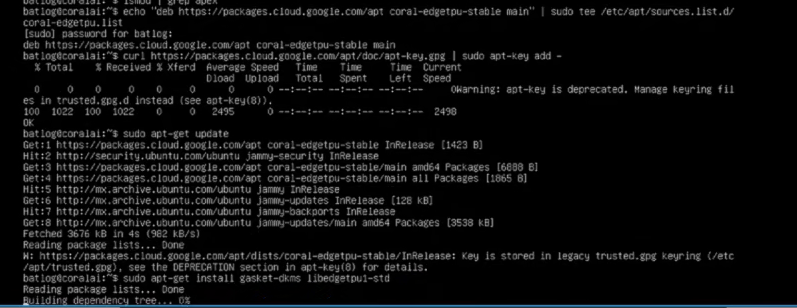
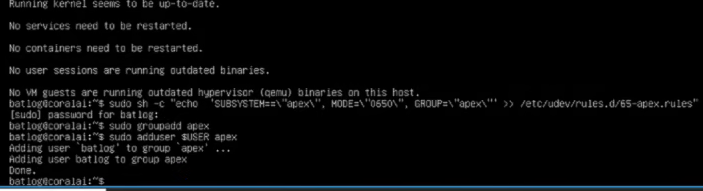
<p>First I had to install the drivers and assigning permissions to allow my user to use the device, this went mostly according to plan except for APT giving me a warning due to Google failing to maintain their repository keys, regardless since I'm running kernel 5.x everything went smoothly.</p>
<table style="border-collapse: collapse; width: 100%;" border="1">
<tbody>
<tr>
<td style="width: 49.9288%;">Commands to install the drivers</td>
<td style="width: 49.9288%;">Commands to allow your user to use the TPU</td>
</tr>
<tr>
<td style="width: 49.9288%;">echo "deb https://packages.cloud.google.com/apt coral-edgetpu-stable main" | sudo tee /etc/apt/sources.list.d/coral-edgetpu.list<br><br>curl https://packages.cloud.google.com/apt/doc/apt-key.gpg | sudo apt-key add -<br><br>sudo apt-get update<br><br>sudo apt-get install gasket-dkms libedgetpu1-std</td>
<td style="width: 49.9288%;">sudo sh -c "echo 'SUBSYSTEM==\"apex\", MODE=\"0660\", GROUP=\"apex\"' &gt;&gt; /etc/udev/rules.d/65-apex.rules"<br><br>sudo groupadd apex<br><br>sudo adduser $USER apex</td>
</tr>
</tbody>
</table>
<div class="gallery-wrapper"><div class="gallery" data-is-empty="false" data-translation="Add images" data-columns="2">
<figure class="gallery__item"><a href="https://bat.moe/media/posts/16/gallery/6.png" data-size="797x308"><img loading="lazy" src="https://bat.moe/media/posts/16/gallery/6-thumbnail.png" alt="2.1" width="768" height="297"></a>
<figcaption>Installing the drivers</figcaption>
</figure>
<figure class="gallery__item"><a href="https://bat.moe/media/posts/16/gallery/7.png" data-size="703x191"><img loading="lazy" src="https://bat.moe/media/posts/16/gallery/7-thumbnail.png" alt="2.2" width="703" height="191"></a>
<figcaption>Assigning permissions to user</figcaption>
</figure>
</div></div>
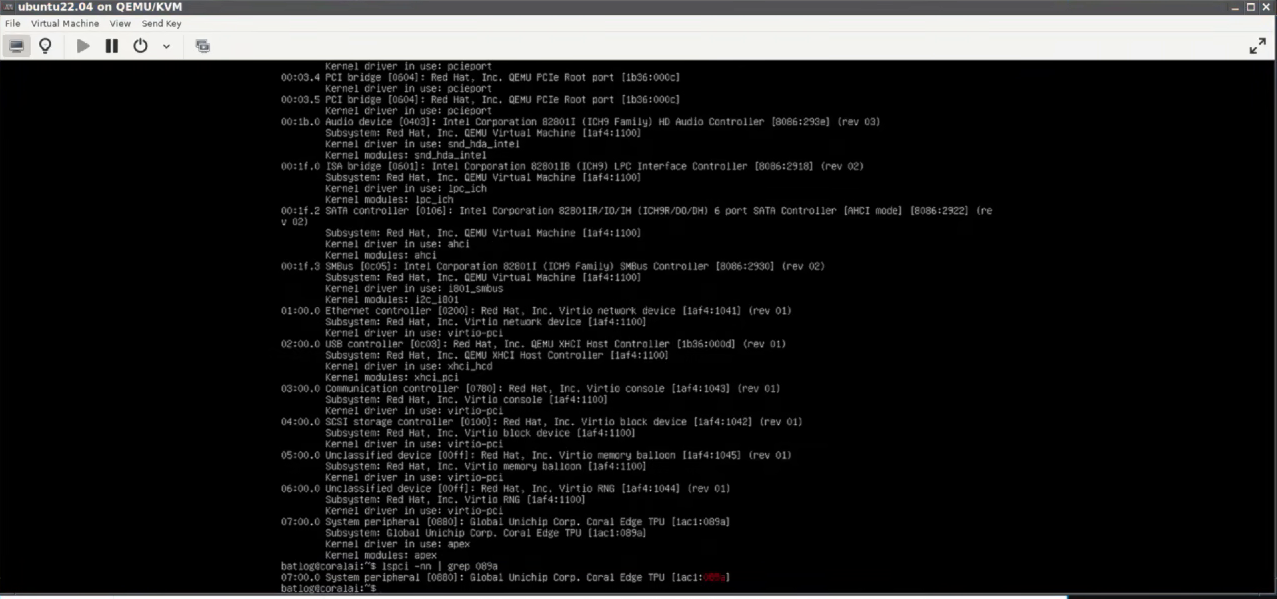
<p>Once that's done and checked the drivers were actually loaded and working with lspci -knn.</p>
<figure class="post__image"><img loading="lazy" src="https://bat.moe/media/posts/16/8.png" alt="loaded Drivers" width="1277" height="599" sizes="(min-width: 760px) 660px, calc(93.18vw - 30px)" srcset="https://bat.moe/media/posts/16/responsive/8-xs.png 320w ,https://bat.moe/media/posts/16/responsive/8-sm.png 480w ,https://bat.moe/media/posts/16/responsive/8-md.png 768w ,https://bat.moe/media/posts/16/responsive/8-xl.png 1024w">
<figcaption>Yup</figcaption>
</figure>
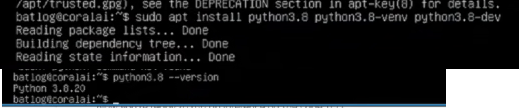
<figure class="post__image">Now begins the pain as the rest of the software stack works using python. To start I had to add the deadsnakes ppa repository and install python version 3.8. The way the deadsnakes repository works is that any command I run from this point on must specify which version of python I'm using as seen in the example below.</figure>
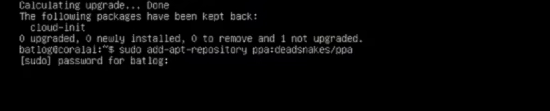
<p><code>Installing the Deadsnakes PPA:</code><br><code>sudo apt install software-properties-common</code><br><code>sudo add-apt-repository ppa:deadsnakes/ppa</code><br><code>sudo apt update</code><br><br><code>Installing python 3.8 and related packages:</code><br><code>sudo apt install python3.8 python3.8-venv python3.8-dev</code></p>
<div class="gallery-wrapper"><div class="gallery" data-is-empty="false" data-translation="Add images" data-columns="2">
<figure class="gallery__item"><a href="https://bat.moe/media/posts/16/gallery/9.png" data-size="550x111"><img loading="lazy" src="https://bat.moe/media/posts/16/gallery/9-thumbnail.png" alt="2.3" width="550" height="111"></a>
<figcaption>Installing the deadsnakes PPA</figcaption>
</figure>
<figure class="gallery__item"><a href="https://bat.moe/media/posts/16/gallery/10.png" data-size="519x110"><img loading="lazy" src="https://bat.moe/media/posts/16/gallery/10-thumbnail.png" alt="2.4" width="519" height="110"></a>
<figcaption>Installing all python 3.8 packages and running a command</figcaption>
</figure>
</div></div>
<p>Now all it's left is install pycoral. And<strong><em><span style="text-decoration: underline;"> this </span></em></strong>is the point where things went wrong.</p>
<figure class="post__image"><img loading="lazy" src="https://bat.moe/media/posts/16/11-2.png" alt="AptFail" width="689" height="393" sizes="(min-width: 760px) 660px, calc(93.18vw - 30px)" srcset="https://bat.moe/media/posts/16/responsive/11-2-xs.png 320w ,https://bat.moe/media/posts/16/responsive/11-2-sm.png 480w ,https://bat.moe/media/posts/16/responsive/11-2-md.png 768w ,https://bat.moe/media/posts/16/responsive/11-2-xl.png 1024w">
<figcaption>Read: Your software is unmaintained and I won't downgrade the version of a package I have installed because Ubuntu's  developers thought it was a great idea to have my network work completely using python for some god forsaken reason</figcaption>
</figure>
<p>Great<em><strong> </strong></em><span style="text-decoration: underline;"><strong>that's just the whole fucking software stack</strong></span>, no biggie. I just have to find a workaround.  First I tried to make python3.8 the main python version with a symlink in Linux, I'm not even bother gonna document doing this and I'll just tell you not to do it, that broke the entire system and it wouldn't boot any longer. </p>
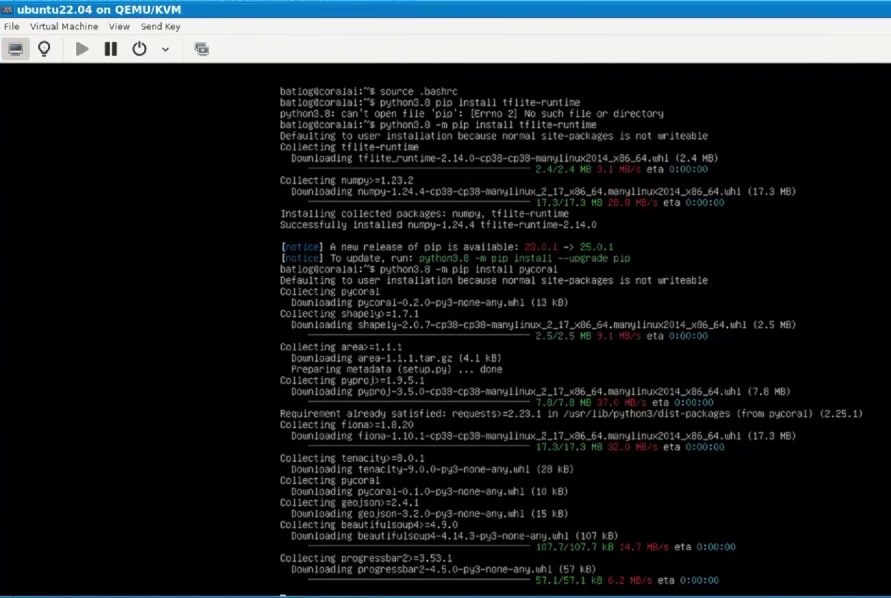
<p>I also tried installing tflite-runtime and pycoral using pip but that also didn't work</p>
<figure class="post__image"><img loading="lazy" src="https://bat.moe/media/posts/16/12.png" alt="piptflite" width="891" height="598" sizes="(min-width: 760px) 660px, calc(93.18vw - 30px)" srcset="https://bat.moe/media/posts/16/responsive/12-xs.png 320w ,https://bat.moe/media/posts/16/responsive/12-sm.png 480w ,https://bat.moe/media/posts/16/responsive/12-md.png 768w ,https://bat.moe/media/posts/16/responsive/12-xl.png 1024w">
<figcaption>Long story short: also DON'T DO THIS</figcaption>
</figure>
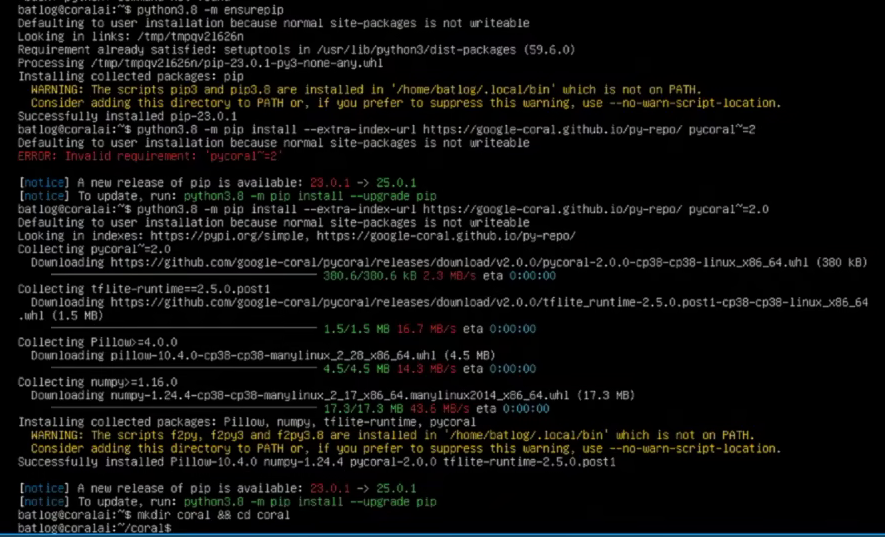
<p>What worked: First I ensured pip was installed and afterwards I installed the pycoral version directly from Google's github</p>
<p><code>python3.8 -m ensurepip</code><br><code>python3.8 -m pip install --extra-index-url https://google-coral.github.io/py-repo/ pycoral~=2.0</code></p>
<figure class="post__image"><img loading="lazy" src="https://bat.moe/media/posts/16/13.png" alt="pipwin" width="885" height="537" sizes="(min-width: 760px) 660px, calc(93.18vw - 30px)" srcset="https://bat.moe/media/posts/16/responsive/13-xs.png 320w ,https://bat.moe/media/posts/16/responsive/13-sm.png 480w ,https://bat.moe/media/posts/16/responsive/13-md.png 768w ,https://bat.moe/media/posts/16/responsive/13-xl.png 1024w">
<figcaption>Do THIS</figcaption>
</figure>
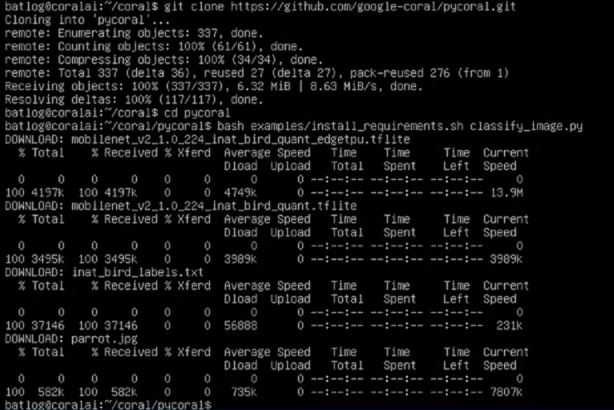
<p>Afterwards I just cloned the coral git and downloaded an example.</p>
<p><code>mkdir coral &amp;&amp; cd coral</code><br><code>git clone https://github.com/google-coral/pycoral.git</code><br><code>cd pycoral</code><br><code>bash examples/install_requirements.sh classify_image.py</code></p>
<figure class="post__image"><img loading="lazy"  src="https://bat.moe/media/posts/16/14.png" alt="cloningcoral" width="614" height="410" sizes="(min-width: 760px) 660px, calc(93.18vw - 30px)" srcset="https://bat.moe/media/posts/16/responsive/14-xs.png 320w ,https://bat.moe/media/posts/16/responsive/14-sm.png 480w ,https://bat.moe/media/posts/16/responsive/14-md.png 768w ,https://bat.moe/media/posts/16/responsive/14-xl.png 1024w"></figure>
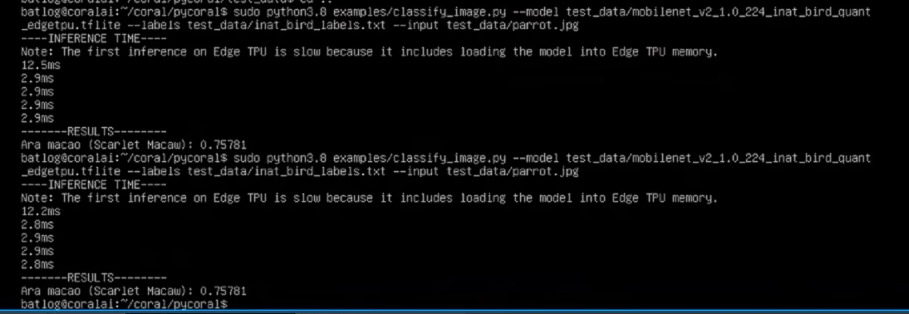
<p>Finally, all I had to do was run a very long command and just like that I verified it was working properly and ready for archival.</p>
<p>sudo python3.8 examples/classify_image.py --model test_data/mobilenet_v2_1.0_224_inat_bird_quant_edgetpu.tflite --labels test_data/inat_bird_labels.txt --input test_data/parrot.jpg</p>
<figure class="post__image"><img loading="lazy"  src="https://bat.moe/media/posts/16/15.png" alt="success" width="909" height="314" sizes="(min-width: 760px) 660px, calc(93.18vw - 30px)" srcset="https://bat.moe/media/posts/16/responsive/15-xs.png 320w ,https://bat.moe/media/posts/16/responsive/15-sm.png 480w ,https://bat.moe/media/posts/16/responsive/15-md.png 768w ,https://bat.moe/media/posts/16/responsive/15-xl.png 1024w"></figure>
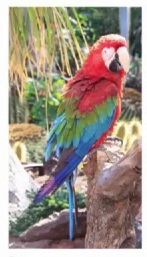
<p>This is the image the command is pointing to by the way: </p>
<figure class="post__image align-center"><img loading="lazy"  src="https://bat.moe/media/posts/16/16.png" alt="image" width="147" height="257" sizes="(min-width: 760px) 660px, calc(93.18vw - 30px)" srcset="https://bat.moe/media/posts/16/responsive/16-xs.png 320w ,https://bat.moe/media/posts/16/responsive/16-sm.png 480w ,https://bat.moe/media/posts/16/responsive/16-md.png 768w ,https://bat.moe/media/posts/16/responsive/16-xl.png 1024w"></figure>
<h3><span style="color: #3598db;">The reasons why I think it failed and why I think they were still a good idea and why I'm preserving this.</span></h3>
<p>There are quite a few things that I think contributed to Coral being shelved by Google almost immediately after release</p>
<p>One may think a contributing factor was the leak of the uncensored Stable Diffusion models by NovelAI in 2022 that effectively lead to the rapid replacement of small computing devices for Large Language Models and the current AI craze the world finds itself in (After all why have a stationary robot like Flippy at White Castle when you can have a whole fleet of robot workers on your Amazon warehouse?). But more than anything I believe killed Coral was because it ran against Google's business model, allow me to elaborate.</p>
<p>The main thing that killed Coral in general in my opinion is that SBC's began using NPU's everywhere, in particular Risc V SBCs, and since most of the people interested in this tech are companies or governments (Be it for automation or mass surveillance) there really is no point to having a cheap device that allows your average Joe to run basic image recognition models. For instance one of the worst Risc V SBCs I own a Sipeed M1S Dock; a rather limited SBC with only 64MB of RAM and even there I see no practical difference in using that over using another SBC or computer with a Coral TPU as far as using it for automation is concerned (I may make an article on that device later).</p>
<p>There is a big difference between a TPU and an NPU though: you <em><strong>cannot</strong></em> train models on an NPU, only run them, and for that alone combined with the ridiculously small power footprint, I think these devices are worth preserving. However, I also get why Google abandoned this idea and hasn't looked back, after all why allow end-consumers to train their own models and run them offline when <em>you </em>can train the models, sell them to companies and implement DRM on them? </p>
<p>I may look into upgrading the software stack one day just out of spite but for now Coral joins the Google graveyard in the long list of projects killed by Google.</p>
<p> </p>
<h3><figure class="post__image"><img loading="lazy"  src="https://bat.moe/media/posts/16/logowhite.png" alt="" width="200" height="200" sizes="(min-width: 760px) 660px, calc(93.18vw - 30px)" srcset="https://bat.moe/media/posts/16/responsive/logowhite-xs.png 320w ,https://bat.moe/media/posts/16/responsive/logowhite-sm.png 480w ,https://bat.moe/media/posts/16/responsive/logowhite-md.png 768w ,https://bat.moe/media/posts/16/responsive/logowhite-xl.png 1024w"></figure> <span style="color: #ecf0f1;"> <a href="https://bat.moe/about-me.html" style="color: #ecf0f1;">-Batlog</a></span></h3>
<p> </p>
<hr>
<pre>If you enjoyed this article or if it was of any use to you, please consider donating some crypto. All funds go towards paying for the hosting.<br><br>Monero/XMR:<br>88MC6ksaVyLbtH9fT4owLSPX16vYD9cf6YELmXjaNWWd71R6iwfFV6DJtp7BXR5c6vWnxLEEGyu1tfwXwTqDM1CUCqDGeRY<br><br>Bitcoin/BTC: <br>bc1qzw9g97ffhllwukhagkvn5g0u9d8rhjv86xhf8h<br><br>Ethereum/ETH:<br>0xf948ab59E492865Fb5200A97F0F4F2f31F7b443f<br><br>Litecoin/LTC:<br>ltc1qqfv05jpyh8yvzyetmf7n5ve500jl656yxpc8y4<br><br>Doge:<br>DT5iG6GxoyZtHSSmaZHHV63NpEoH5yuixg</pre>
<p> </p>
            ]]>
        </content>
    </entry>
    <entry>
        <title>Remembering and using Archipelis</title>
        <author>
            <name>Batlog</name>
        </author>
        <link href="https://bat.moe/remembering-and-using-archipelis.html"/>
        <id>https://bat.moe/remembering-and-using-archipelis.html</id>
        <media:content url="https://bat.moe/media/posts/15/archipelisdraftbg.png" medium="image" />
            <category term="Windows"/>
            <category term="Virtualization"/>
            <category term="Design"/>

        <updated>2026-06-25T14:15:00-06:00</updated>
            <summary type="html">
                <![CDATA[
                        <img src="https://bat.moe/media/posts/15/archipelisdraftbg.png" alt="" />
                    There is a rather cool program (If a bit outdated) that I&hellip;
                ]]>
            </summary>
        <content type="html">
            <![CDATA[
                    <p><img src="https://bat.moe/media/posts/15/archipelisdraftbg.png" class="type:primaryImage" alt="" /></p>
                <p>There is a rather cool program (If a bit outdated) that I came across a few years ago called "Archipelis 3D Designer". I'm currently trying to get into game development and I decided to finally make use of my copy (Which I bought for a whole 30 dollars).</p>
<p>However, to my shock when I wanted to check the manual, only available online, it was gone and not only was the page for the manual gone, <strong>As of 22/06/2026 the whole website was hijacked and used to promote some crypto online casino scam shit or something</strong>. I have no idea what happened to the developer and neither do the couple of people that I contacted about it that had a partnership or relationship with them, the software is about 20 years old now so it's safe to assume<strong> the software is gone for good.</strong></p>
<p>I'm wising this post not so much as a guide but rather as a showcase as I think this is an idea worth re-exploring and why I'll likely use the software despite requiring a VM to run it.</p>
<h3><span style="color: #3598db;">What is/Was Archipelis</span></h3>
<p>Archipelis was a software used to translate 2D images into fully textured 3D meshes by tracing over them. It was also very simple and very easy to do (The exe installer is 5 MB in size and once installed the binary is only 2.5 MB). This worked by "inflating" the shapes that you drew which you can then fine-tune and adjust according to your needs, act following you can export them to quite a few file types (Some of which are relevant and usable even 20 years later) and animate them or add them to your game engine or whatever.</p>
<p>It came from a bizarre moment in time when people thought Second Life would become the metaverse rather than a furry paradise and was intended to make exports for it. It doesn't work all that well for humans or furniture with sharp corners but it works very well for minor assets or non-human characters and honestly if this idea had caught on I can't help but think it would've accelerated some workflows massively, particularly on the indie side.</p>
<h4><span style="color: #3598db;">Getting Archipelis to work</span></h4>
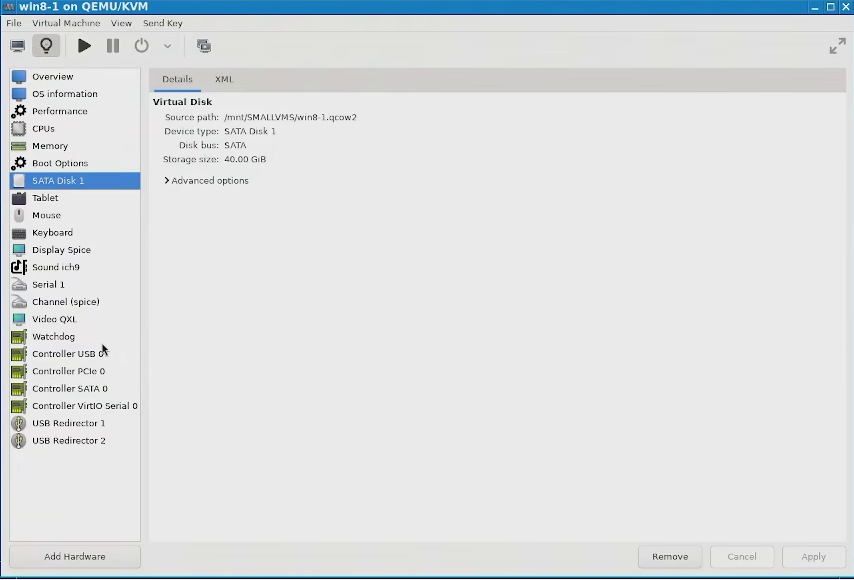
<p>I have no proof but I swear back when the website existed it claimed to be able to be installed on Windows 7, windows 8 and Wine. I can vouch having this run on wine is 100% nonsense, I could never get it to run. After some testing the last version of Windows that this runs on is Windows 8.1 with all the updates. Therefore I just made a Windows 8.1 WM with very few modifications. Except a rather obvious one.</p>
<figure class="post__image align-center"><img loading="lazy"  src="https://bat.moe/media/posts/15/1.png" alt="Basic Windows 8 VM sans network" width="854" height="580" sizes="(min-width: 760px) 660px, calc(93.18vw - 30px)" srcset="https://bat.moe/media/posts/15/responsive/1-xs.png 320w ,https://bat.moe/media/posts/15/responsive/1-sm.png 480w ,https://bat.moe/media/posts/15/responsive/1-md.png 768w ,https://bat.moe/media/posts/15/responsive/1-xl.png 1024w"></figure>
<p>This virtual machine has no network card and the reason for that is because Archipelis actually phones home and not only it phones home it does so in a way that it communicates to the server which buyer is using it (See addendum why I can't distribute it below). Funnily enough you can bypass this by just removing all network capabilities from your computer, it doesn't even need to phone home once or anything.</p>
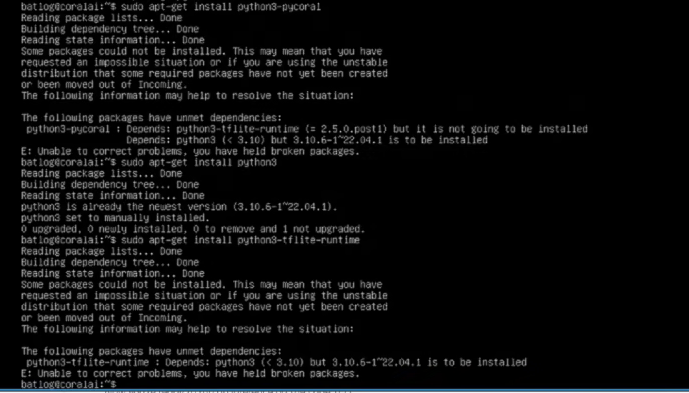
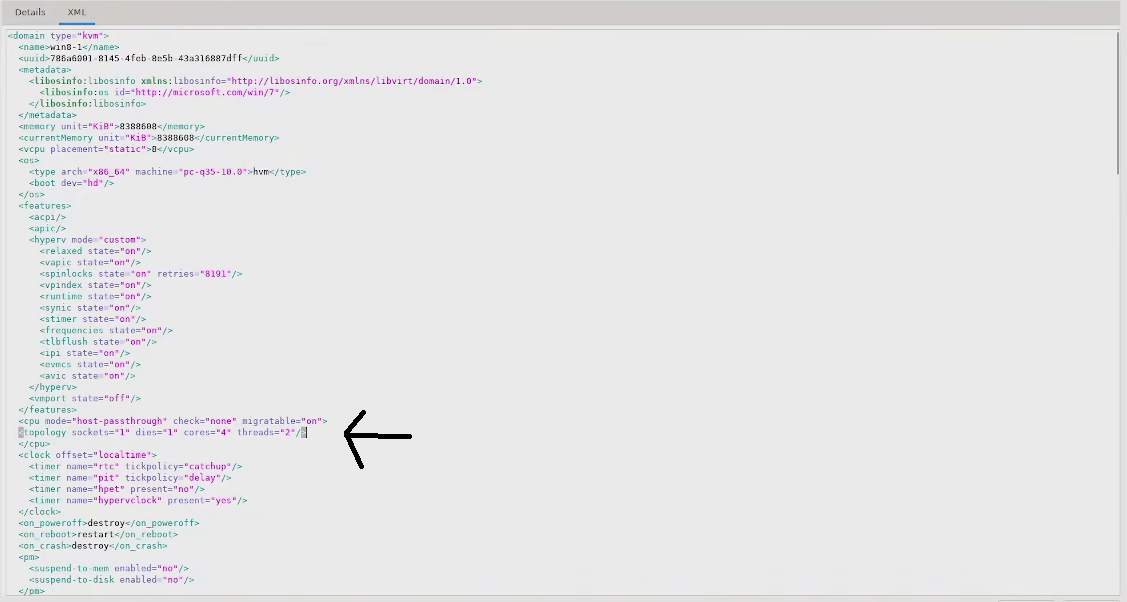
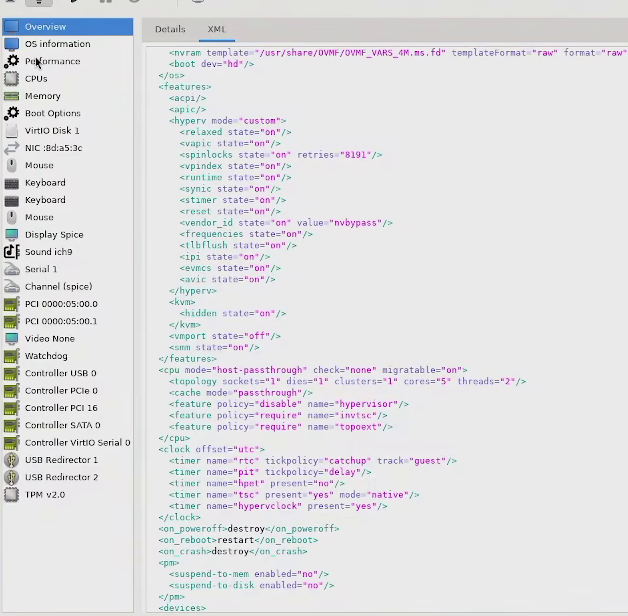
<p>I also did a small change in the xml so the virtual machine could load more than two cores (This is an issue with any windows version).</p>
<figure class="post__image align-center"><img loading="lazy"  src="https://bat.moe/media/posts/15/2.png" alt="Fixing topology for 8 virtual cores" width="1127" height="602" sizes="(min-width: 760px) 660px, calc(93.18vw - 30px)" srcset="https://bat.moe/media/posts/15/responsive/2-xs.png 320w ,https://bat.moe/media/posts/15/responsive/2-sm.png 480w ,https://bat.moe/media/posts/15/responsive/2-md.png 768w ,https://bat.moe/media/posts/15/responsive/2-xl.png 1024w"></figure>
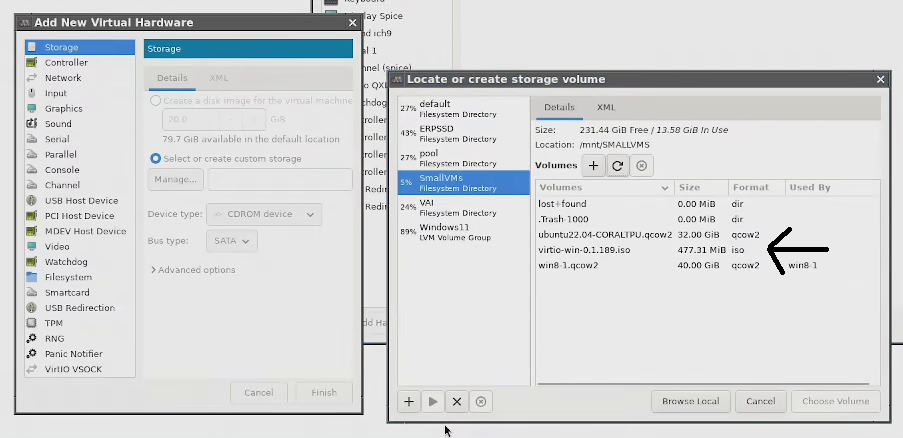
<p>Then I installed virtio guest tools to make the VM run smoother, you want version 0.189, any newer version doesn't work on windows 8.1... </p>
<figure class="post__image align-center"><img loading="lazy"  src="https://bat.moe/media/posts/15/3.png" alt="Adding the virtio guest tools disc" width="903" height="438" sizes="(min-width: 760px) 660px, calc(93.18vw - 30px)" srcset="https://bat.moe/media/posts/15/responsive/3-xs.png 320w ,https://bat.moe/media/posts/15/responsive/3-sm.png 480w ,https://bat.moe/media/posts/15/responsive/3-md.png 768w ,https://bat.moe/media/posts/15/responsive/3-xl.png 1024w"></figure>
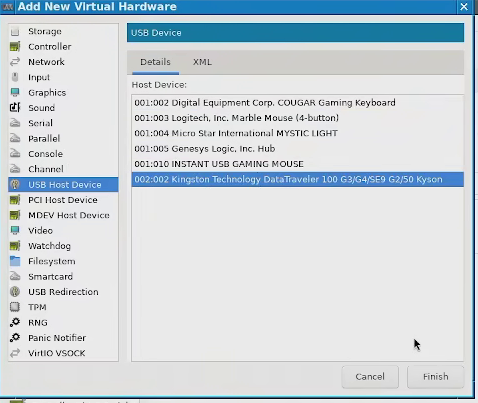
<p>... And finally I transfered the files I needed into the VM using a usb drive </p>
<figure class="post__image align-center"><img loading="lazy"  src="https://bat.moe/media/posts/15/4.png" alt="Attaching a USB drive to transfer files" width="478" height="403" sizes="(min-width: 760px) 660px, calc(93.18vw - 30px)" srcset="https://bat.moe/media/posts/15/responsive/4-xs.png 320w ,https://bat.moe/media/posts/15/responsive/4-sm.png 480w ,https://bat.moe/media/posts/15/responsive/4-md.png 768w ,https://bat.moe/media/posts/15/responsive/4-xl.png 1024w"></figure>
<p> </p>
<p>Now that I have everything I just ran the installer (Which was a very standard affair) and I was good to go.</p>
<h4><span style="color: #3598db;">Actually using Archipelis</span></h4>
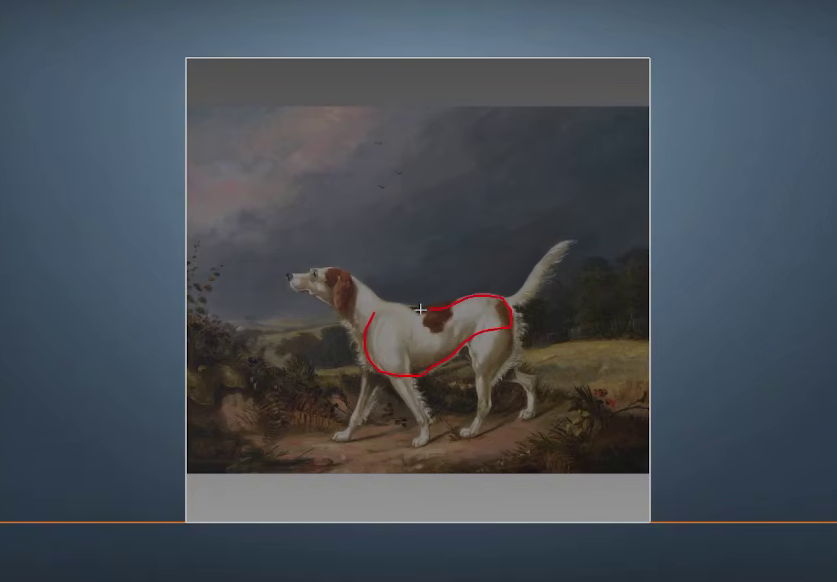
<p>If there's one thing I think all archipelis users agree on is that it's specially good for two types of things, rounded objects and animals. For this example I'll be using a public domain painting of a dog made in the 18th century by Francis Calcraft Turner.</p>
<p>First you start by importing an image and then you have to draw over it, for this I recommend drawing over the largest body part like the torso (You cannot zoom or do anything else, all menus are gone until you've drawn this first part).</p>
<figure class="post__image"><img loading="lazy"  src="https://bat.moe/media/posts/15/5.png" alt="Drawing the main part" width="837" height="582" sizes="(min-width: 760px) 660px, calc(93.18vw - 30px)" srcset="https://bat.moe/media/posts/15/responsive/5-xs.png 320w ,https://bat.moe/media/posts/15/responsive/5-sm.png 480w ,https://bat.moe/media/posts/15/responsive/5-md.png 768w ,https://bat.moe/media/posts/15/responsive/5-xl.png 1024w"></figure>
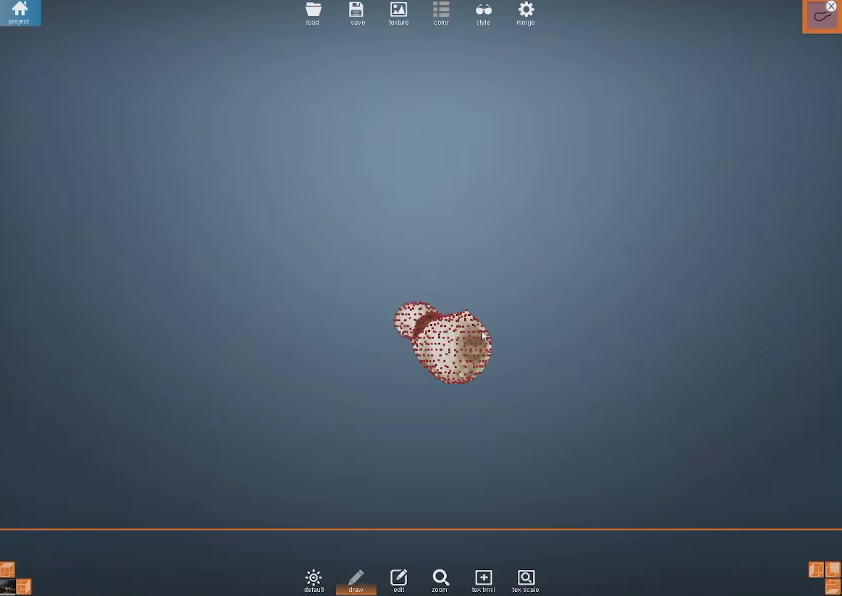
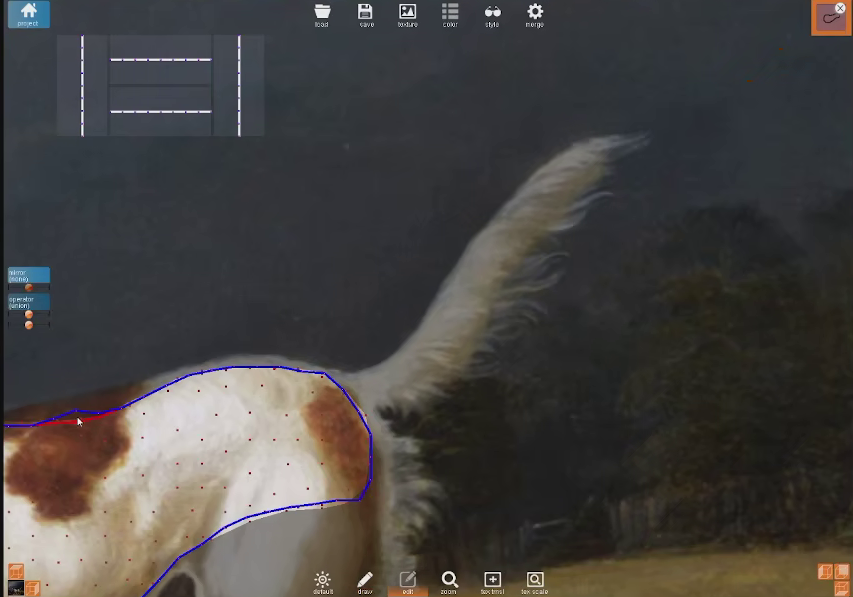
<p>After you close the loop (Or come close to) The software will immediately generate a 3D render that you can then jump into edit mode and adjust the line of it in case it has taken some of the picture's background.</p>
<div class="gallery-wrapper"><div class="gallery" data-is-empty="false" data-translation="Add images" data-columns="3">
<figure class="gallery__item"><a href="https://bat.moe/media/posts/15/gallery/6.png" data-size="842x596"><img loading="lazy" src="https://bat.moe/media/posts/15/gallery/6-thumbnail.png" alt="" width="768" height="544"></a>
<figcaption>The program makes a crude render</figcaption>
</figure>
<figure class="gallery__item"><a href="https://bat.moe/media/posts/15/gallery/7.png" data-size="853x597"><img loading="lazy" src="https://bat.moe/media/posts/15/gallery/7-thumbnail.png" alt="" width="768" height="538"></a>
<figcaption>You can adjust the outline of the render</figcaption>
</figure>
</div></div>
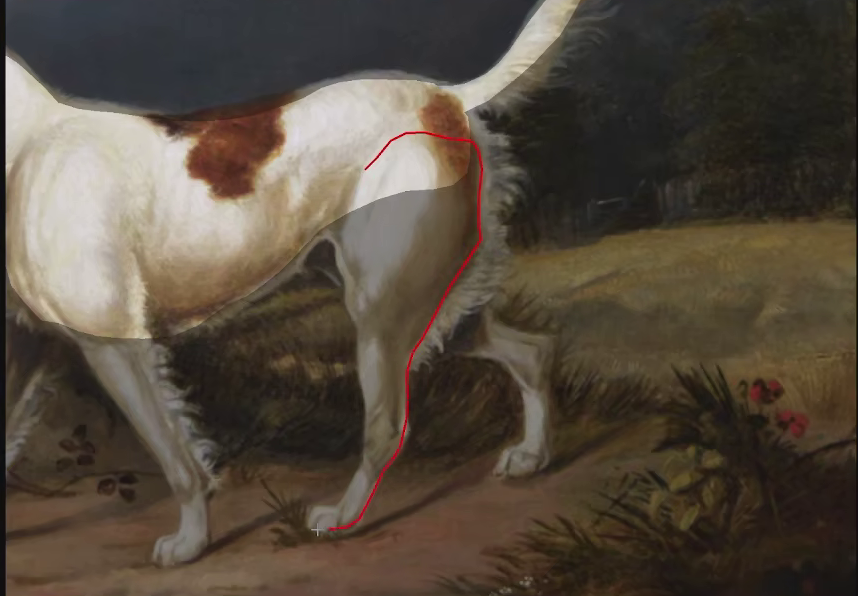
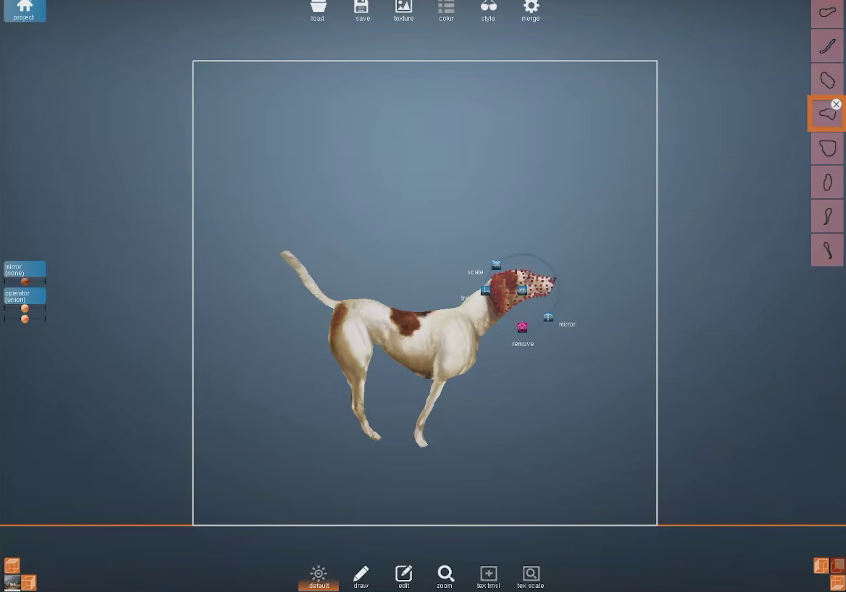
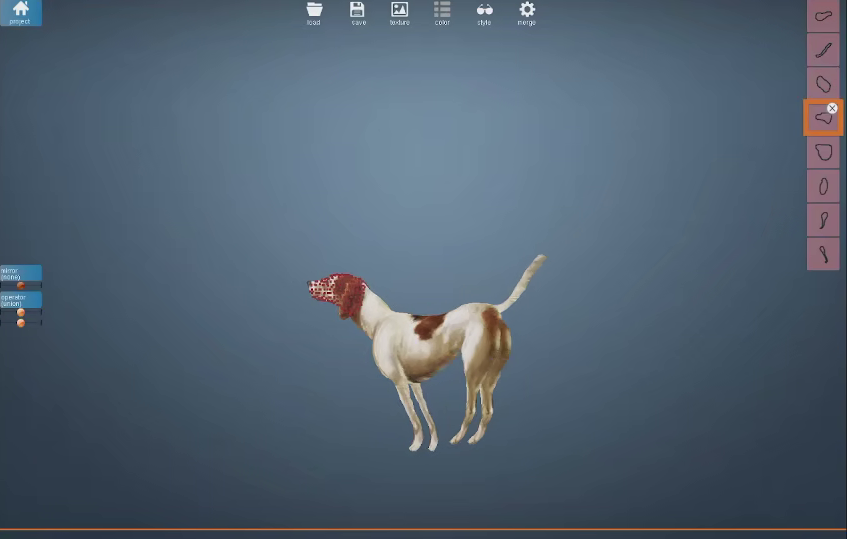
<p>Act following You can just continue drawing and making shapes which will be accumulated and stored individually </p>
<figure class="post__image align-center"><img loading="lazy"  src="https://bat.moe/media/posts/15/8-2.png" alt="Drawing more" width="858" height="596" sizes="(min-width: 760px) 660px, calc(93.18vw - 30px)" srcset="https://bat.moe/media/posts/15/responsive/8-2-xs.png 320w ,https://bat.moe/media/posts/15/responsive/8-2-sm.png 480w ,https://bat.moe/media/posts/15/responsive/8-2-md.png 768w ,https://bat.moe/media/posts/15/responsive/8-2-xl.png 1024w"></figure>
<p>And eventually I ended up with an initial render that looks like this</p>
<figure class="post__image align-center"><img loading="lazy"  src="https://bat.moe/media/posts/15/9.png" alt="Initial render" width="598" height="418" sizes="(min-width: 760px) 660px, calc(93.18vw - 30px)" srcset="https://bat.moe/media/posts/15/responsive/9-xs.png 320w ,https://bat.moe/media/posts/15/responsive/9-sm.png 480w ,https://bat.moe/media/posts/15/responsive/9-md.png 768w ,https://bat.moe/media/posts/15/responsive/9-xl.png 1024w"></figure>
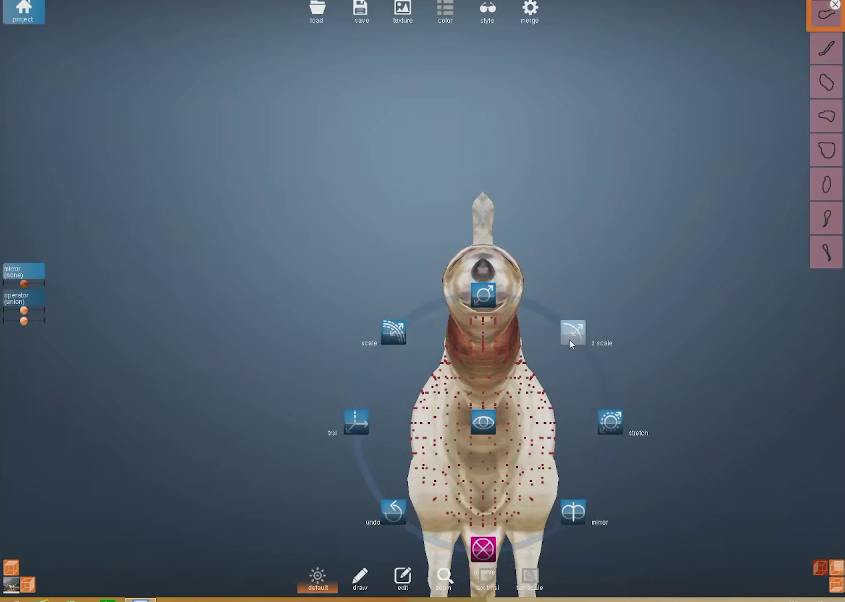
<p>Nice, until you look at it from the front.</p>
<figure class="post__image align-center"><img loading="lazy"  src="https://bat.moe/media/posts/15/10-2.png" alt="Front view" width="845" height="602" sizes="(min-width: 760px) 660px, calc(93.18vw - 30px)" srcset="https://bat.moe/media/posts/15/responsive/10-2-xs.png 320w ,https://bat.moe/media/posts/15/responsive/10-2-sm.png 480w ,https://bat.moe/media/posts/15/responsive/10-2-md.png 768w ,https://bat.moe/media/posts/15/responsive/10-2-xl.png 1024w"></figure>
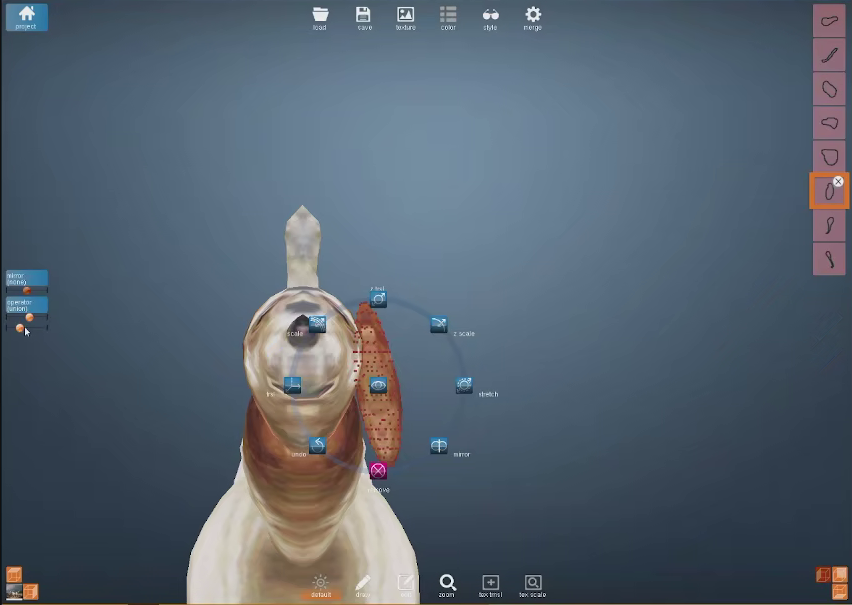
<p>... However from this point on you can just fine-tune it, the software allows you to change the scale of all your parts, their position, mirror them and rotate them.</p>
<figure class="post__image align-center"><img loading="lazy"  src="https://bat.moe/media/posts/15/11.png" alt="Editing parts" width="852" height="605" sizes="(min-width: 760px) 660px, calc(93.18vw - 30px)" srcset="https://bat.moe/media/posts/15/responsive/11-xs.png 320w ,https://bat.moe/media/posts/15/responsive/11-sm.png 480w ,https://bat.moe/media/posts/15/responsive/11-md.png 768w ,https://bat.moe/media/posts/15/responsive/11-xl.png 1024w"></figure>
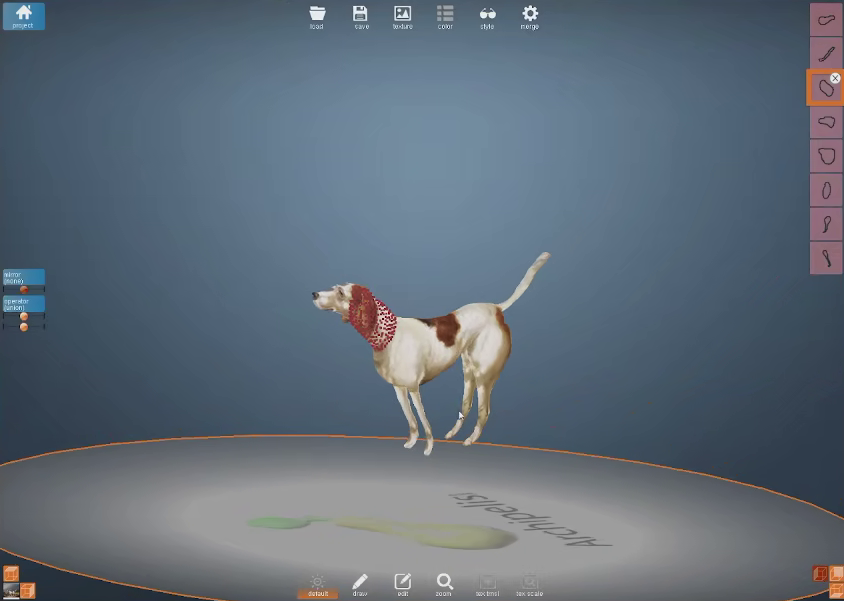
<p>Eventually I ended up with a model  that looks like this</p>
<div class="gallery-wrapper"><div class="gallery" data-is-empty="false" data-translation="Add images" data-columns="3">
<figure class="gallery__item"><a href="https://bat.moe/media/posts/15/gallery/12-2.png" data-size="844x601"><img loading="lazy" src="https://bat.moe/media/posts/15/gallery/12-2-thumbnail.png" alt="" width="768" height="547"></a>
<figcaption>Front view</figcaption>
</figure>
<figure class="gallery__item"><a href="https://bat.moe/media/posts/15/gallery/13-2.png" data-size="847x539"><img loading="lazy" src="https://bat.moe/media/posts/15/gallery/13-2-thumbnail.png" alt="" width="768" height="489"></a>
<figcaption>Back view</figcaption>
</figure>
</div></div>
<p> </p>
<p>From here all you have to do is save it and export it, which as I said in the beginning has quite a few formats to do so.</p>
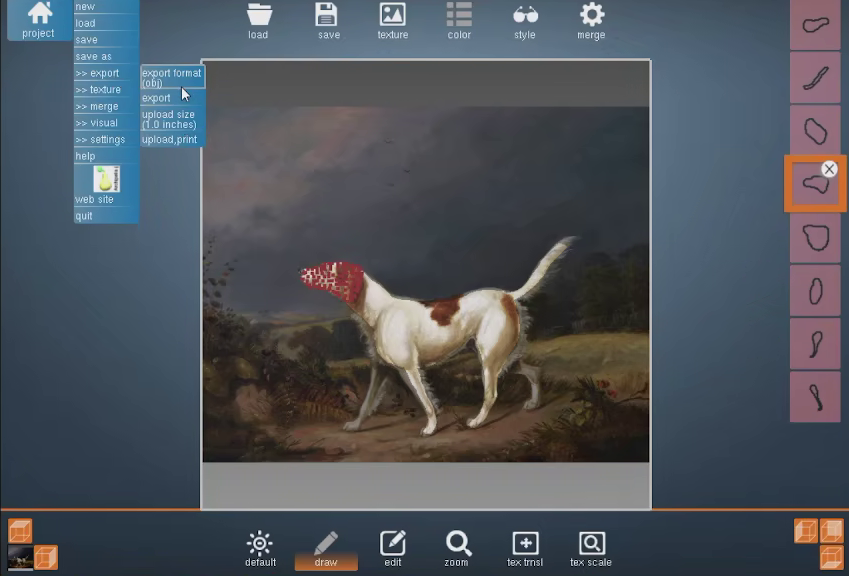
<figure class="post__image"><img loading="lazy"  src="https://bat.moe/media/posts/15/14.png" alt="Exporting" width="849" height="576" sizes="(min-width: 760px) 660px, calc(93.18vw - 30px)" srcset="https://bat.moe/media/posts/15/responsive/14-xs.png 320w ,https://bat.moe/media/posts/15/responsive/14-sm.png 480w ,https://bat.moe/media/posts/15/responsive/14-md.png 768w ,https://bat.moe/media/posts/15/responsive/14-xl.png 1024w"></figure>
<p>I know the results may not look that impressive for today's standards but what if I told you the result is very low poly and it was done by someone that has barely any knowledge regarding 3D modeling barely putting any effort or heart in it in <em>30 minutes</em>? I honestly don't know of any software that's faster than this and I think it would effectively reduce the workload of small teams exponentially, maybe even enable the creation and distribution of easily-made assets</p>
<h4>Similar software (And why there's no replacement for this)</h4>
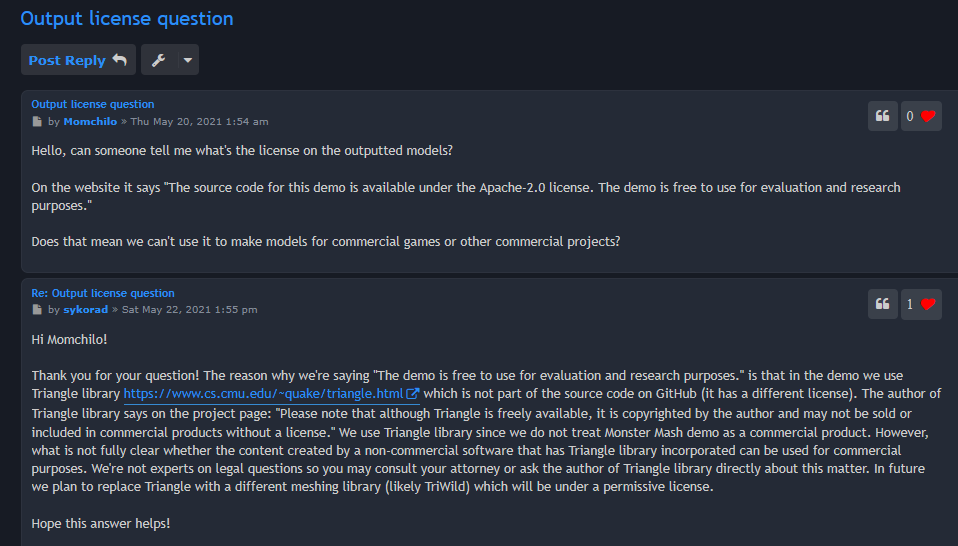
<p>Monster mash is the obvious one, I'd dare say it was inspired by this software. However that software comes with one huge caveat in the form of the license, while their github makes it seem like you can use the software without any problems under an Apache license the reality is that you cannot, and you may get into legal trouble for doing so as per their forums:</p>
<figure class="post__image"><img loading="lazy"  src="https://bat.moe/media/posts/15/15.png" alt="Monster Mash license usage" width="958" height="546" sizes="(min-width: 760px) 660px, calc(93.18vw - 30px)" srcset="https://bat.moe/media/posts/15/responsive/15-xs.png 320w ,https://bat.moe/media/posts/15/responsive/15-sm.png 480w ,https://bat.moe/media/posts/15/responsive/15-md.png 768w ,https://bat.moe/media/posts/15/responsive/15-xl.png 1024w"></figure>
<p>This promise to change the library was never followed upon and 4 years later I don't think they're doing squat about it. Archipelis has a very permissive license that allows you to do whatever you want with the outputs produced by the software as long as you Attribute that it was done in part or fully by Archipelis.</p>
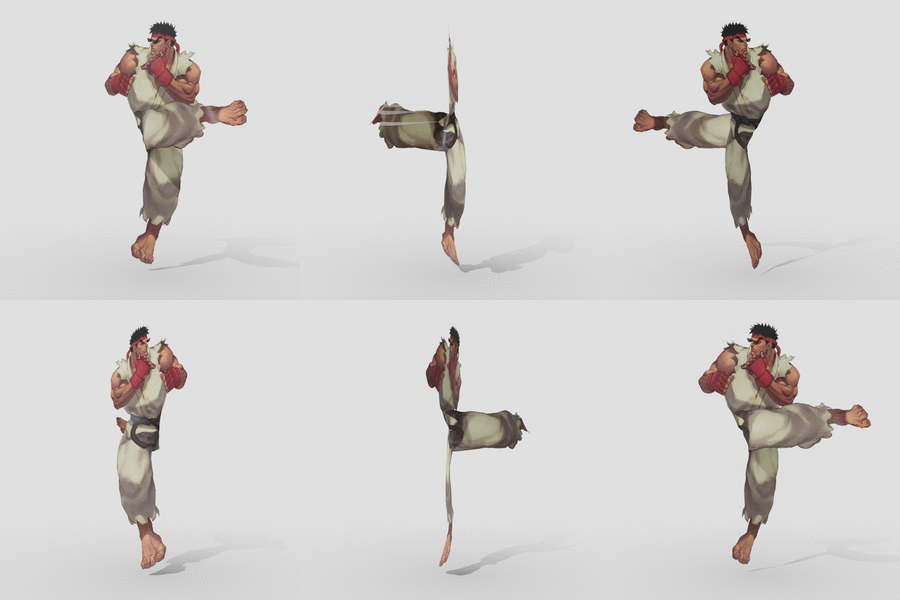
<p>The second one is a plugin for blender called 'Tesselate texture plane' by Pullusb on Github, which... does exactly what it says on the box.</p>
<p>The problem I have with that one is that it does not inflate the parts of whatever you draw over (Which curiously is the same issue Monster Mash has regarding licensing) So anything you do ends up as a paper render in 3D</p>
<figure class="post__image align-center"><img loading="lazy"  src="https://bat.moe/media/posts/15/paper_ryu-tatsumaki_20fps.gif" alt="Tesselate Texture Plane Output" width="300" height="300"></figure>
<p>It's cool but not really a replacement for Archipelis</p>
<p>It's a shame really, if the idea had caught on I can't help but think there would be something way easier to use and more modern by now.</p>
<h4><span style="color: #3598db;">Addendum 1: Why I can't distribute it</span></h4>
<p>Going back to the software calling home it does something weird, when you downloaded the software it would make a special version of the software that baked in your mail and full name into the program and basicallly makes a version for you and only you.</p>
<p>The mail and the name of the person that purchased it can be seen front and centre in any project that you open, which for me would result in immediate doxing. For an example of what I'm talking about look at the video of pdhowler using the software on youtube, where his full legal name and personal mail is displayed for the world to see.</p>
<p> </p>
<h3><figure class="post__image"><img loading="lazy"  src="file:///C:/Users/Admin/Documents/Publii/sites/the-bat-blog-of-the-batlog/input/media/posts/16/logowhite.png" alt="" width="200" height="200" sizes="(min-width: 760px) 660px, calc(93.18vw - 30px)" srcset="file:///C:/Users/Admin/Documents/Publii/sites/the-bat-blog-of-the-batlog/input/media/posts/16/responsive/logowhite-xs.png 320w ,file:///C:/Users/Admin/Documents/Publii/sites/the-bat-blog-of-the-batlog/input/media/posts/16/responsive/logowhite-sm.png 480w ,file:///C:/Users/Admin/Documents/Publii/sites/the-bat-blog-of-the-batlog/input/media/posts/16/responsive/logowhite-md.png 768w ,file:///C:/Users/Admin/Documents/Publii/sites/the-bat-blog-of-the-batlog/input/media/posts/16/responsive/logowhite-xl.png 1024w"></figure> <span style="color: #ecf0f1;"> <a href="https://bat.moe/about-me.html" style="color: #ecf0f1;">-Batlog</a></span></h3>
<p> </p>
<p> </p>
<hr>
<pre>If you enjoyed this article or if it was of any use to you, please consider donating some crypto. All funds go towards paying for the hosting.<br><br>Monero/XMR:<br>88MC6ksaVyLbtH9fT4owLSPX16vYD9cf6YELmXjaNWWd71R6iwfFV6DJtp7BXR5c6vWnxLEEGyu1tfwXwTqDM1CUCqDGeRY<br><br>Bitcoin/BTC: <br>bc1qzw9g97ffhllwukhagkvn5g0u9d8rhjv86xhf8h<br><br>Ethereum/ETH:<br>0xf948ab59E492865Fb5200A97F0F4F2f31F7b443f<br><br>Litecoin/LTC:<br>ltc1qqfv05jpyh8yvzyetmf7n5ve500jl656yxpc8y4<br><br>Doge:<br>DT5iG6GxoyZtHSSmaZHHV63NpEoH5yuixg</pre>
            ]]>
        </content>
    </entry>
    <entry>
        <title>Creating a virtualized AI generation environment (Stable Diffusion)</title>
        <author>
            <name>Batlog</name>
        </author>
        <link href="https://bat.moe/getting-the-cakewalk-suite-to-work-again.html"/>
        <id>https://bat.moe/getting-the-cakewalk-suite-to-work-again.html</id>
        <media:content url="https://bat.moe/media/posts/14/virtual-aibg.png" medium="image" />
            <category term="Virtualization"/>
            <category term="Linux"/>
            <category term="AI"/>

        <updated>2026-06-20T14:14:00-06:00</updated>
            <summary type="html">
                <![CDATA[
                        <img src="https://bat.moe/media/posts/14/virtual-aibg.png" alt="" />
                    This article will cover the process on how to make a virtual&hellip;
                ]]>
            </summary>
        <content type="html">
            <![CDATA[
                    <p><img src="https://bat.moe/media/posts/14/virtual-aibg.png" class="type:primaryImage" alt="" /></p>
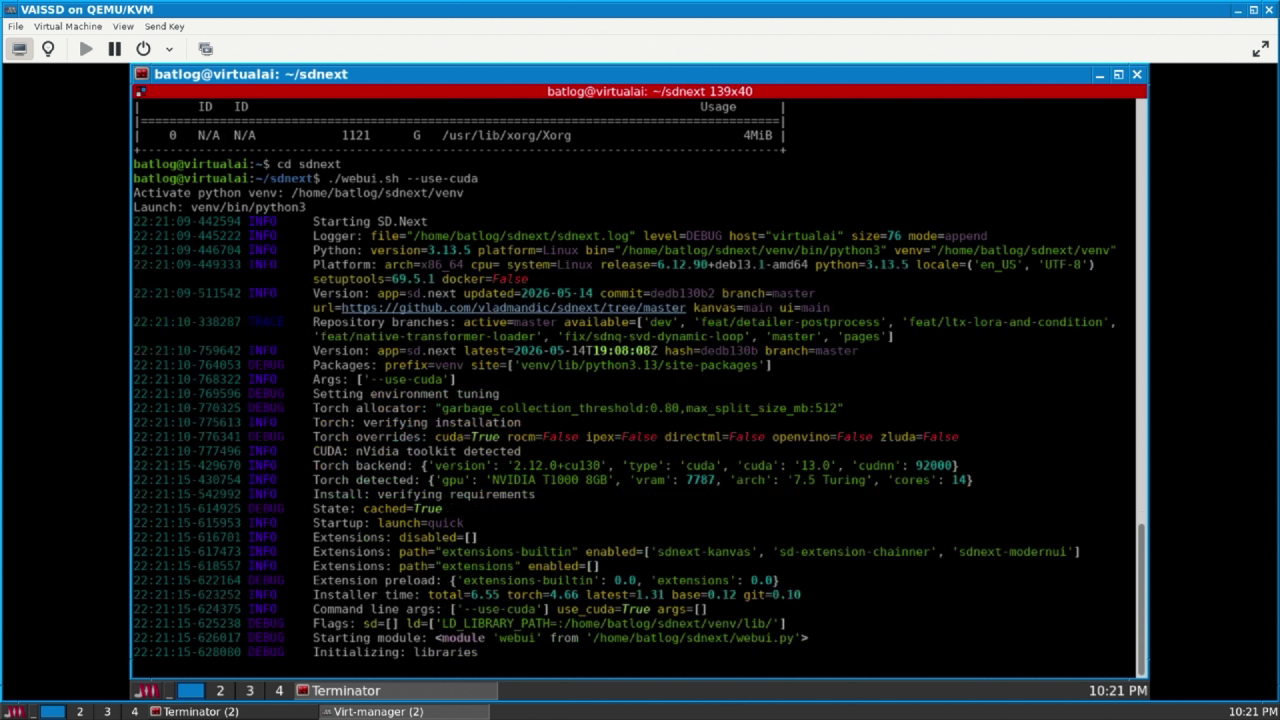
                <p>This article will cover the process on how to make a virtual environment for generative AI by attaching a GPU to a virtual machine and running the latest version available of SDNext.</p>
<p>I already covered parts of this in my guide to <a href="https://bat.moe/optimizations-for-a-windows-11-gaming-vm.html">make a Windows 11 VM for gaming </a>(They use the same GPU), but regardless I'll document this process due to the difference regarding the installation of drivers and intent.</p>
<h3><span style="color: #3598db;">Step 0:  Checking motherboard compatibility and enabling IOMMU</span></h3>
<p>Before making any virtual machines or anything you may want to check if the motherboard you're working with is even compatible with detaching PCI devices from the host.</p>
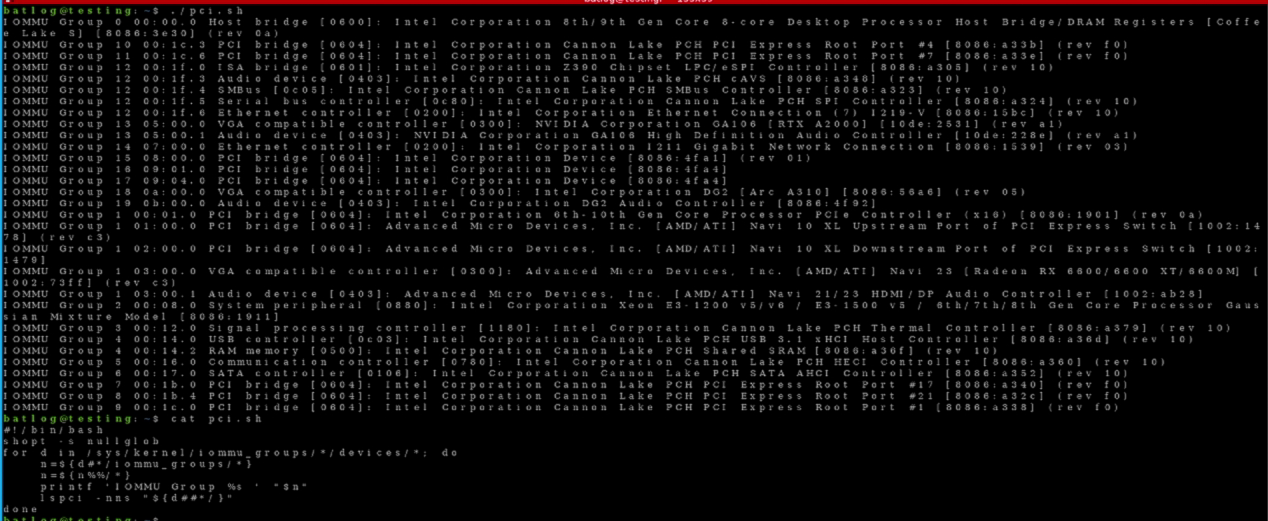
<p>Assuming you already have a computer or can test it before buying it, you'll want to run the following bash script :</p>
<p><code>#!/bin/bash</code><br><code>for d in $(find /sys/kernel/iommu_groups/ -type l | sort -n -k5 -t/); do </code><br><code>    n=${d#*/iommu_groups/*}; n=${n%%/*}</code><br><code>    printf 'IOMMU Group %s ' "$n"</code><br><code>    lspci -nns "${d##*/}"</code><br><code>done;</code></p>
<p class="align-center">(Script taken from flungo at github)</p>
<p>What this does is list the IOMMU groups of your PC, which allows you to check if there are any conflicts.</p>
<figure class="post__image"><img loading="lazy"  src="file:///C:/Users/Admin/Documents/Publii/sites/the-bat-blog-of-the-batlog/input/media/posts/7/1.png" alt="IOMMU groups" width="1268" height="521" sizes="(min-width: 760px) 660px, calc(93.18vw - 30px)" srcset="file:///C:/Users/Admin/Documents/Publii/sites/the-bat-blog-of-the-batlog/input/media/posts/7/responsive/1-xs.png 320w ,file:///C:/Users/Admin/Documents/Publii/sites/the-bat-blog-of-the-batlog/input/media/posts/7/responsive/1-sm.png 480w ,file:///C:/Users/Admin/Documents/Publii/sites/the-bat-blog-of-the-batlog/input/media/posts/7/responsive/1-md.png 768w ,file:///C:/Users/Admin/Documents/Publii/sites/the-bat-blog-of-the-batlog/input/media/posts/7/responsive/1-xl.png 1024w"></figure>
<p>If the video card you're trying to pass through is not part of some other group (Eg your usb ports or your sound card or something else) Then you're in the green. Otherwise I don't recommend you follow up with this, there is a method around it by using a modified kernel called  linux-vfio which can be found in the Arch AUR repository but honestly It's outside the scope of this article.</p>
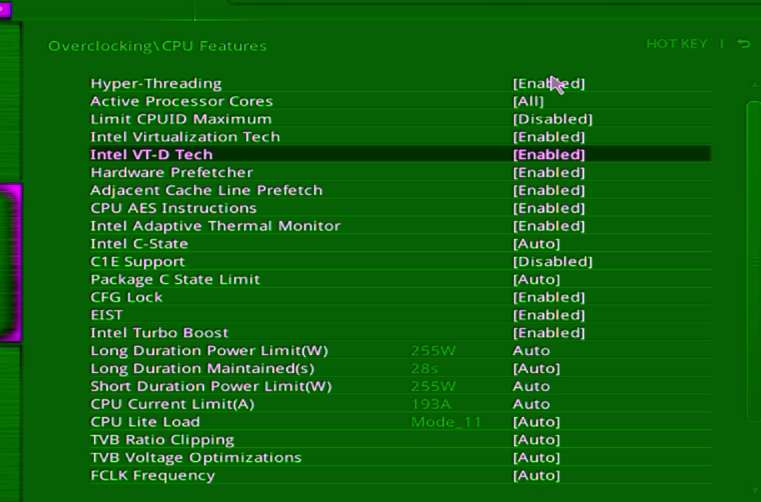
<p>Lastly you need to ensure your motherboard supports IOMMU and enable IOMMU in the bios, most modern motherboards support this but depending on your model you may have to look for it under advanced PCI or advanced CPU settings. (Sorry about the green tint, my capture card doesn't like VESA graphics). It's usually labeled as 'intel VT-D' for intel motherboards and as AMD IOMMU for AMD motherboards, however the names aren't completely standardised and may vary, check your motherboard manual or support forum.</p>

<figure class="post__image"><img loading="lazy"  src="file:///C:/Users/Admin/Documents/Publii/sites/the-bat-blog-of-the-batlog/input/media/posts/7/0.png" alt="iommu" width="761" height="502" sizes="(min-width: 760px) 660px, calc(93.18vw - 30px)" srcset="file:///C:/Users/Admin/Documents/Publii/sites/the-bat-blog-of-the-batlog/input/media/posts/7/responsive/0-xs.png 320w ,file:///C:/Users/Admin/Documents/Publii/sites/the-bat-blog-of-the-batlog/input/media/posts/7/responsive/0-sm.png 480w ,file:///C:/Users/Admin/Documents/Publii/sites/the-bat-blog-of-the-batlog/input/media/posts/7/responsive/0-md.png 768w ,file:///C:/Users/Admin/Documents/Publii/sites/the-bat-blog-of-the-batlog/input/media/posts/7/responsive/0-xl.png 1024w"></figure>
<h3><span style="color: #3598db;">Step 1: Configuring a VM for GPU Pass-through</span></h3>
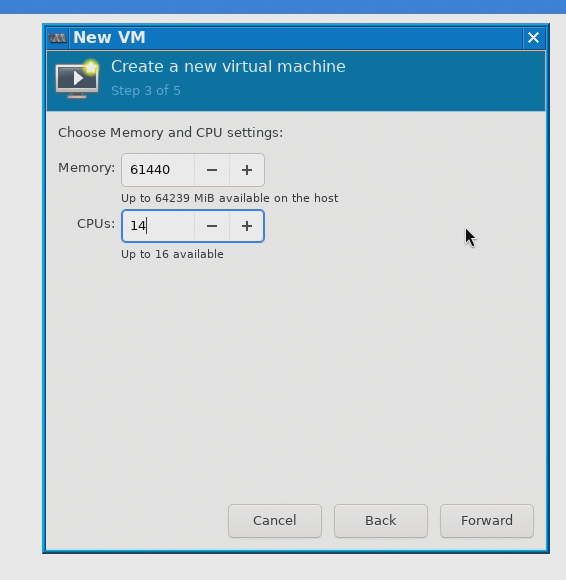
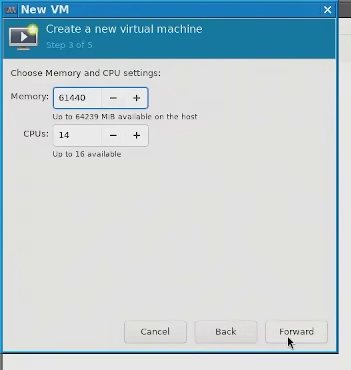
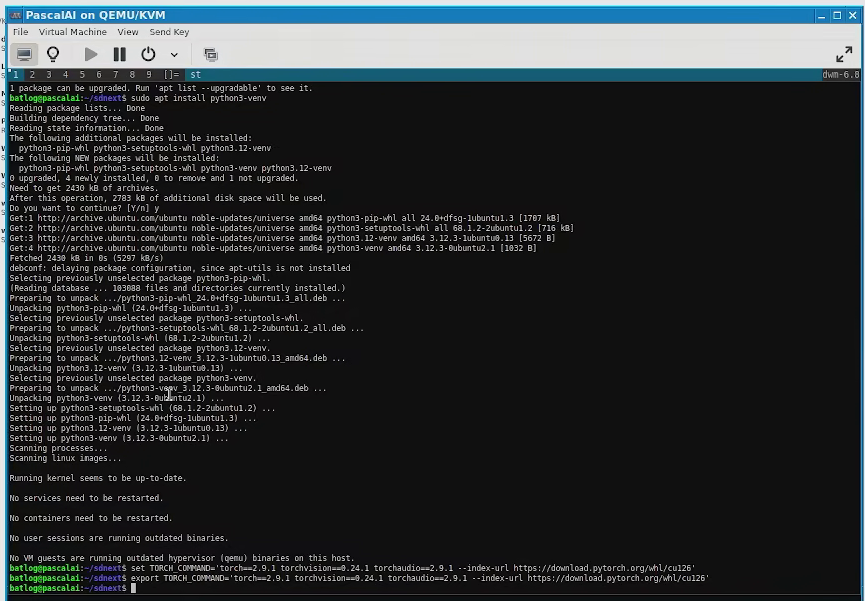
<p>First, you have to create a VM. Honestly the process is rather straight-forward and you're free to make the install of any packagages you want as the only real dependency is python3 venv (I picked Debian 13 and installed Xorg and JWM). On this note the only distro I wouldn't recommend is Ubuntu because they use Pythion for networking and as such can cause dependency issues. The only notable thing you should take inti consideration is allocating the most amount of memory and processing power available without stunting your host system, for me it was 60GB of RAM out of 64 and 14 threads out of 16:</p>
<figure class="post__image align-center"><img loading="lazy"  src="https://bat.moe/media/posts/14/0.png" alt="Allocating resources" width="566" height="580" sizes="(min-width: 760px) 660px, calc(93.18vw - 30px)" srcset="https://bat.moe/media/posts/14/responsive/0-xs.png 320w ,https://bat.moe/media/posts/14/responsive/0-sm.png 480w ,https://bat.moe/media/posts/14/responsive/0-md.png 768w ,https://bat.moe/media/posts/14/responsive/0-xl.png 1024w"></figure>
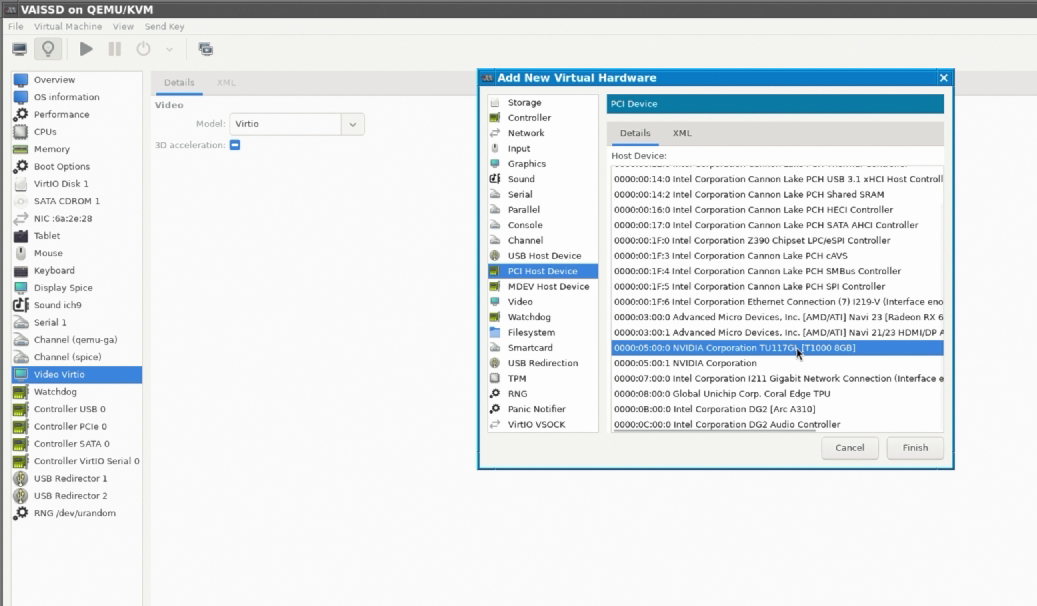
<p>Once you ahve your VM configured to your liking, you need to pass-through a GPU into the VM.</p>
<p>The process is rather simple, first identify your GPU with lspci -nn and write down ALL the devices IDs that share the same group as the GPU, In my case I only had to write two devices down, the graphics card itself and the sound card that comes with the GPU.</p>
<p>Then open edit /etc/default/grub with your favorite text editor (In my case nano) and under 'CMDLINE-LINUX-DEFAULT' add:</p>
<ol>
<li>intel_iommu=on (Or amd_iommu=on if you're on an amd motherboard) and;</li>
<li>vfio-pci.ids=&lt;the values you wrote down separated by commas&gt; </li>
</ol>
<figure class="post__image"><img loading="lazy"  src="file:///C:/Users/Admin/Documents/Publii/sites/the-bat-blog-of-the-batlog/input/media/posts/7/17.png" alt="Grub devices" width="1280" height="720" sizes="(min-width: 760px) 660px, calc(93.18vw - 30px)" srcset="file:///C:/Users/Admin/Documents/Publii/sites/the-bat-blog-of-the-batlog/input/media/posts/7/responsive/17-xs.png 320w ,file:///C:/Users/Admin/Documents/Publii/sites/the-bat-blog-of-the-batlog/input/media/posts/7/responsive/17-sm.png 480w ,file:///C:/Users/Admin/Documents/Publii/sites/the-bat-blog-of-the-batlog/input/media/posts/7/responsive/17-md.png 768w ,file:///C:/Users/Admin/Documents/Publii/sites/the-bat-blog-of-the-batlog/input/media/posts/7/responsive/17-xl.png 1024w"></figure>
<p>Afterwards update grub, if you get no errors you're in the clear</p>
<figure class="post__image align-center"><img loading="lazy"  src="file:///C:/Users/Admin/Documents/Publii/sites/the-bat-blog-of-the-batlog/input/media/posts/7/18.png" alt="updating grub" width="729" height="166" sizes="(min-width: 760px) 660px, calc(93.18vw - 30px)" srcset="file:///C:/Users/Admin/Documents/Publii/sites/the-bat-blog-of-the-batlog/input/media/posts/7/responsive/18-xs.png 320w ,file:///C:/Users/Admin/Documents/Publii/sites/the-bat-blog-of-the-batlog/input/media/posts/7/responsive/18-sm.png 480w ,file:///C:/Users/Admin/Documents/Publii/sites/the-bat-blog-of-the-batlog/input/media/posts/7/responsive/18-md.png 768w ,file:///C:/Users/Admin/Documents/Publii/sites/the-bat-blog-of-the-batlog/input/media/posts/7/responsive/18-xl.png 1024w"></figure>
<p>Afterwards, execute lspci -knn to check the driver currently loaded in the kernel for your graphics card and other devices. Then, create a new file on /etc/modprobe.d/virtio.conf and add to it:</p>
<ol>
<li>options vfio-pci ids=&lt;same device values you added on grub&gt;</li>
<li>softdep &lt;kernel module currently loaded&gt; pre: vfio-pci (You must do this for all the devices individually)</li>
</ol>
<figure class="post__image"><img loading="lazy"  src="file:///C:/Users/Admin/Documents/Publii/sites/the-bat-blog-of-the-batlog/input/media/posts/7/19.png" alt="modprobed" width="1280" height="720" sizes="(min-width: 760px) 660px, calc(93.18vw - 30px)" srcset="file:///C:/Users/Admin/Documents/Publii/sites/the-bat-blog-of-the-batlog/input/media/posts/7/responsive/19-xs.png 320w ,file:///C:/Users/Admin/Documents/Publii/sites/the-bat-blog-of-the-batlog/input/media/posts/7/responsive/19-sm.png 480w ,file:///C:/Users/Admin/Documents/Publii/sites/the-bat-blog-of-the-batlog/input/media/posts/7/responsive/19-md.png 768w ,file:///C:/Users/Admin/Documents/Publii/sites/the-bat-blog-of-the-batlog/input/media/posts/7/responsive/19-xl.png 1024w"></figure>
<p>Afterwards, upgrade your initramfs (Please note this command varies greatly from distro to distro). If you get no errors, you <em>may </em>be in the green.</p>
<figure class="post__image"><img loading="lazy"  src="file:///C:/Users/Admin/Documents/Publii/sites/the-bat-blog-of-the-batlog/input/media/posts/7/20.png" alt="updating initramfs" width="664" height="41" sizes="(min-width: 760px) 660px, calc(93.18vw - 30px)" srcset="file:///C:/Users/Admin/Documents/Publii/sites/the-bat-blog-of-the-batlog/input/media/posts/7/responsive/20-xs.png 320w ,file:///C:/Users/Admin/Documents/Publii/sites/the-bat-blog-of-the-batlog/input/media/posts/7/responsive/20-sm.png 480w ,file:///C:/Users/Admin/Documents/Publii/sites/the-bat-blog-of-the-batlog/input/media/posts/7/responsive/20-md.png 768w ,file:///C:/Users/Admin/Documents/Publii/sites/the-bat-blog-of-the-batlog/input/media/posts/7/responsive/20-xl.png 1024w"></figure>
<p>Afterwards reboot your system and run lspci -knn if the command shows that your devices are using vfio-pci drivers then you're golden, if not go back and check that you configured the file in modprobe.d correctly (It's <em>very </em>sensitive to spaces).</p>
<figure class="post__image"><img loading="lazy"  src="file:///C:/Users/Admin/Documents/Publii/sites/the-bat-blog-of-the-batlog/input/media/posts/7/21.png" alt="vfio drivers" width="1218" height="204" sizes="(min-width: 760px) 660px, calc(93.18vw - 30px)" srcset="file:///C:/Users/Admin/Documents/Publii/sites/the-bat-blog-of-the-batlog/input/media/posts/7/responsive/21-xs.png 320w ,file:///C:/Users/Admin/Documents/Publii/sites/the-bat-blog-of-the-batlog/input/media/posts/7/responsive/21-sm.png 480w ,file:///C:/Users/Admin/Documents/Publii/sites/the-bat-blog-of-the-batlog/input/media/posts/7/responsive/21-md.png 768w ,file:///C:/Users/Admin/Documents/Publii/sites/the-bat-blog-of-the-batlog/input/media/posts/7/responsive/21-xl.png 1024w"></figure>
<p>Attach the GPU and attached devices (In my case just the unlabelled sound card) to the virtual machine and fire it up.</p>
<figure class="post__image"><img loading="lazy"  src="https://bat.moe/media/posts/14/2.png" alt="attachinggpu" width="1037" height="606" sizes="(min-width: 760px) 660px, calc(93.18vw - 30px)" srcset="https://bat.moe/media/posts/14/responsive/2-xs.png 320w ,https://bat.moe/media/posts/14/responsive/2-sm.png 480w ,https://bat.moe/media/posts/14/responsive/2-md.png 768w ,https://bat.moe/media/posts/14/responsive/2-xl.png 1024w"></figure>
<h3><span style="color: #3598db;">Step 2: installing the drivers</span></h3>
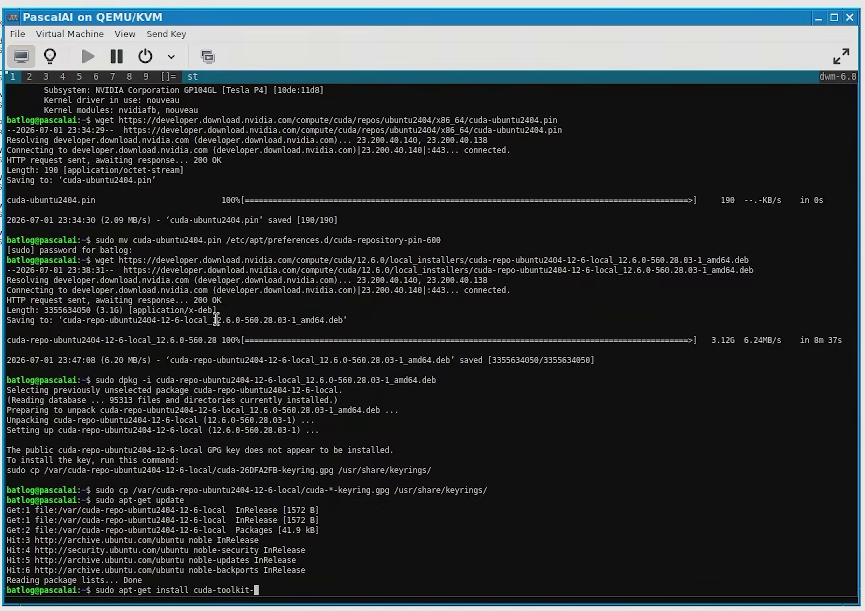
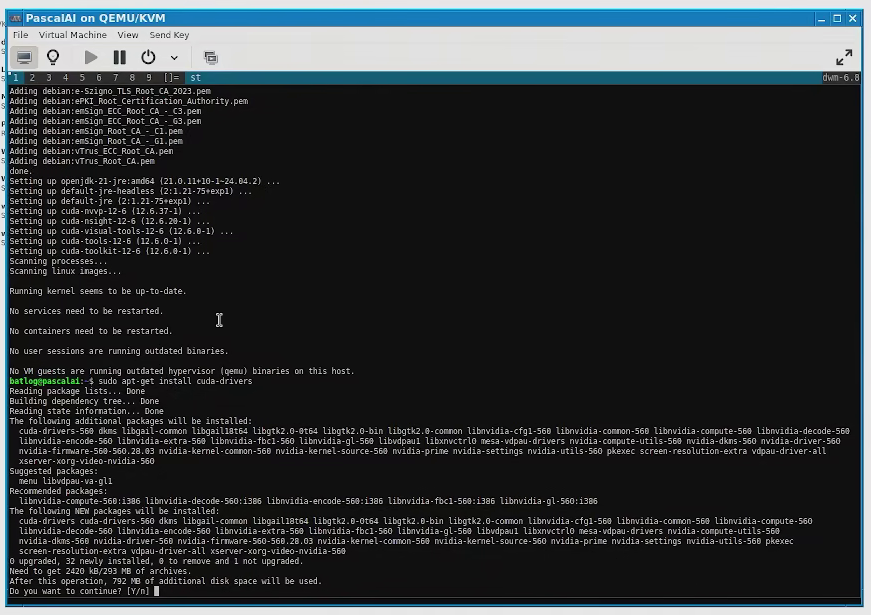
<p><span style="color: #e03e2d;">WARNING: AVOID INSTALLING THE NVIDIA DRIVERS CONTAINED IN PACKAGE MANAGERS UNLESS YOU'RE USING A ROLLING RELEASE DISTRO, THEY'RE USUALLY SEVERAL VERSIONS BEHIND THE LATEST VERSION AND AS SUCH PYTORCH WILL FAIL TO RUN.</span></p>
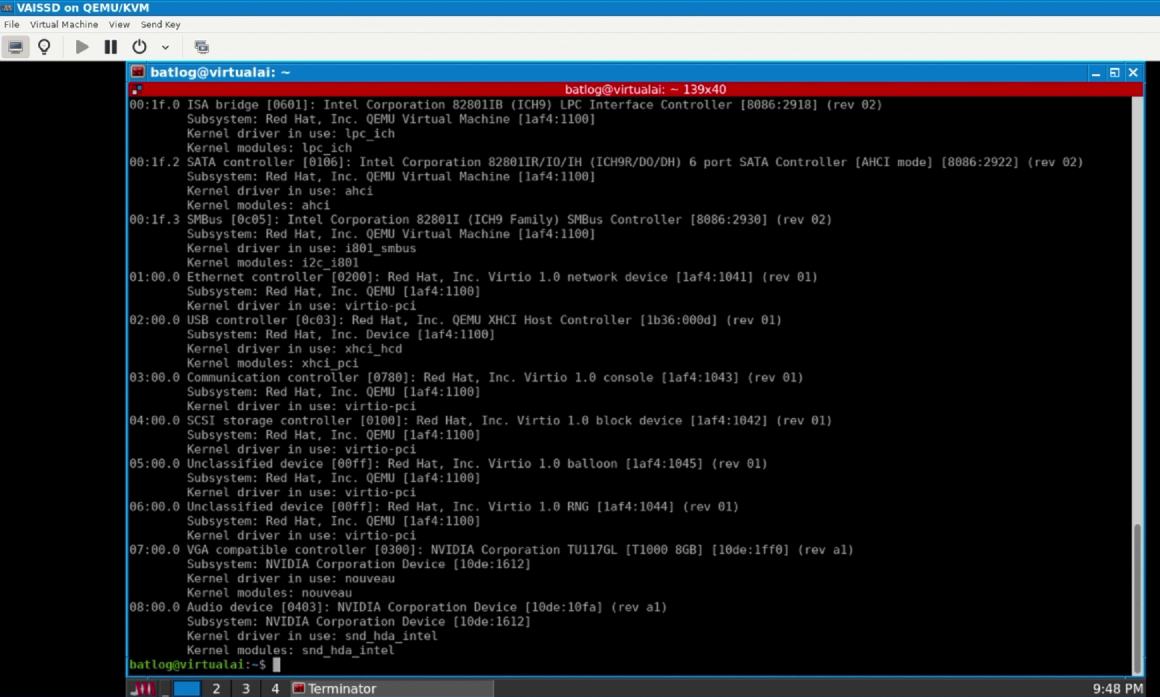
<p>Verify the GPU is detected in the VM.</p>
<figure class="post__image"><img loading="lazy"  src="https://bat.moe/media/posts/14/3.png" alt="GPU in the VM" width="1160" height="697" sizes="(min-width: 760px) 660px, calc(93.18vw - 30px)" srcset="https://bat.moe/media/posts/14/responsive/3-xs.png 320w ,https://bat.moe/media/posts/14/responsive/3-sm.png 480w ,https://bat.moe/media/posts/14/responsive/3-md.png 768w ,https://bat.moe/media/posts/14/responsive/3-xl.png 1024w"></figure>
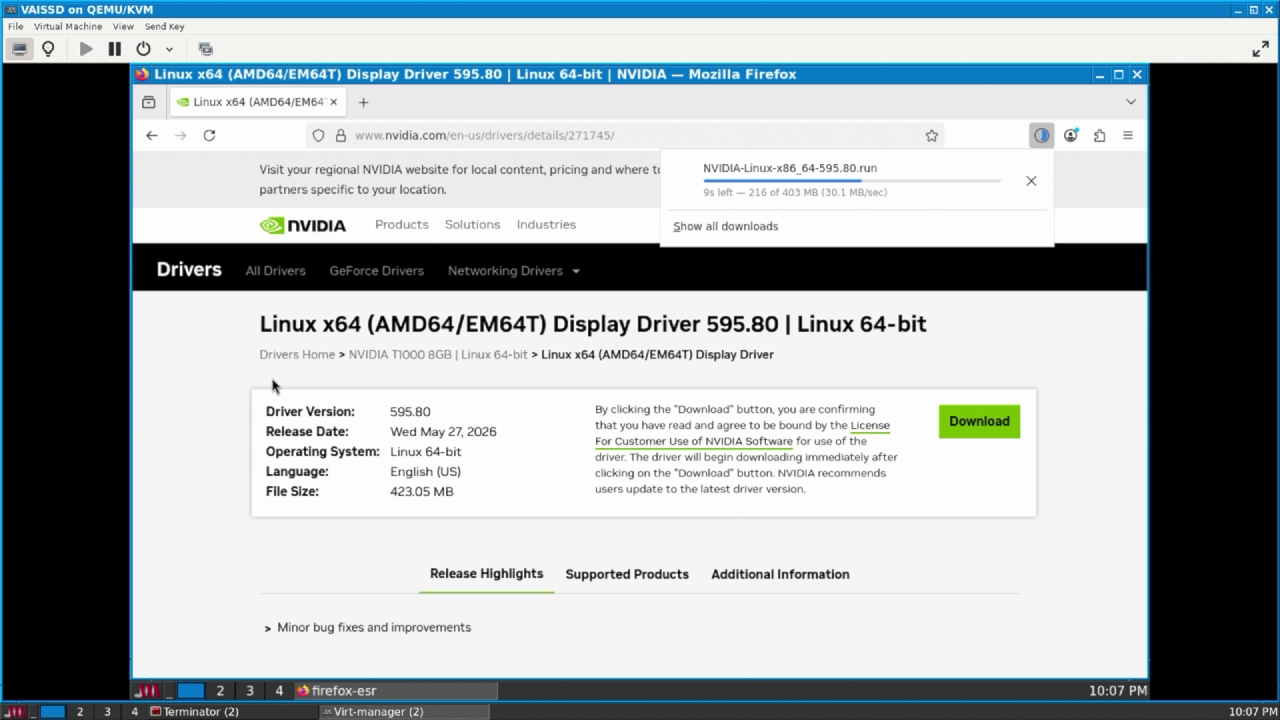
<p>The next step is installing drivers, since I'm using a card that's still supported by Nvidia and as such is supported by the latest drivers (And by extension, the latest Cuda version) I can just install the drivers by downloading the latest version available from Nvidia's website.</p>
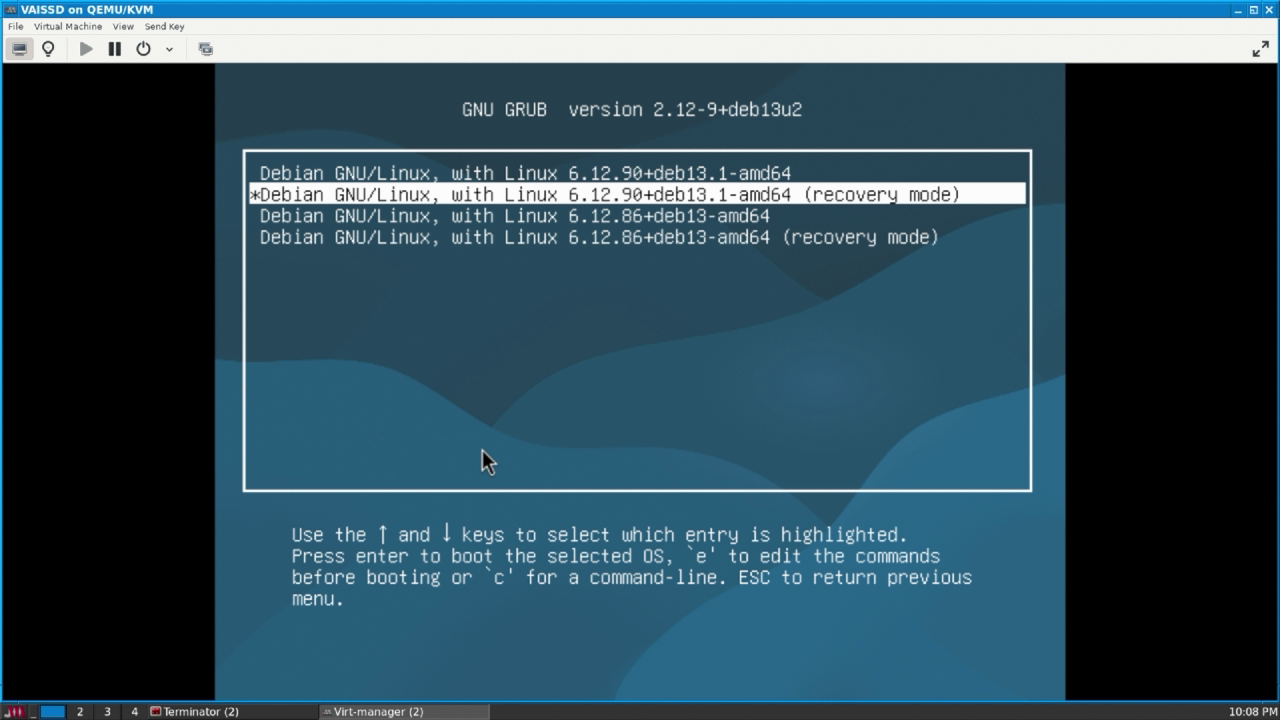
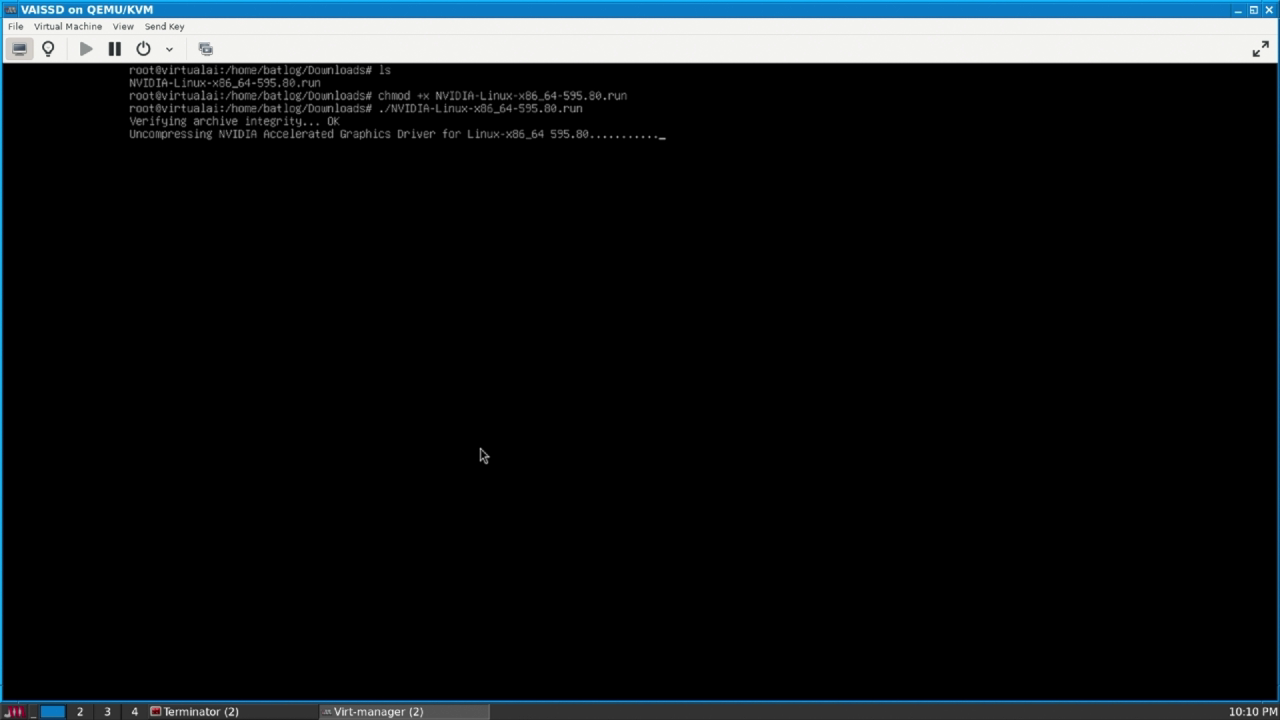
<p>Nvidia's drivers for Linux require you to enter CLI-only mode and run the installer as root, in Debian this is easily accomplished by going into recovery mode.</p>
<div class="gallery-wrapper"><div class="gallery" data-is-empty="false" data-translation="Add images" data-columns="3">
<figure class="gallery__item"><a href="https://bat.moe/media/posts/14/gallery/4.png" data-size="1280x720"><img loading="lazy" src="https://bat.moe/media/posts/14/gallery/4-thumbnail.png" alt="2.1" width="768" height="432"></a>
<figcaption>Downloading nvidia drivers</figcaption>
</figure>
<figure class="gallery__item"><a href="https://bat.moe/media/posts/14/gallery/5.png" data-size="1280x720"><img loading="lazy" src="https://bat.moe/media/posts/14/gallery/5-thumbnail.png" alt="2.2" width="768" height="432"></a>
<figcaption>Entering recovery mode</figcaption>
</figure>
<figure class="gallery__item"><a href="https://bat.moe/media/posts/14/gallery/6.png" data-size="1280x720"><img loading="lazy" src="https://bat.moe/media/posts/14/gallery/6-thumbnail.png" alt="2.3" width="768" height="432"></a>
<figcaption>Executing the nvidia drivers</figcaption>
</figure>
</div></div>
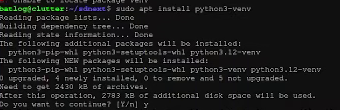
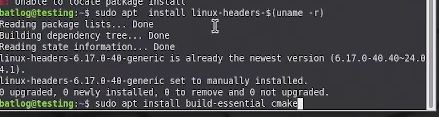
<p>There are a three dependencies that the drivers need, the linux headers, gcc and make. I recommend installing the latest headers and build essentials (I also recommend running these commands apart instead of in a single apt)</p>
<p><code>sudo apt install linux-headers-$(uname -r) &amp;&amp; sudo apt install build-essential</code></p>
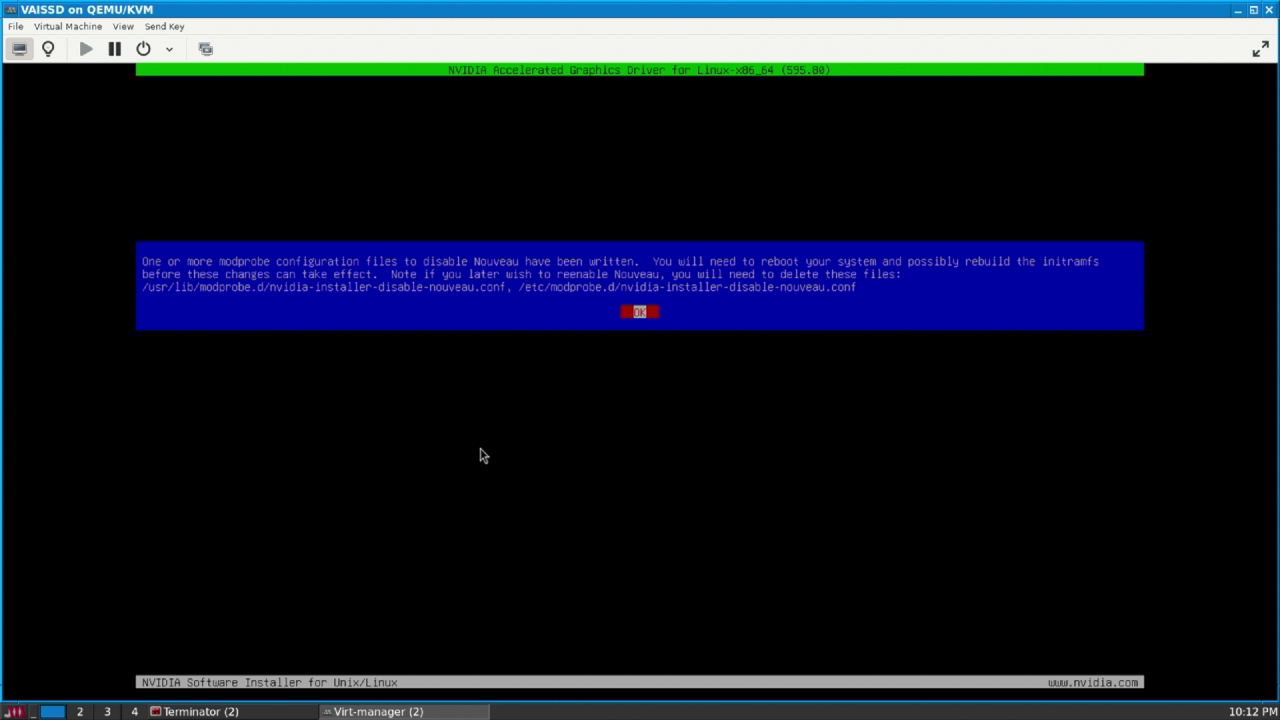
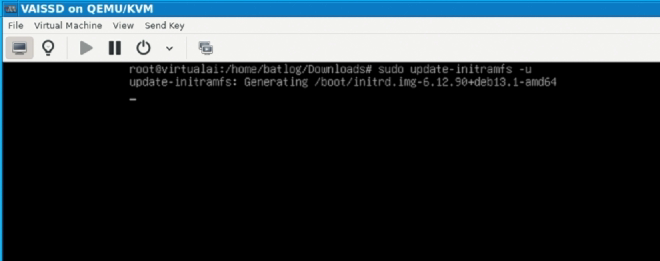
<p>After you run the drivers the first time, if nouveau drivers are loaded (Which they most likely are) Nvidia will generate a file to blacklist them completely in modprobe.d and will prompt you to update initramfs. Honestly? The installer has always failed at updating initramfs for me, so just pick you don't want for the installer to do anything anything else and update initramfs by yourself.</p>
<div class="gallery-wrapper"><div class="gallery" data-is-empty="false" data-translation="Add images" data-columns="2">
<figure class="gallery__item"><a href="https://bat.moe/media/posts/14/gallery/7.png" data-size="1280x720"><img loading="lazy" src="https://bat.moe/media/posts/14/gallery/7-thumbnail.png" alt="2.4" width="768" height="432"></a>
<figcaption>Nvidia blacklisting nouveau</figcaption>
</figure>
<figure class="gallery__item"><a href="https://bat.moe/media/posts/14/gallery/8.png" data-size="660x261"><img loading="lazy" src="https://bat.moe/media/posts/14/gallery/8-thumbnail.png" alt="2.5" width="660" height="261"></a>
<figcaption>Updating Initramfs</figcaption>
</figure>
</div></div>
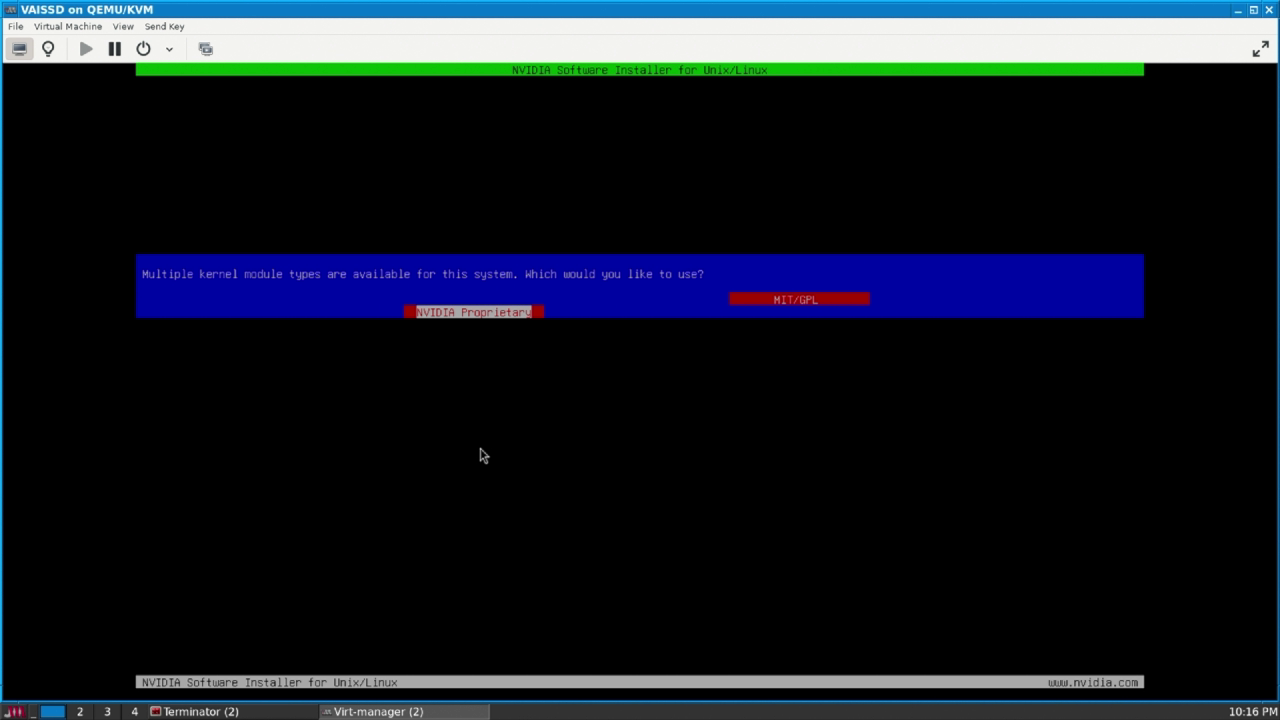
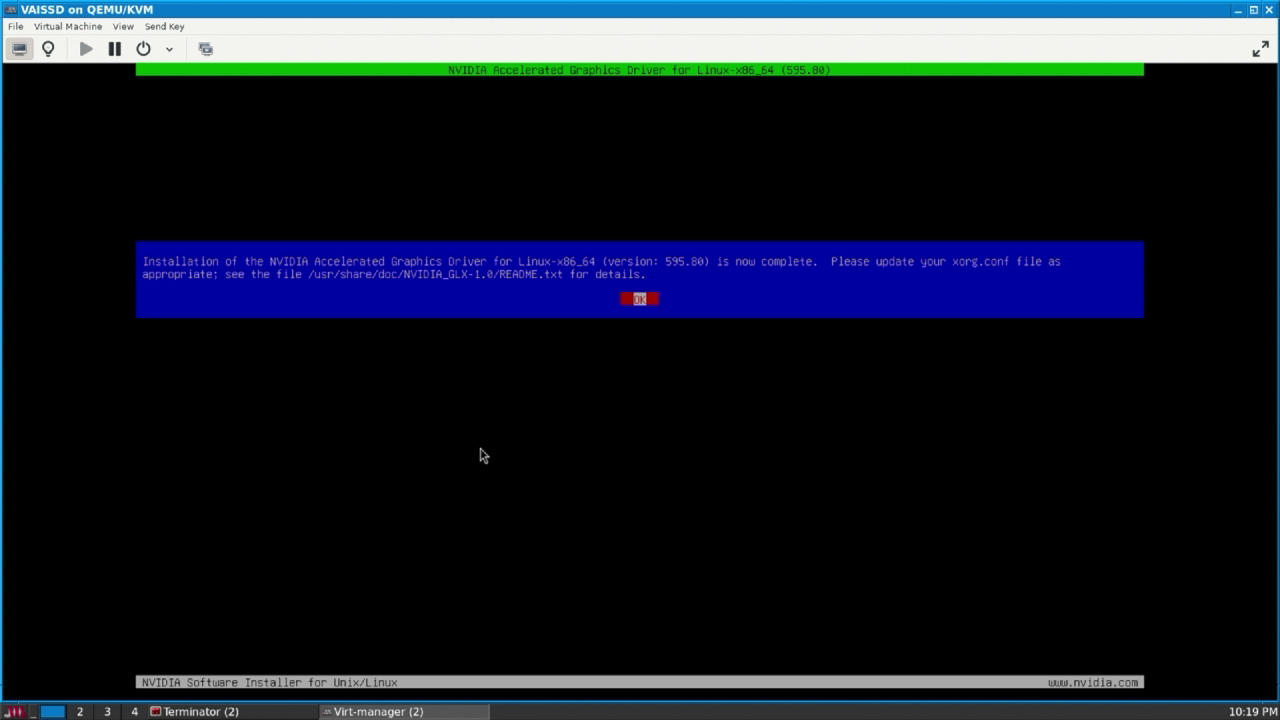
<p>Reboot the virtual machine and run the installer again, select whatever version of the driver you want (I always do proprietary) and just proceed with the installation as normal (You may get a couple of errors regarding 32 bit libraries and EGL, ignore those they're not needed for this particular project).</p>
<div class="gallery-wrapper"><div class="gallery" data-is-empty="false" data-translation="Add images" data-columns="2">
<figure class="gallery__item"><a href="https://bat.moe/media/posts/14/gallery/9.png" data-size="1280x720"><img loading="lazy" src="https://bat.moe/media/posts/14/gallery/9-thumbnail.png" alt="2.6" width="768" height="432"></a>
<figcaption>Installing Nvidia drivers</figcaption>
</figure>
<figure class="gallery__item"><a href="https://bat.moe/media/posts/14/gallery/10.png" data-size="1280x720"><img loading="lazy" src="https://bat.moe/media/posts/14/gallery/10-thumbnail.png" alt="2.7" width="768" height="432"></a>
<figcaption>Installation complete</figcaption>
</figure>
</div></div>
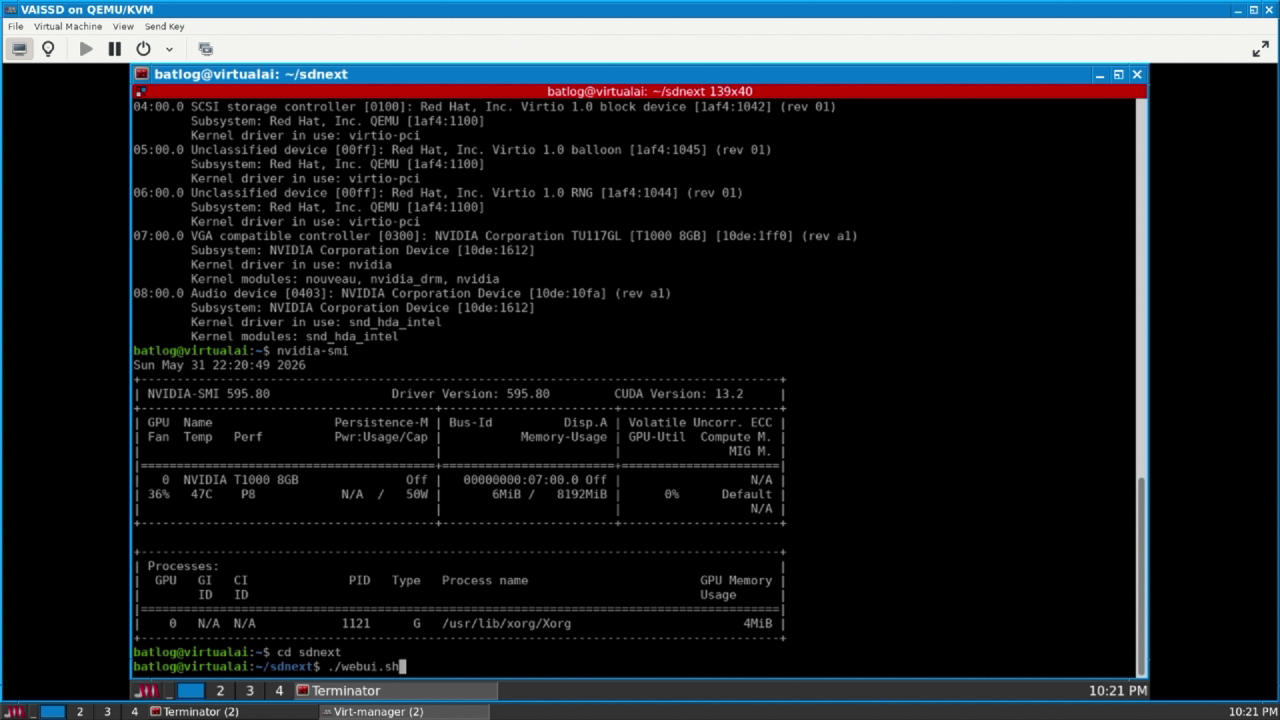
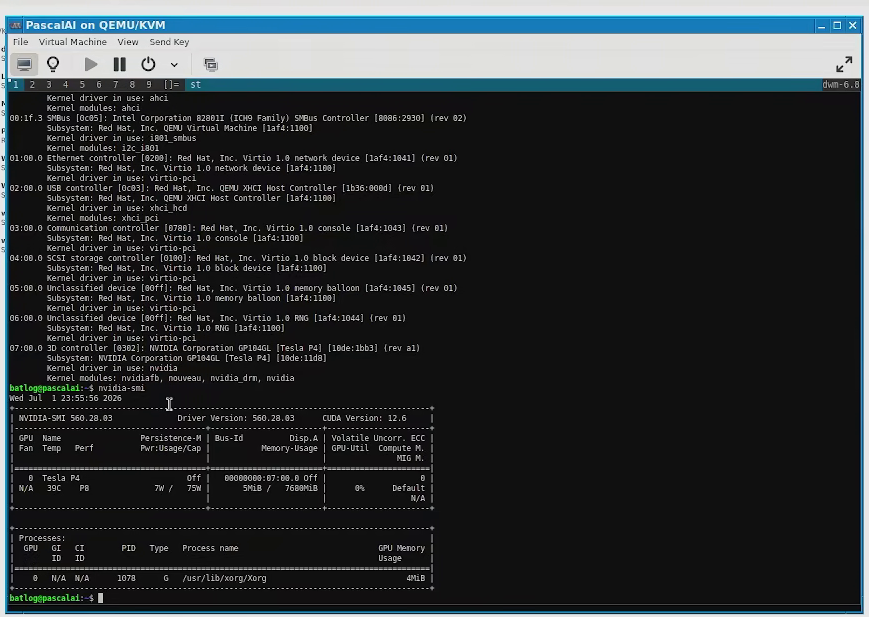
<p>After a reboot enter your graphical environment and if nvidia-smi shows the latest driver CUDA versions they've been installed correctly.</p>
<figure class="post__image"><img loading="lazy"  src="https://bat.moe/media/posts/14/11.png" alt="nvidiasmi" width="1280" height="720" sizes="(min-width: 760px) 660px, calc(93.18vw - 30px)" srcset="https://bat.moe/media/posts/14/responsive/11-xs.png 320w ,https://bat.moe/media/posts/14/responsive/11-sm.png 480w ,https://bat.moe/media/posts/14/responsive/11-md.png 768w ,https://bat.moe/media/posts/14/responsive/11-xl.png 1024w"></figure>
<p> </p>
<h3><span style="color: #3598db;">Step 3: Cloning the WebUI and launching it</span></h3>
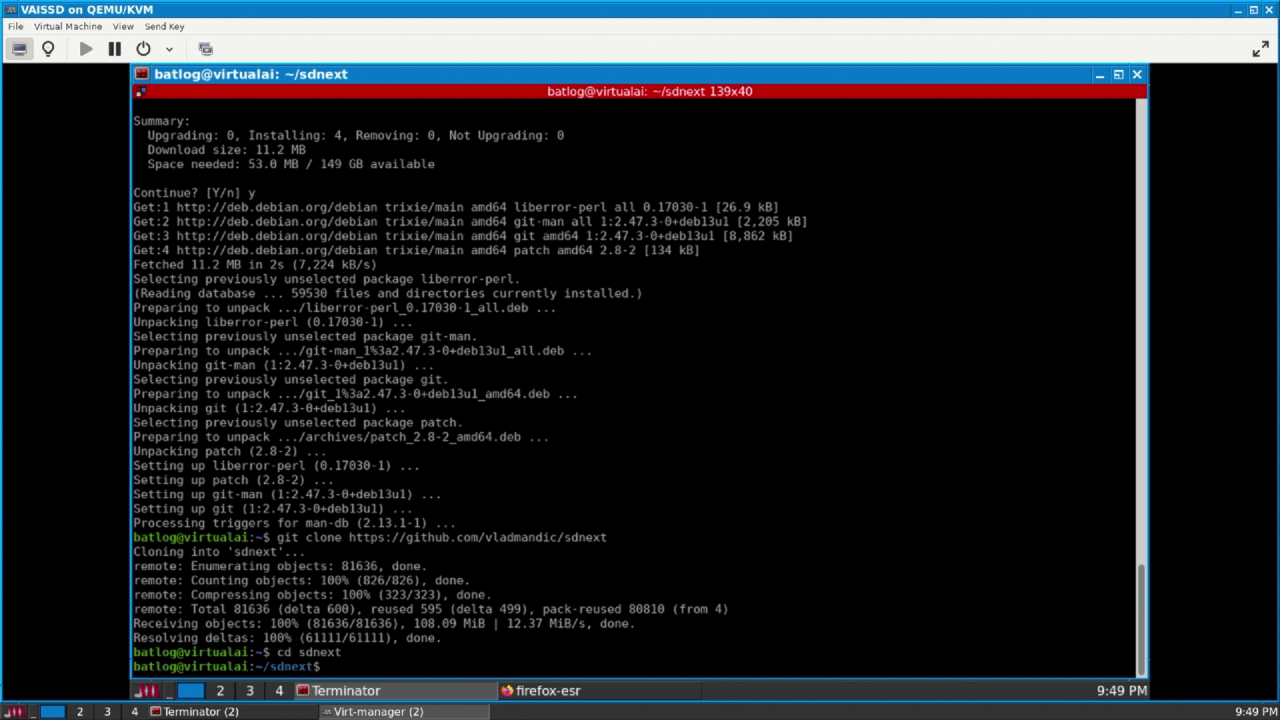
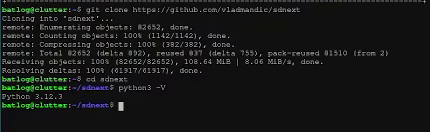
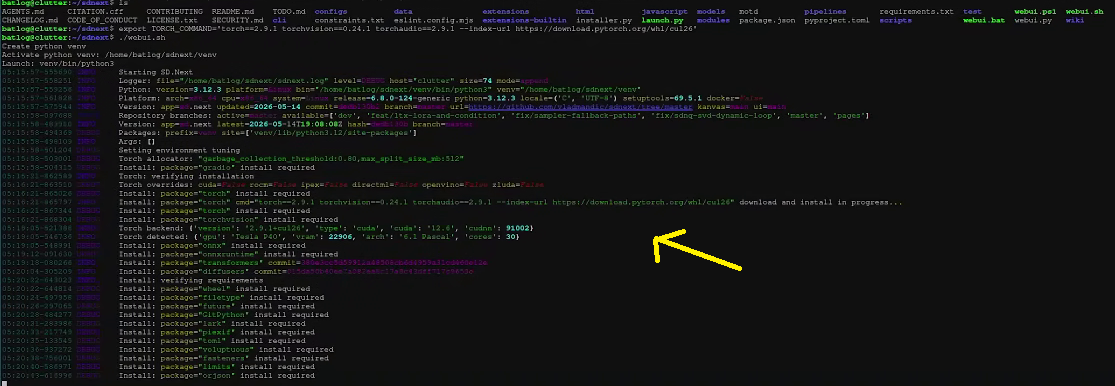
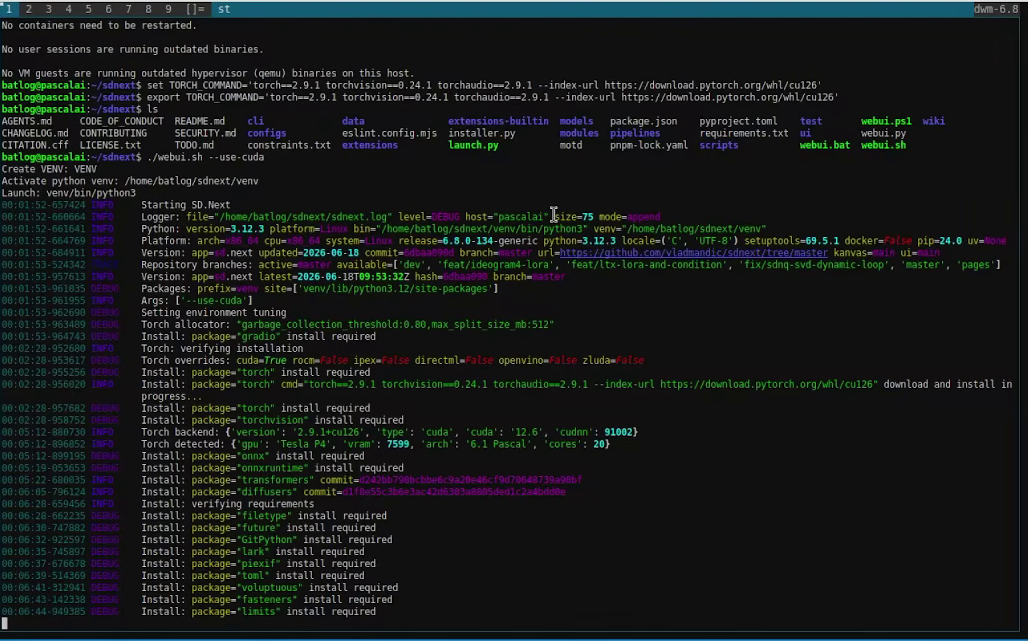
<p>Clone the repository and execute the webui by using --use-cuda as an argument, if you get no Torch errors that causes the webui to default to CPU mode, you're pretty much  done.</p>
<div class="gallery-wrapper"><div class="gallery" data-is-empty="false" data-translation="Add images" data-columns="3">
<figure class="gallery__item"><a href="https://bat.moe/media/posts/14/gallery/12.png" data-size="1280x720"><img loading="lazy" src="https://bat.moe/media/posts/14/gallery/12-thumbnail.png" alt="3.1" width="768" height="432"></a>
<figcaption>Cloning SDNEXT</figcaption>
</figure>
<figure class="gallery__item"><a href="https://bat.moe/media/posts/14/gallery/13.png" data-size="1280x720"><img loading="lazy" src="https://bat.moe/media/posts/14/gallery/13-thumbnail.png" alt="3.2" width="768" height="432"></a>
<figcaption>Running SDNEXT with cuda arguments</figcaption>
</figure>
</div></div>
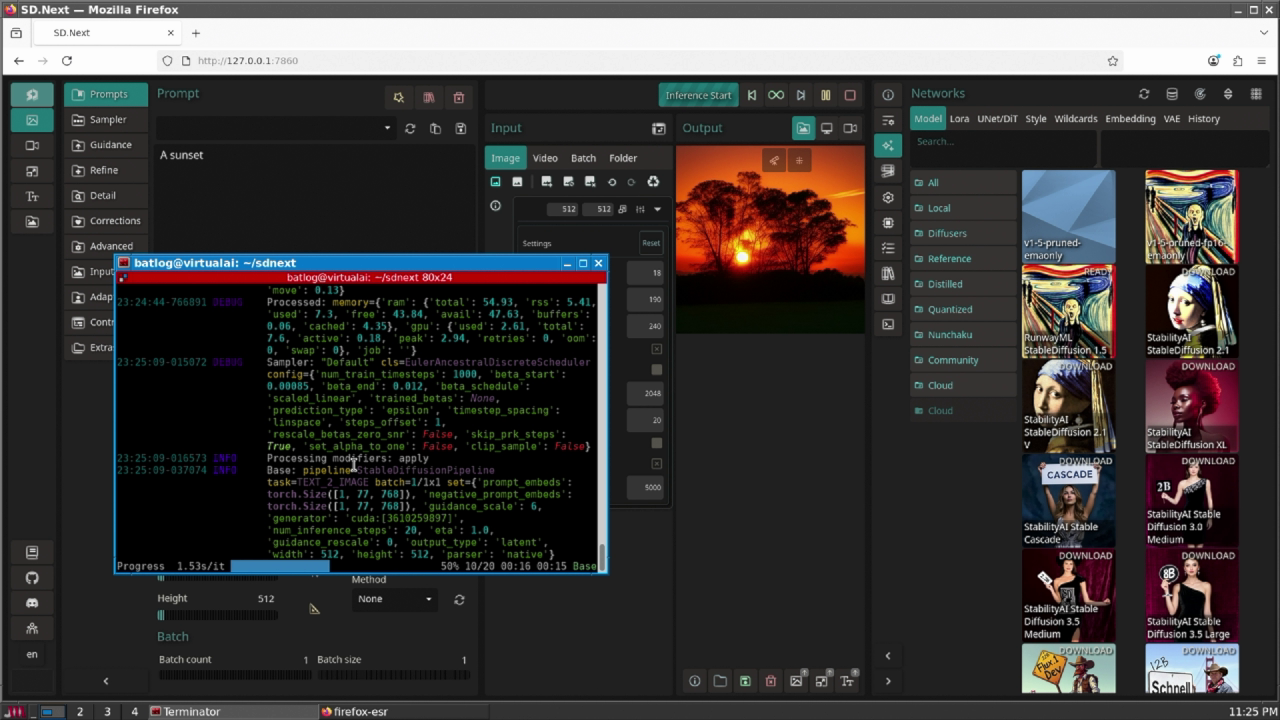
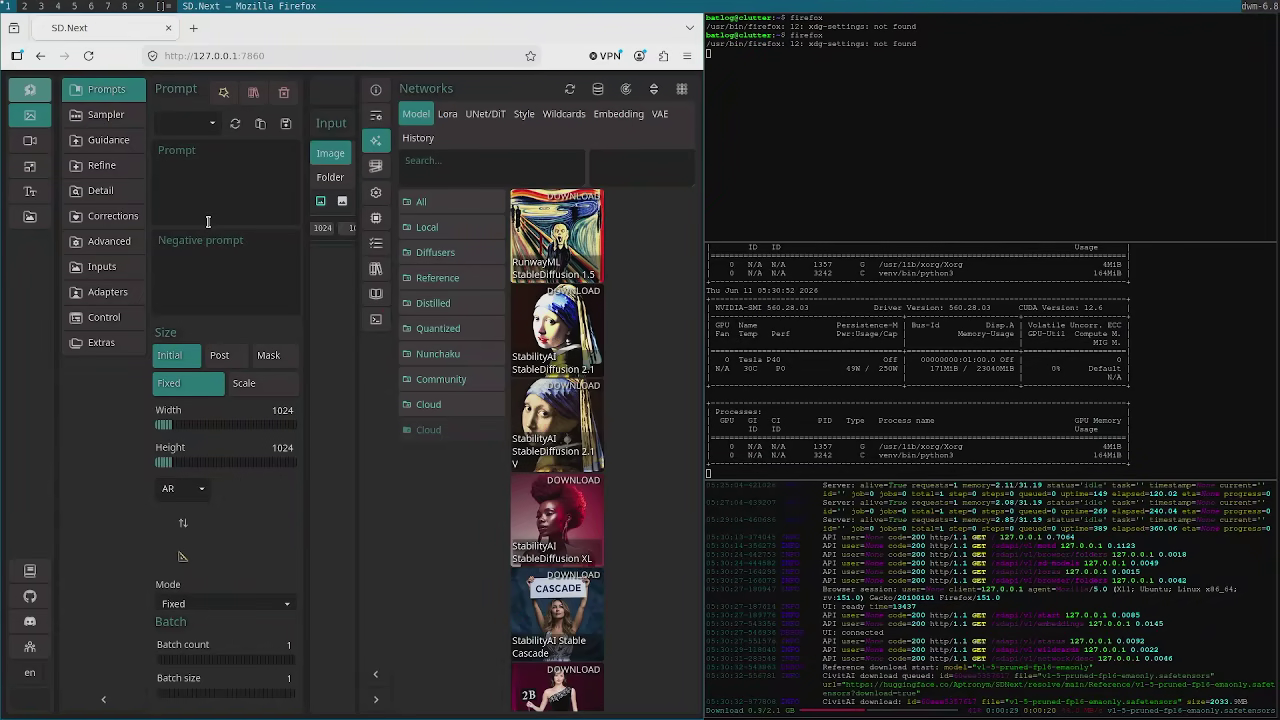
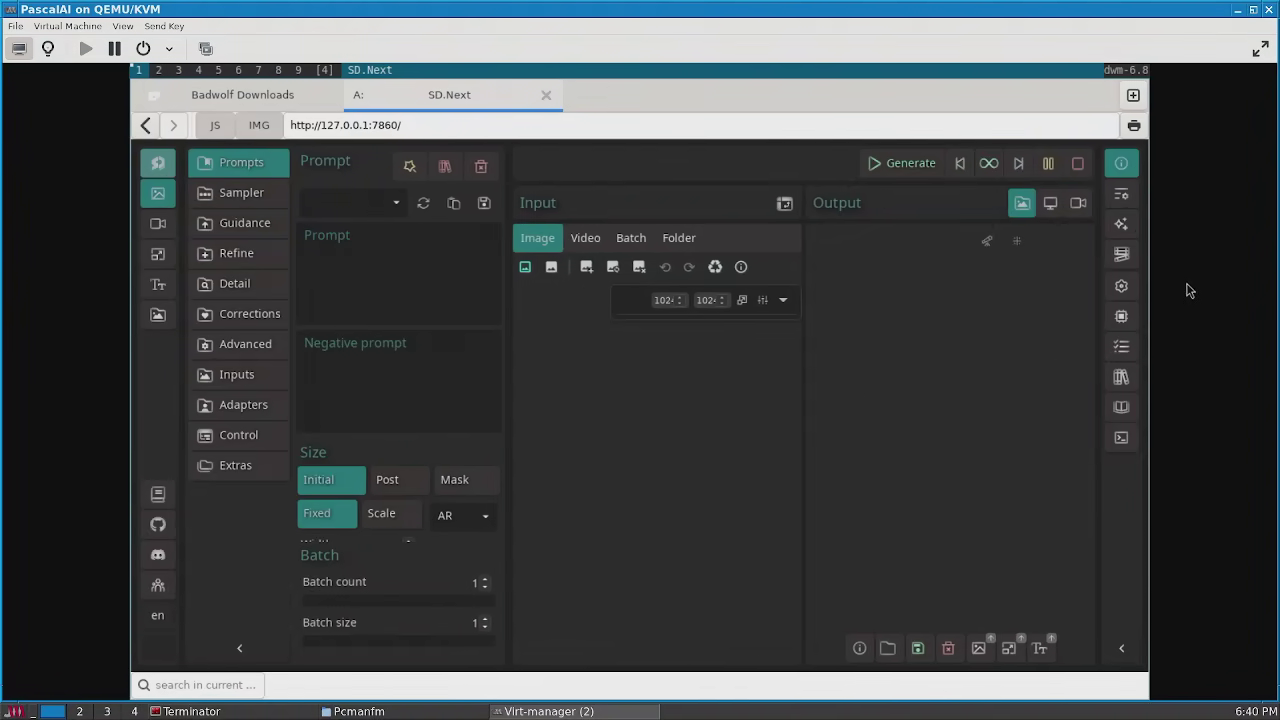
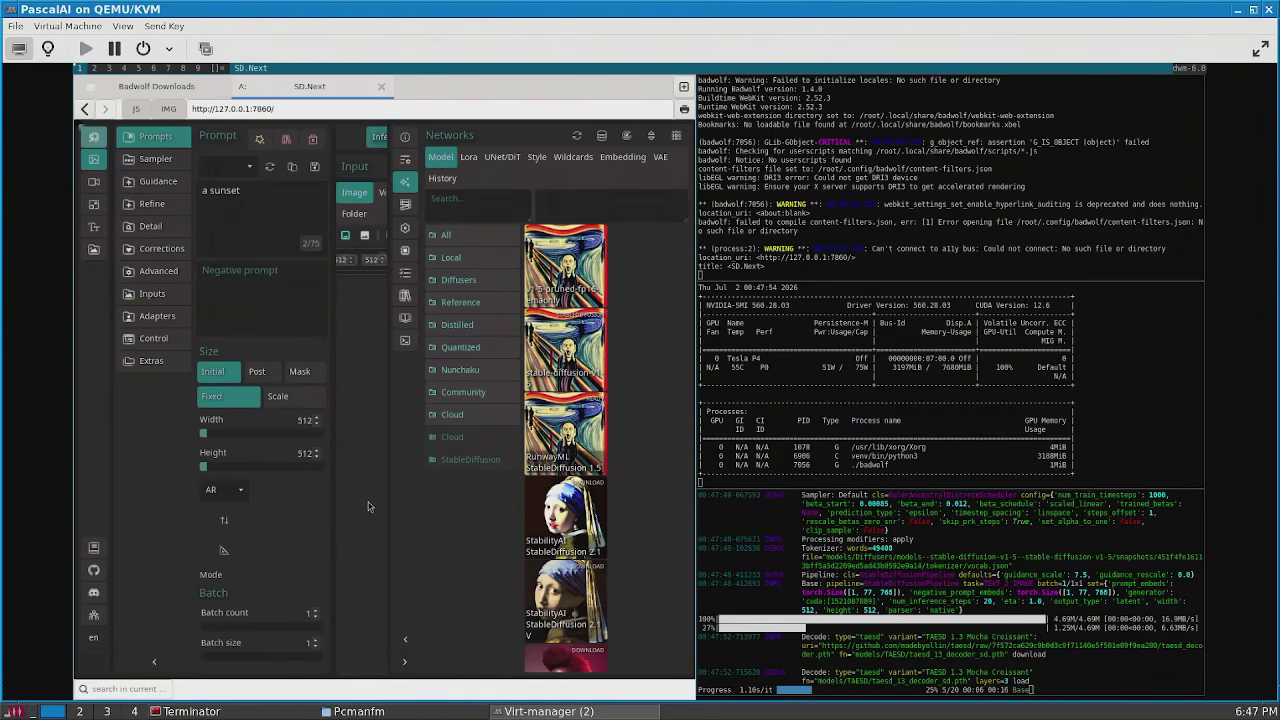
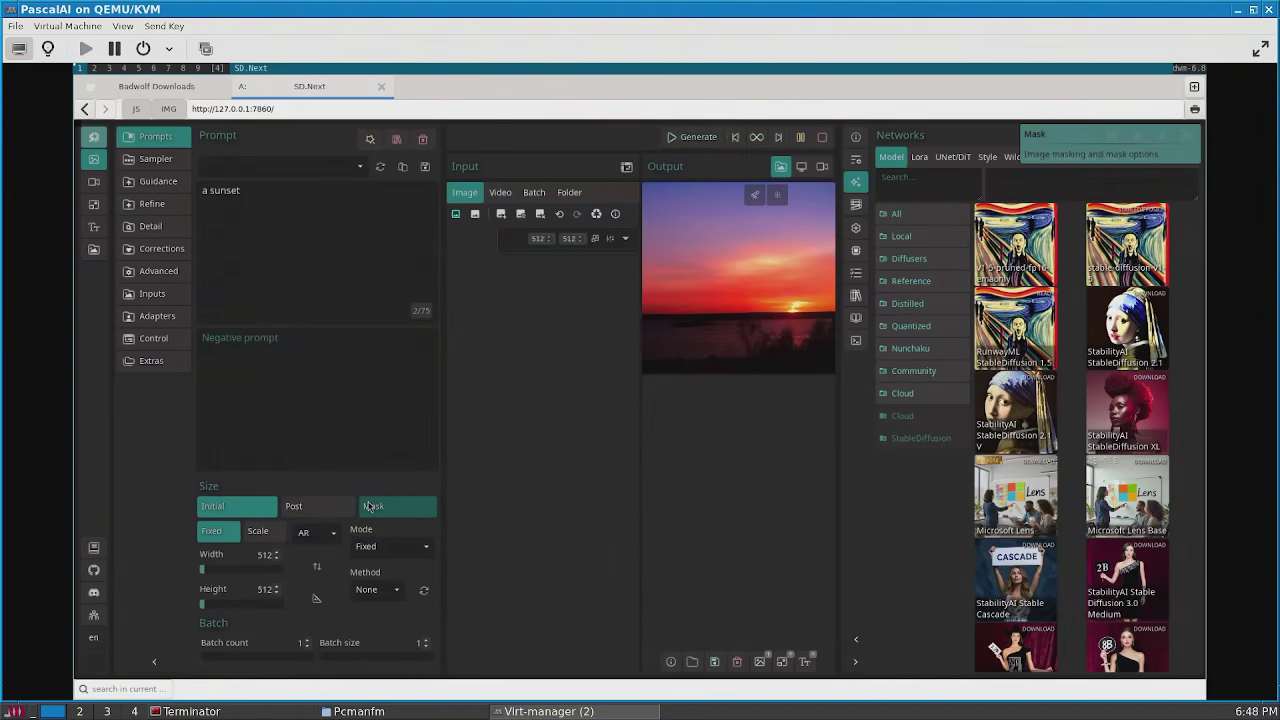
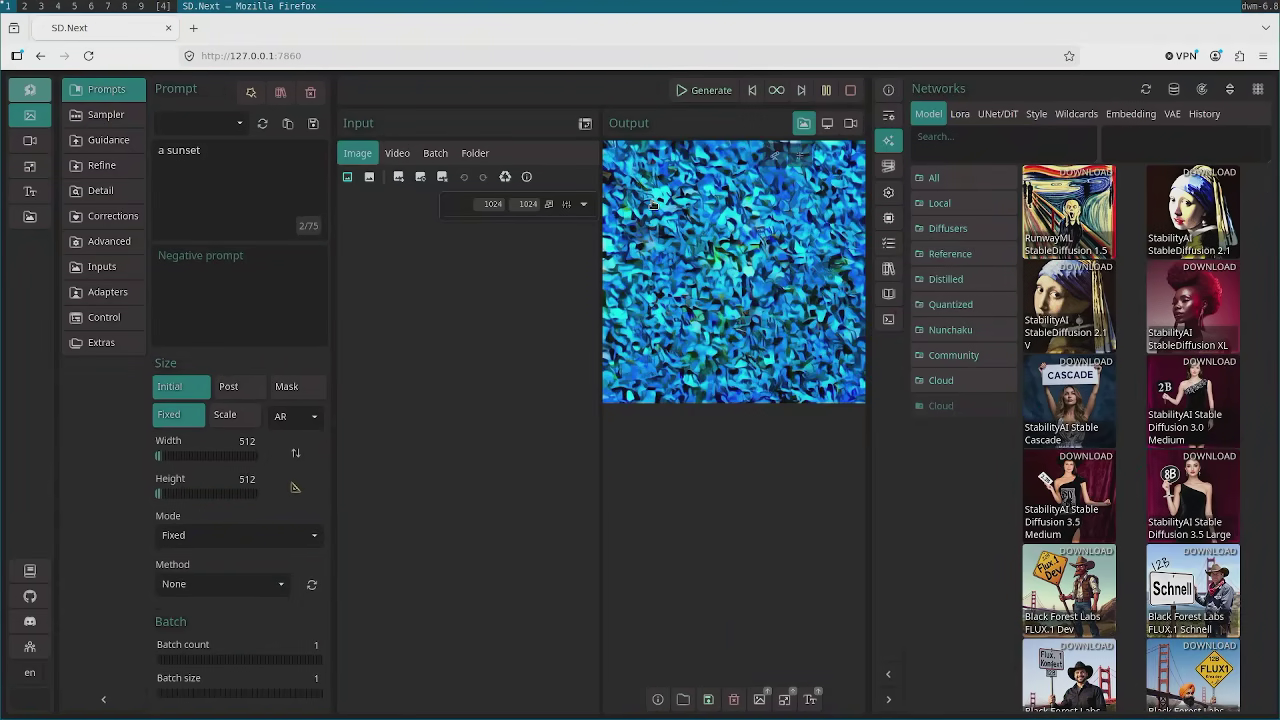
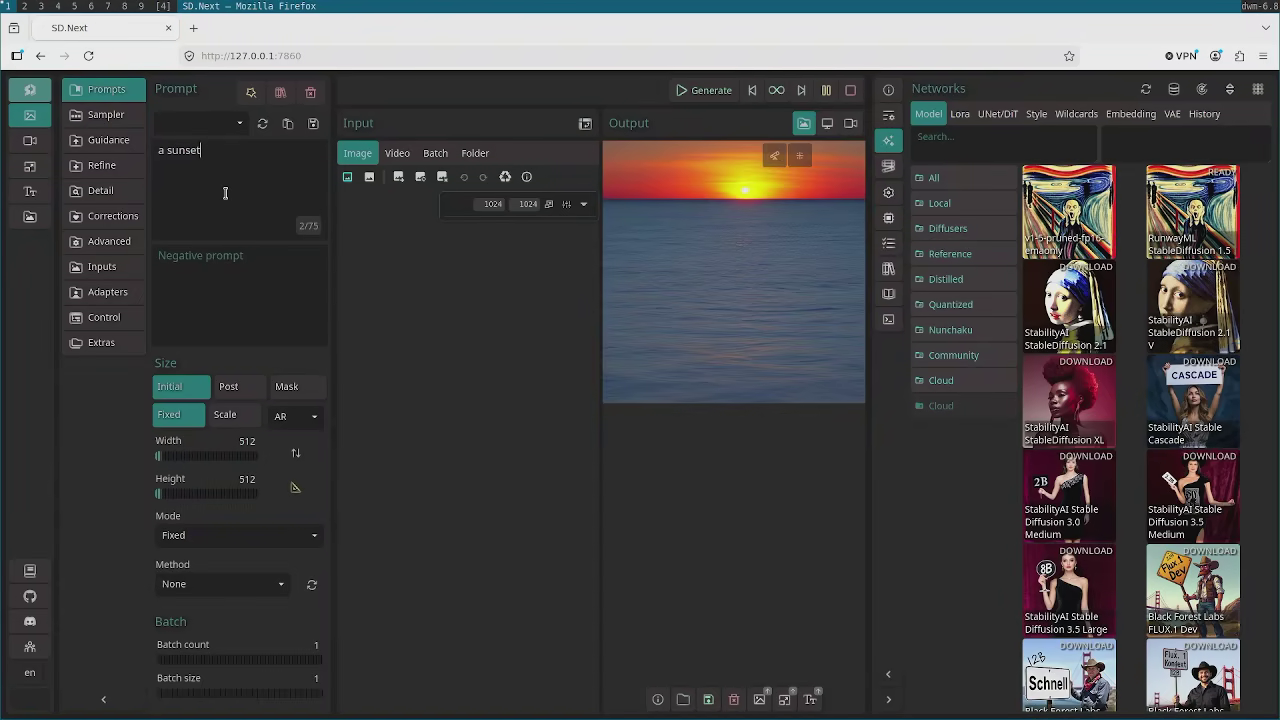
<p>Now all you have to do is open a browser with Javascript enabled, open the localhost in the port 7860, download a model and run a prompt.</p>
<figure class="post__image"><img loading="lazy"  src="https://bat.moe/media/posts/14/14.png" alt="success" width="1280" height="720" sizes="(min-width: 760px) 660px, calc(93.18vw - 30px)" srcset="https://bat.moe/media/posts/14/responsive/14-xs.png 320w ,https://bat.moe/media/posts/14/responsive/14-sm.png 480w ,https://bat.moe/media/posts/14/responsive/14-md.png 768w ,https://bat.moe/media/posts/14/responsive/14-xl.png 1024w"></figure>
<h3><span style="color: #3598db;">Addendum 1: Why do this?</span></h3>
<p>Aside from the obvious advantage of replicability and being able to host multiple environments from a single server, one problem I often come across when running LLMs is VRAM usage and the lack of tools to manage it, the more you use a virtualized environment the more the VRAM fills up with data 'learning' of previous iterations in order to speed up generation and get more accurate results but eventually you cannot generate more images or text anymore, your environment becomes useless and you must start over again (I even had an AIO GUI solution store this data outside the venv and I had reinstall the whole system).</p>
<p>For small users like me this posses an issue that is easily solved by just taking a snapshot and nuking everything out of existence, the system is once again reset from zero and I can generate dozens of images at once again. This is also great for development or testing environments, honestly I don't know why people don't do this instead of using docker for everything.</p>
<p> </p>
<p> </p>
<h3><figure class="post__image"><img loading="lazy"  src="file:///C:/Users/Admin/Documents/Publii/sites/the-bat-blog-of-the-batlog/input/media/posts/16/logowhite.png" alt="" width="200" height="200" sizes="(min-width: 760px) 660px, calc(93.18vw - 30px)" srcset="file:///C:/Users/Admin/Documents/Publii/sites/the-bat-blog-of-the-batlog/input/media/posts/16/responsive/logowhite-xs.png 320w ,file:///C:/Users/Admin/Documents/Publii/sites/the-bat-blog-of-the-batlog/input/media/posts/16/responsive/logowhite-sm.png 480w ,file:///C:/Users/Admin/Documents/Publii/sites/the-bat-blog-of-the-batlog/input/media/posts/16/responsive/logowhite-md.png 768w ,file:///C:/Users/Admin/Documents/Publii/sites/the-bat-blog-of-the-batlog/input/media/posts/16/responsive/logowhite-xl.png 1024w"></figure> <span style="color: #ecf0f1;"> <a href="https://bat.moe/about-me.html" style="color: #ecf0f1;">-Batlog</a></span></h3>
<p> </p>
<p> </p>
<hr>
<pre>If you enjoyed this article or if it was of any use to you, please consider donating some crypto. All funds go towards paying for the hosting.<br><br>Monero/XMR:<br>88MC6ksaVyLbtH9fT4owLSPX16vYD9cf6YELmXjaNWWd71R6iwfFV6DJtp7BXR5c6vWnxLEEGyu1tfwXwTqDM1CUCqDGeRY<br><br>Bitcoin/BTC: <br>bc1qzw9g97ffhllwukhagkvn5g0u9d8rhjv86xhf8h<br><br>Ethereum/ETH:<br>0xf948ab59E492865Fb5200A97F0F4F2f31F7b443f<br><br>Litecoin/LTC:<br>ltc1qqfv05jpyh8yvzyetmf7n5ve500jl656yxpc8y4<br><br>Doge:<br>DT5iG6GxoyZtHSSmaZHHV63NpEoH5yuixg</pre>
            ]]>
        </content>
    </entry>
    <entry>
        <title>Flashing a Visionfive 2 EMMC</title>
        <author>
            <name>Batlog</name>
        </author>
        <link href="https://bat.moe/general-static-website-considerations.html"/>
        <id>https://bat.moe/general-static-website-considerations.html</id>
        <media:content url="https://bat.moe/media/posts/12/risc-vBG.png" medium="image" />
            <category term="Oddware"/>
            <category term="Linux"/>

        <updated>2026-06-19T14:09:00-06:00</updated>
            <summary type="html">
                <![CDATA[
                        <img src="https://bat.moe/media/posts/12/risc-vBG.png" alt="" />
                    I have several Risc V devices and out of all of them&hellip;
                ]]>
            </summary>
        <content type="html">
            <![CDATA[
                    <p><img src="https://bat.moe/media/posts/12/risc-vBG.png" class="type:primaryImage" alt="" /></p>
                <p>I have several Risc V devices and out of all of them the Visionfive 2 remains my favorite, and is honestly one of my favourite SBC's out there. One of the main reasons is because it allows for easy flashing of an on-board drive, allowing you to have storage without using a micro SD.</p>
<p>However with the last update to the visionfive 2 being in November 2025 and StarFive going silent everywhere I get the feeling an EOL notice may appear one of these days, therefore I feel the need to document something as mundane as flashing the disks for the day when that happens.</p>
<p>For the record I'm using the same EMMC that works with the Orange Pi, the Visionfive shares the same pinout.</p>
<h3><span style="color: #3598db;">Getting the latest version  and flashing main drive</span></h3>
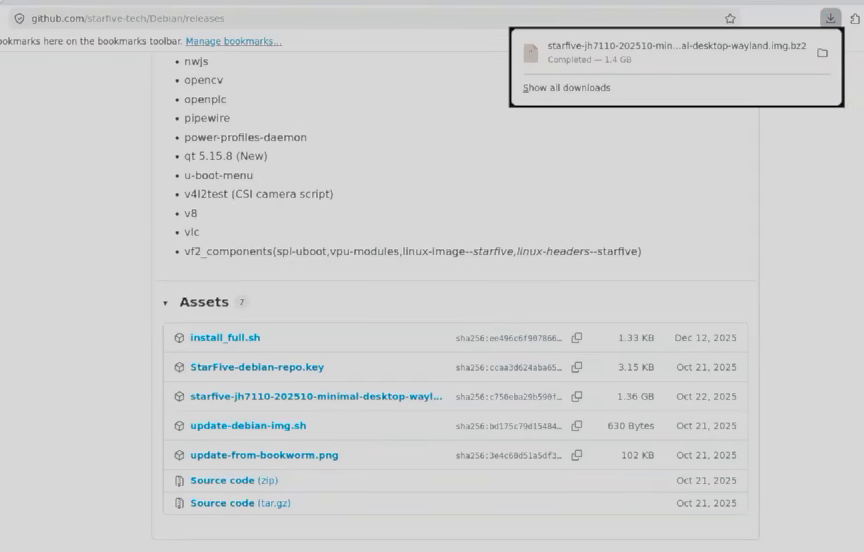
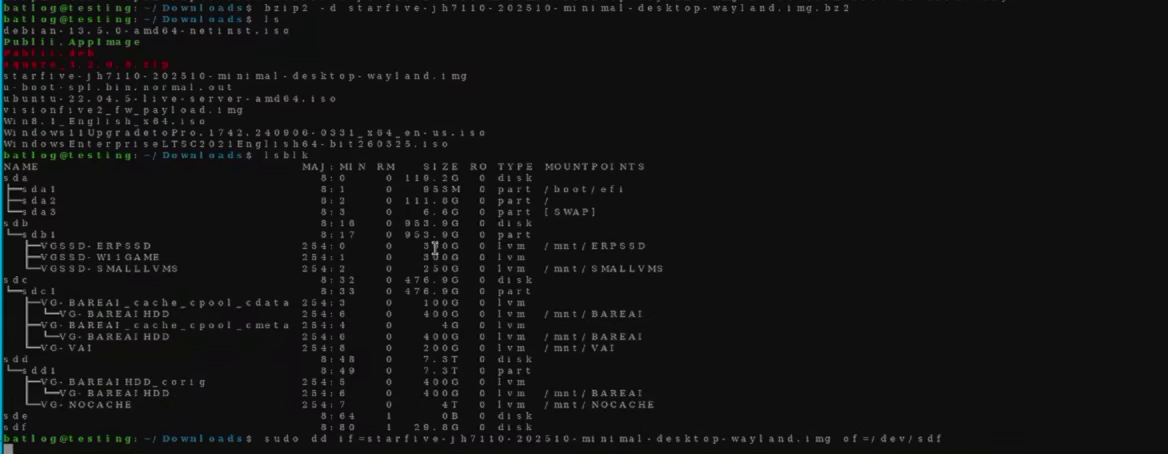
<p>Before flashing the on-board drive you have to flash a micro SD card (Flashing the on-board EMMC can also be done via ssh but to be honest I don't like doing that method because I don't like having the VisionFive 2 online). To do this all that needs to be done is downloading the latest Debian image from the git and running flashing it with dd to a MicroSD.</p>
<div class="gallery-wrapper"><div class="gallery" data-is-empty="false" data-translation="Add images" data-columns="3">
<figure class="gallery__item"><a href="https://bat.moe/media/posts/12/gallery/1.png" data-size="864x552"><img loading="lazy" src="https://bat.moe/media/posts/12/gallery/1-thumbnail.png" alt="1.1" width="768" height="491"></a>
<figcaption>Downloading the last visionfive image</figcaption>
</figure>
<figure class="gallery__item"><a href="https://bat.moe/media/posts/12/gallery/2.png" data-size="1168x454"><img loading="lazy" src="https://bat.moe/media/posts/12/gallery/2-thumbnail.png" alt="1.2" width="768" height="299"></a>
<figcaption>Flashing the image to the micro SD</figcaption>
</figure>
</div></div>
<h3><span style="color: #3598db;">Expanding the SD Drive</span></h3>
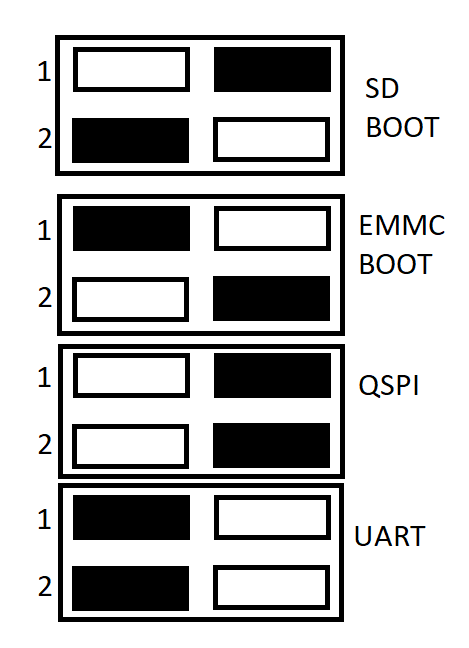
<p>Before flashing the on-board EMMC the drive that was just flashed must be expanded as otherwise the system will run out of space and crash. First the vision five must be set to boot, the switch positions are shown below:</p>
<figure class="post__image align-center"><img loading="lazy" src="https://bat.moe/media/posts/12/switches.png" alt="switches" width="250" height="345" sizes="(min-width: 760px) 660px, calc(93.18vw - 30px)" srcset="https://bat.moe/media/posts/12/responsive/switches-xs.png 320w ,https://bat.moe/media/posts/12/responsive/switches-sm.png 480w ,https://bat.moe/media/posts/12/responsive/switches-md.png 768w ,https://bat.moe/media/posts/12/responsive/switches-xl.png 1024w">
<figcaption>Switch positions</figcaption>
</figure>
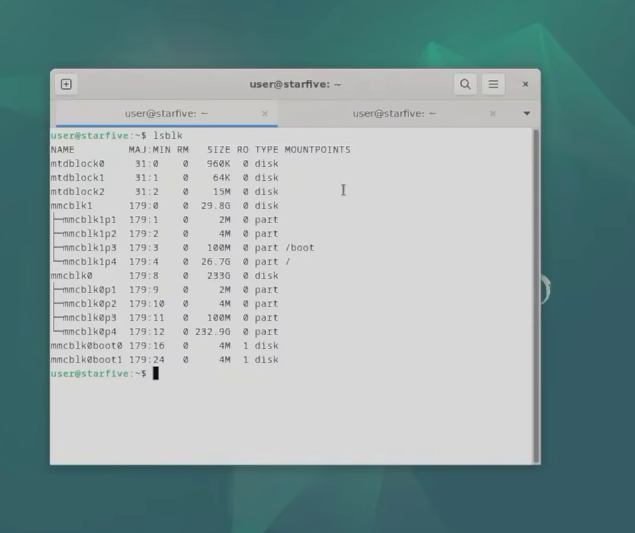
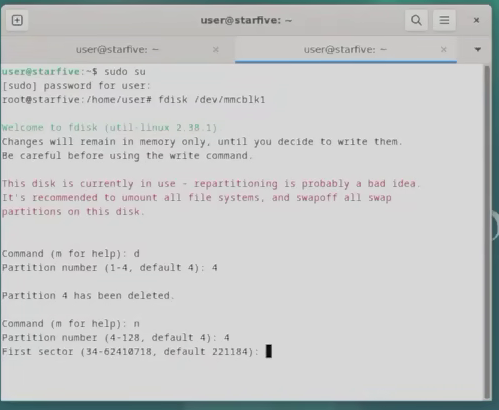
<p>Once booted (The default password for new installs is 'starfive'). You must check the disks loaded, then open up fdisk and delete and create again the data partition (Partition 4) of the sd card.</p>
<div class="gallery-wrapper"><div class="gallery" data-is-empty="false" data-translation="Add images" data-columns="3">
<figure class="gallery__item"><a href="https://bat.moe/media/posts/12/gallery/3.png" data-size="635x533"><img loading="lazy" src="https://bat.moe/media/posts/12/gallery/3-thumbnail.png" alt="2.1" width="635" height="533"></a>
<figcaption>Listing disks</figcaption>
</figure>
<figure class="gallery__item"><a href="https://bat.moe/media/posts/12/gallery/4.png" data-size="499x410"><img loading="lazy" src="https://bat.moe/media/posts/12/gallery/4-thumbnail.png" alt="2.2" width="499" height="410"></a>
<figcaption>Deleting and creating the data partition with fdisk</figcaption>
</figure>
</div></div>
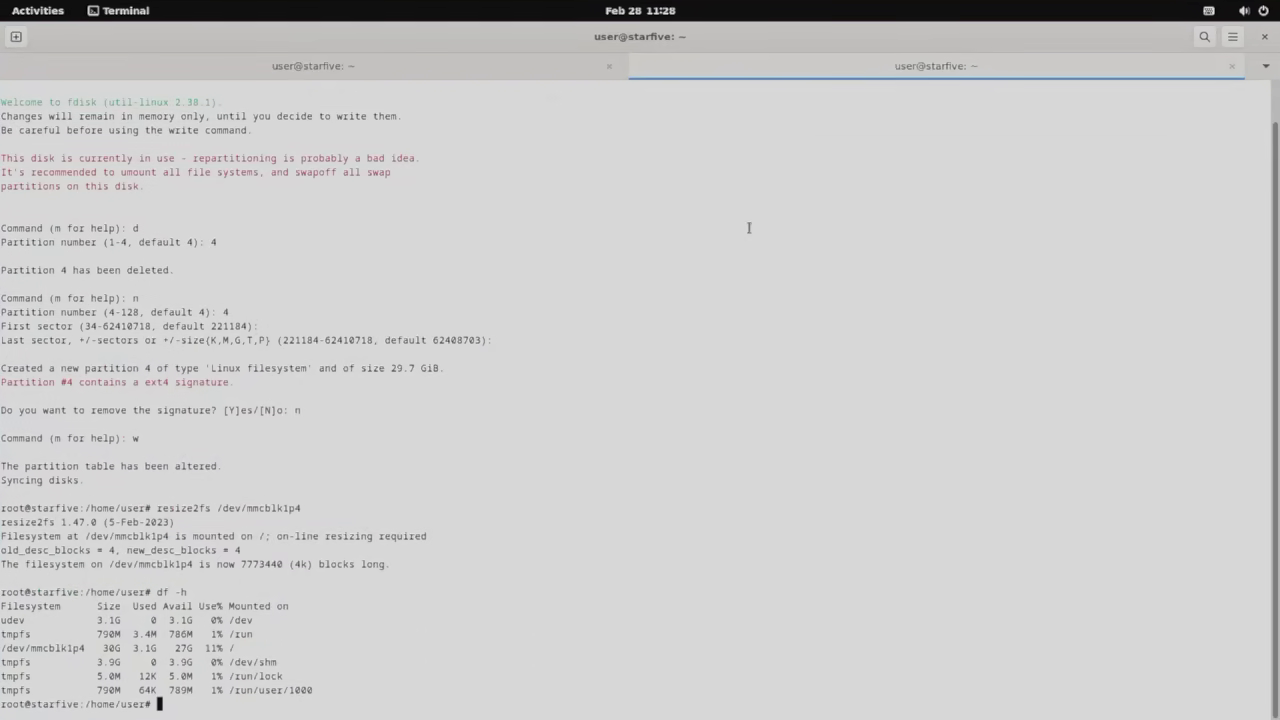
<p>Finally the partition must be resized with resize2fs. If df -h shows that the drive is mostly empty, you've successfully resized the disk.</p>
<figure class="post__image"><img loading="lazy"  src="https://bat.moe/media/posts/12/5.png" alt="resized disk" width="1280" height="720" sizes="(min-width: 760px) 660px, calc(93.18vw - 30px)" srcset="https://bat.moe/media/posts/12/responsive/5-xs.png 320w ,https://bat.moe/media/posts/12/responsive/5-sm.png 480w ,https://bat.moe/media/posts/12/responsive/5-md.png 768w ,https://bat.moe/media/posts/12/responsive/5-xl.png 1024w"></figure>
<h3><span style="color: #3598db;">Flashing and expanding the second drive</span></h3>
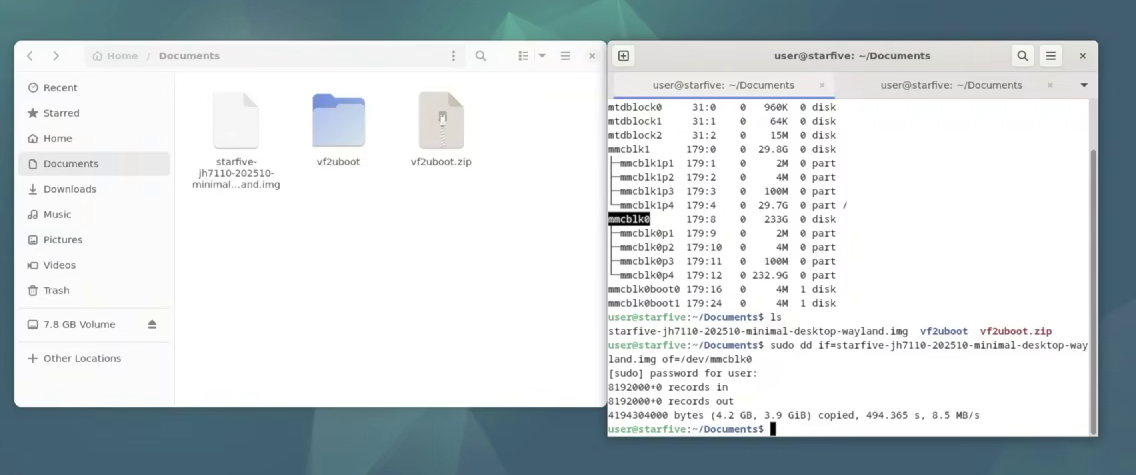
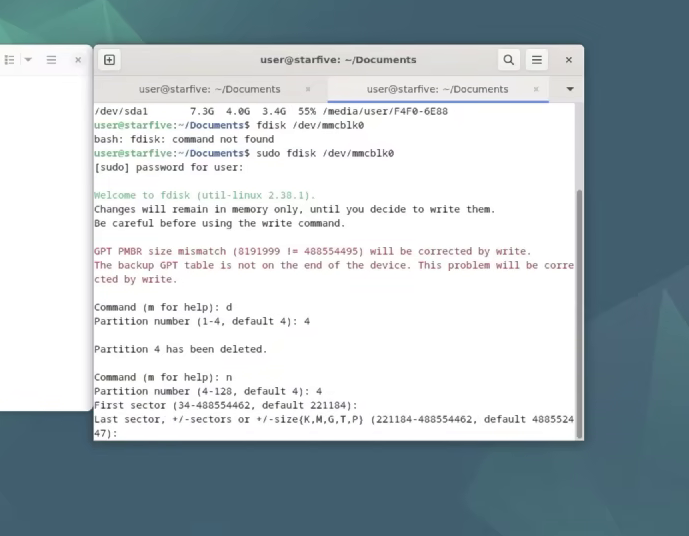
<p>After resizing I transfered the image file to the sd drive and flashed it to the EMMC, then I used fdisk to do the same procedure to the data partition as I did with the SD card.</p>
<div class="gallery-wrapper"><div class="gallery" data-is-empty="false" data-translation="Add images" data-columns="3">
<figure class="gallery__item"><a href="https://bat.moe/media/posts/12/gallery/6.png" data-size="1136x475"><img loading="lazy" src="https://bat.moe/media/posts/12/gallery/6-thumbnail.png" alt="3.1" width="768" height="321"></a>
<figcaption>Flashing the EMMC</figcaption>
</figure>
<figure class="gallery__item"><a href="https://bat.moe/media/posts/12/gallery/7.png" data-size="689x536"><img loading="lazy" src="https://bat.moe/media/posts/12/gallery/7-thumbnail.png" alt="3.2" width="689" height="536"></a>
<figcaption>Formatting partition 4 with fdisk</figcaption>
</figure>
</div></div>
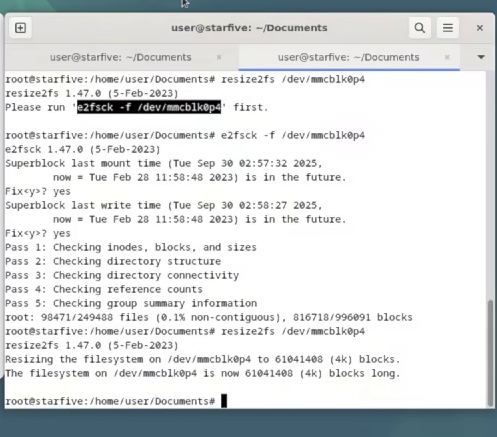
<p>Finally I resized the EMMC, I had an error but apparently it was only an error due to conflict in dates as I had used the drive before (For the record this wouldn't have happened if I had wiped the EMMC before-hand and it wasn't that big of a deal)</p>
<figure class="post__image"><img loading="lazy"  src="https://bat.moe/media/posts/12/8.png" alt="resizing the emmc" width="497" height="437" sizes="(min-width: 760px) 660px, calc(93.18vw - 30px)" srcset="https://bat.moe/media/posts/12/responsive/8-xs.png 320w ,https://bat.moe/media/posts/12/responsive/8-sm.png 480w ,https://bat.moe/media/posts/12/responsive/8-md.png 768w ,https://bat.moe/media/posts/12/responsive/8-xl.png 1024w"></figure>
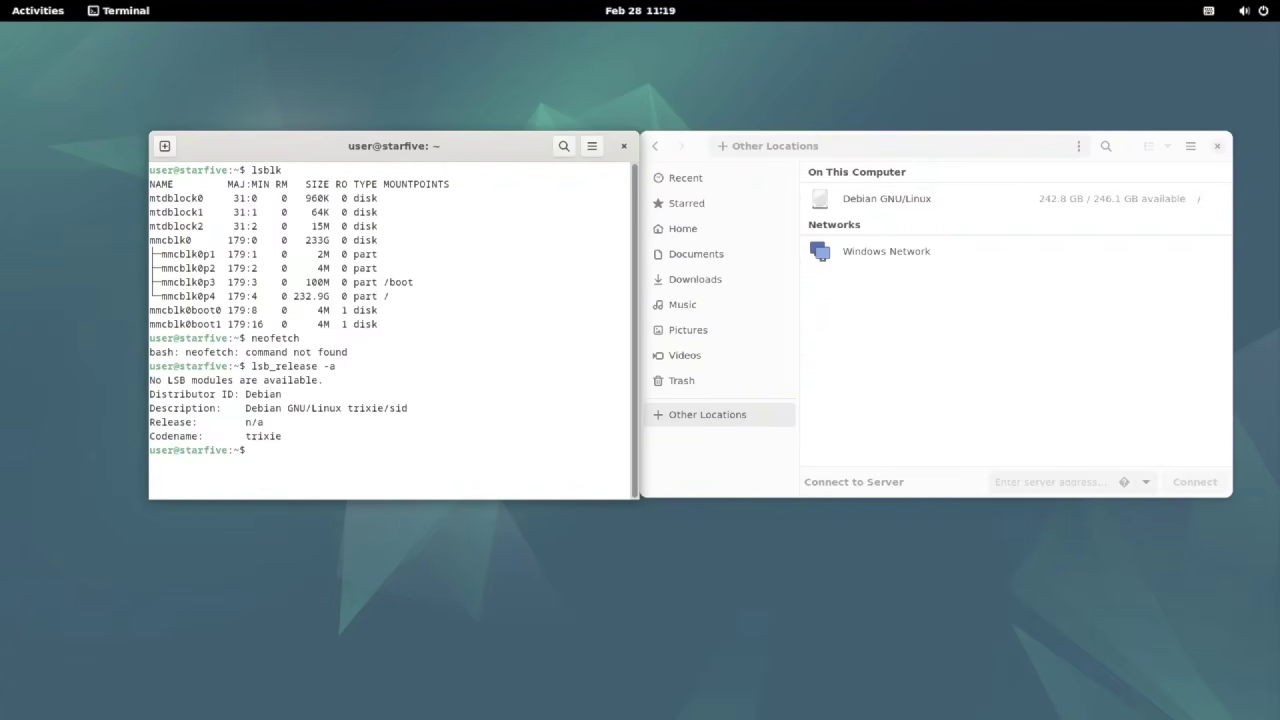
<p>Afterwards I turned off the computer, set the boot switches for the EMMC, took out the micro sd and turned it on again, I checked that the disk was available and the system was mounted correctly.</p>
<figure class="post__image"><img loading="lazy"  src="https://bat.moe/media/posts/12/9.png" alt="ready2work" width="1280" height="720" sizes="(min-width: 760px) 660px, calc(93.18vw - 30px)" srcset="https://bat.moe/media/posts/12/responsive/9-xs.png 320w ,https://bat.moe/media/posts/12/responsive/9-sm.png 480w ,https://bat.moe/media/posts/12/responsive/9-md.png 768w ,https://bat.moe/media/posts/12/responsive/9-xl.png 1024w"></figure>
<p>By the looks of it the latest image contained a preview of Trixie or a modified version of it, regardless it could run apt update and as such will have limited support until August 2028. </p>
<p>I may look into expanding this article in the future as apparently progress is being made on getting Debian official working on the VisionFive 2 and I may include other SBC devices.</p>
<h3><span style="color: #3598db;">Addendum 1: Why I don't like having the VisionFive 2 online (Or any Risc V for that matter)</span></h3>
<p>I see a constant pattern with cheap SBC's and in particular Risc V SBC's where the developers expect you to place them online and use them as servers with SSH enabled. Honestly? Not a fan. </p>
<p>The main reason for this is because you have to manually upgrade them; unlike X86_64 machines some of the drivers or base kernel modules they come with are modified for the chip they use and if you upgrade them from the official debian/gentoo/whatever repository they just break and you must re-flash them. Therefore you must identify which packages can actually be upgraded without breaking the system and upgrade only those.</p>
<p>This leads to a situation where they inevitably get vulnerabilities and I feel like the skill gap between malicious actors and OS maintainers widens every day due to their differing philosophies in regards to hiring practices. I'm honestly too paranoid to have them online as a server, I don't mind using them as personal devices for a few hours a day but I lack the will to leave them unattended 24/7.</p>
<p>If you are not as paranoid or as black-pilled as I am in regards to the open source community though, I wouldn't worry that much. I admit an actor that gets inside a Risc V device may find most if not all of scripts failing to work most of the time due to the different architecture and wacky nonsense Risc V devices rely on, buying the server manager some time to detect the intrusion.</p>
<p> </p>
<h3><figure class="post__image"><img loading="lazy"  src="file:///C:/Users/Admin/Documents/Publii/sites/the-bat-blog-of-the-batlog/input/media/posts/16/logowhite.png" alt="" width="200" height="200" sizes="(min-width: 760px) 660px, calc(93.18vw - 30px)" srcset="file:///C:/Users/Admin/Documents/Publii/sites/the-bat-blog-of-the-batlog/input/media/posts/16/responsive/logowhite-xs.png 320w ,file:///C:/Users/Admin/Documents/Publii/sites/the-bat-blog-of-the-batlog/input/media/posts/16/responsive/logowhite-sm.png 480w ,file:///C:/Users/Admin/Documents/Publii/sites/the-bat-blog-of-the-batlog/input/media/posts/16/responsive/logowhite-md.png 768w ,file:///C:/Users/Admin/Documents/Publii/sites/the-bat-blog-of-the-batlog/input/media/posts/16/responsive/logowhite-xl.png 1024w"></figure> <span style="color: #ecf0f1;"> <a href="https://bat.moe/about-me.html" style="color: #ecf0f1;">-Batlog</a></span></h3>
<p> </p>
<p> </p>
<hr>
<pre>If you enjoyed this article or if it was of any use to you, please consider donating some crypto. All funds go towards paying for the hosting.<br><br>Monero/XMR:<br>88MC6ksaVyLbtH9fT4owLSPX16vYD9cf6YELmXjaNWWd71R6iwfFV6DJtp7BXR5c6vWnxLEEGyu1tfwXwTqDM1CUCqDGeRY<br><br>Bitcoin/BTC: <br>bc1qzw9g97ffhllwukhagkvn5g0u9d8rhjv86xhf8h<br><br>Ethereum/ETH:<br>0xf948ab59E492865Fb5200A97F0F4F2f31F7b443f<br><br>Litecoin/LTC:<br>ltc1qqfv05jpyh8yvzyetmf7n5ve500jl656yxpc8y4<br><br>Doge:<br>DT5iG6GxoyZtHSSmaZHHV63NpEoH5yuixg</pre>
            ]]>
        </content>
    </entry>
    <entry>
        <title>Getting an old Pascal Card (Tesla P40) to use generative AI in 2026 (Stable Diffusion)</title>
        <author>
            <name>Batlog</name>
        </author>
        <link href="https://bat.moe/dlashing-a-visionfive-2-emmc.html"/>
        <id>https://bat.moe/dlashing-a-visionfive-2-emmc.html</id>
        <media:content url="https://bat.moe/media/posts/11/p40bg.png" medium="image" />
            <category term="Oddware"/>
            <category term="Linux"/>
            <category term="AI"/>

        <updated>2026-06-17T14:06:00-06:00</updated>
            <summary type="html">
                <![CDATA[
                        <img src="https://bat.moe/media/posts/11/p40bg.png" alt="" />
                    WARNING: If You're reading this, you're not me and you're thinking of&hellip;
                ]]>
            </summary>
        <content type="html">
            <![CDATA[
                    <p><img src="https://bat.moe/media/posts/11/p40bg.png" class="type:primaryImage" alt="" /></p>
                <h5><span style="color: #e03e2d;">WARNING</span>: If You're reading this, you're not me and you're thinking of getting a TESLA P40 now that they're in the bargain bin again,<span style="color: #e03e2d;"> don't just plug the damn thing into the first PCI slot you see, you <span style="text-decoration: underline;">WILL</span> fry it. <span style="color: #000000;">See addendum 1 for ideas and notes on this.</span></span></h5>
<p>This was relatively easy to pull off on Ubuntu Noble (Version 24.04), however I still feel like documenting it because I feel torch may stop providing the required files in order to get the venv working any day now.</p>
<p>The long story of why this article exists is because Pytorch decided to end support for Volta, Pascal and Maxwell Nvidia cards before Nvidia announced their EOL, which caused for my entire environment to break down after updating my python virtual environment and I get the feeling it may happen again but permanently some time in the future as I cannot find versions of Pytorch compatible with old CUDA versions anywhere. As of right now I managed to get this working on a small SSD for storage but in the future I want to preserve a small virtual machine or a FreeBSD jail, failing that I'll do an LVM (ANYTHING that allows me to do snapshots really I document the reason why this is important to me on my virtual AI article).</p>
<h3><span style="color: #3598db;">Step 1: Installing Cuda </span></h3>
<p>Here's a very specific restriction: you need CUDA version 12.6, no other version will work as that's the exact point in time when Pytorch stopped providing support for Volta, Pascal and Maxwell cards. I recommend doing this in Ubuntu 24 as it's the last OS officially supported by this particular CUDA version and will continue to have support until April 2029 (Also, Debian 13 gave me issues, so there's also that).</p>
<p>Here are the commands to get the cuda toolkit installed, if the apt update half-way through shows the Cuda 12.6 repositories you're in the green:</p>
<pre>wget https://developer.download.nvidia.com/compute/cuda/repos/ubuntu2404/x86_64/cuda-ubuntu2404.pin<br>sudo mv cuda-ubuntu2404.pin /etc/apt/preferences.d/cuda-repository-pin-600<br>wget https://developer.download.nvidia.com/compute/cuda/12.6.0/local_installers/cuda-repo-ubuntu2404-12-6-local_12.6.0-560.28.03-1_amd64.deb<br>sudo dpkg -i cuda-repo-ubuntu2404-12-6-local_12.6.0-560.28.03-1_amd64.deb<br>sudo cp /var/cuda-repo-ubuntu2404-12-6-local/cuda-*-keyring.gpg /usr/share/keyrings/<br>sudo apt-get update<br>sudo apt-get -y install cuda-toolkit-12-6</pre>
<div class="gallery-wrapper"><div class="gallery" data-is-empty="false" data-translation="Add images" data-columns="2">
<figure class="gallery__item"><a href="https://bat.moe/media/posts/11/gallery/1.png" data-size="1280x433"><img loading="lazy" src="https://bat.moe/media/posts/11/gallery/1-thumbnail.png" alt="1.1" width="768" height="260"></a>
<figcaption>Installing the required repositories for CUDA 12.6</figcaption>
</figure>
<figure class="gallery__item"><a href="https://bat.moe/media/posts/11/gallery/2.png" data-size="944x186"><img loading="lazy" src="https://bat.moe/media/posts/11/gallery/2-thumbnail.png" alt="1.2" width="768" height="151"></a>
<figcaption>Installing the CUDA Toolkit 12.6</figcaption>
</figure>
</div></div>
<p>Afterwards you need to install the CUDA kernel modules (Because Nvidia doesn't bundle them for some reason) NVidia pushes you to try out the open source version but honestly in my experience the proprietary version is still better and in the case of Pascal they don't even work as they only work with Turing and onwards.</p>
<pre>sudo apt-get install -y cuda-drivers</pre>
<figure class="post__image"><img loading="lazy" src="https://bat.moe/media/posts/11/3.png" alt="cudakernel" width="1268" height="186" sizes="(min-width: 760px) 660px, calc(93.18vw - 30px)" srcset="https://bat.moe/media/posts/11/responsive/3-xs.png 320w ,https://bat.moe/media/posts/11/responsive/3-sm.png 480w ,https://bat.moe/media/posts/11/responsive/3-md.png 768w ,https://bat.moe/media/posts/11/responsive/3-xl.png 1024w">
<figcaption>Installing CUDA kernel modules</figcaption>
</figure>
<p>Afterwards reboot your system and run nvidia-smi, if the version shows version 12.6 you can move to the next step.</p>
<figure class="post__image align-center"><img loading="lazy" src="https://bat.moe/media/posts/11/4.png" alt="cuda version 12.6" width="466" height="223" sizes="(min-width: 760px) 660px, calc(93.18vw - 30px)" srcset="https://bat.moe/media/posts/11/responsive/4-xs.png 320w ,https://bat.moe/media/posts/11/responsive/4-sm.png 480w ,https://bat.moe/media/posts/11/responsive/4-md.png 768w ,https://bat.moe/media/posts/11/responsive/4-xl.png 1024w">
<figcaption>CUDA version 12.6 in use</figcaption>
</figure>
<h3><span style="color: #3598db;">Step 2: Installing SDNEXT </span></h3>
<p>Afterwards you need to install SDNext, to be honest there aren't a lot of dependencies to work here, you just need to install python3-venv</p>
<figure class="post__image align-center"><img loading="lazy"  src="https://bat.moe/media/posts/11/5.png" alt="installing python3-venv" width="340" height="110" sizes="(min-width: 760px) 660px, calc(93.18vw - 30px)" srcset="https://bat.moe/media/posts/11/responsive/5-xs.png 320w ,https://bat.moe/media/posts/11/responsive/5-sm.png 480w ,https://bat.moe/media/posts/11/responsive/5-md.png 768w ,https://bat.moe/media/posts/11/responsive/5-xl.png 1024w"></figure>
<p>Next, clone the latest version of SDNext and enter the directory</p>
<figure class="post__image"><img loading="lazy"  src="https://bat.moe/media/posts/11/6.png" alt="cloning sdnext" width="430" height="132" sizes="(min-width: 760px) 660px, calc(93.18vw - 30px)" srcset="https://bat.moe/media/posts/11/responsive/6-xs.png 320w ,https://bat.moe/media/posts/11/responsive/6-sm.png 480w ,https://bat.moe/media/posts/11/responsive/6-md.png 768w ,https://bat.moe/media/posts/11/responsive/6-xl.png 1024w"></figure>
<p>And now you just have to run it for the first time but before you do you must set some environment variables, the guide on SDNext says to use 'set TORCH_COMMAND='torch==2.9.1 torchvision==0.24.1 torchaudio==2.9.1 --index-url https://download.pytorch.org/whl/cu126' but to be honest that didn't do it for me, but what did do it was 'export':</p>
<pre>export TORCH_COMMAND='torch==2.9.1 torchvision==0.24.1 torchaudio==2.9.1 --index-url https://download.pytorch.org/whl/cu126'</pre>
<figure class="post__image"><img loading="lazy"  src="https://bat.moe/media/posts/11/7.png" alt="righttorch" width="1115" height="386" sizes="(min-width: 760px) 660px, calc(93.18vw - 30px)" srcset="https://bat.moe/media/posts/11/responsive/7-xs.png 320w ,https://bat.moe/media/posts/11/responsive/7-sm.png 480w ,https://bat.moe/media/posts/11/responsive/7-md.png 768w ,https://bat.moe/media/posts/11/responsive/7-xl.png 1024w"></figure>
<p>If the system tells you the versions matching the environment variables you set are being installed and doesn't give you a 'This version of Cuda is too old' error then you're pretty much done, otherwise you must go back, delete the directory, clone again and try again.</p>
<p>If it did resolve without errors, let it run for a while until fully loaded, then I recommend running nvidia-smi -l 1 to monitor your GPU while working and finally, open Firefox and go to the localhost address where SDNext is running. Just download the version 1.4 for testing.</p>
<figure class="post__image"><img loading="lazy"  src="https://bat.moe/media/posts/11/vlcsnap-2026-06-25-16h38m32s446.png" alt="Environment ready" width="1280" height="720" sizes="(min-width: 760px) 660px, calc(93.18vw - 30px)" srcset="https://bat.moe/media/posts/11/responsive/vlcsnap-2026-06-25-16h38m32s446-xs.png 320w ,https://bat.moe/media/posts/11/responsive/vlcsnap-2026-06-25-16h38m32s446-sm.png 480w ,https://bat.moe/media/posts/11/responsive/vlcsnap-2026-06-25-16h38m32s446-md.png 768w ,https://bat.moe/media/posts/11/responsive/vlcsnap-2026-06-25-16h38m32s446-xl.png 1024w"></figure>
<p>The First time I ran it, it didn't work. This is normal as the model wasn't pre-loaded before opening the website and SDNext didn't load it.</p>
<figure class="post__image"><img loading="lazy"  style="outline: rgba(13, 139, 242, 0.55) solid 3px !important;" src="https://bat.moe/media/posts/11/vlcsnap-2026-06-25-12h29m37s229.png" alt="failure" width="1280" height="720" sizes="(min-width: 760px) 660px, calc(93.18vw - 30px)" srcset="https://bat.moe/media/posts/11/responsive/vlcsnap-2026-06-25-12h29m37s229-xs.png 320w ,https://bat.moe/media/posts/11/responsive/vlcsnap-2026-06-25-12h29m37s229-sm.png 480w ,https://bat.moe/media/posts/11/responsive/vlcsnap-2026-06-25-12h29m37s229-md.png 768w ,https://bat.moe/media/posts/11/responsive/vlcsnap-2026-06-25-12h29m37s229-xl.png 1024w"></figure>
<p>Just close Firefox, stop SDNext with Ctrl C and start it again (You don't need to set the environment variables again). This time, it ran without issues.</p>
<figure class="post__image"><img loading="lazy"  style="outline: rgba(13, 139, 242, 0.55) solid 3px !important;" src="https://bat.moe/media/posts/11/vlcsnap-2026-06-25-12h29m24s549.png" alt="Successful generation" width="1280" height="720" sizes="(min-width: 760px) 660px, calc(93.18vw - 30px)" srcset="https://bat.moe/media/posts/11/responsive/vlcsnap-2026-06-25-12h29m24s549-xs.png 320w ,https://bat.moe/media/posts/11/responsive/vlcsnap-2026-06-25-12h29m24s549-sm.png 480w ,https://bat.moe/media/posts/11/responsive/vlcsnap-2026-06-25-12h29m24s549-md.png 768w ,https://bat.moe/media/posts/11/responsive/vlcsnap-2026-06-25-12h29m24s549-xl.png 1024w"></figure>
<h3><span style="color: #3598db;">Update 01/Jul/2026: Making a virtual machine to make a replicable environment.</span></h3>
<p>Previously I had tried to get this work on a VM (And as a matter of fact it was always my intention to run this in a VM) due to the fact that torch loves 'cleaning' (Read: making completely inaccessible by pulling them from their servers) older versions and that was the whole reason why I went on this crusade in the first place as after an update the version that I used to use with the original AUTOMATIC1111 webui stopped working completely on my M40 and P40, both of which I believe have still a lot to give as Nvidia has yet to make consumer-grade GPU's with more than 24 gigs of VRAM.</p>
<p>However every time I tried it I got a lot of errors when firing up the VM and couldn't install CUDA 12.6 (Bizarrely the packaged drivers worked fine, it was just the official Nvidia CUDA drivers that didn't work).</p>
<figure class="post__image"><img loading="lazy" src="https://bat.moe/media/posts/11/8.png" alt="vmerrors" width="1280" height="720" sizes="(min-width: 760px) 660px, calc(93.18vw - 30px)" srcset="https://bat.moe/media/posts/11/responsive/8-xs.png 320w ,https://bat.moe/media/posts/11/responsive/8-sm.png 480w ,https://bat.moe/media/posts/11/responsive/8-md.png 768w ,https://bat.moe/media/posts/11/responsive/8-xl.png 1024w">
<figcaption>Errors encountered when firing up a VM with the Nvidia P40</figcaption>
</figure>
<p>I had the feeling it was a BAR problem due to the large amount of VRAM the P40 had but didn't know if it was an error with the virtual machine BIOS or the host computer BIOS. So, I decided to get rid of the three problems to see if it works and troubleshoot later, I made a virtual machine in a better-quality motherboard and used a P4 due to the reduced RAM. Long story short I did the same as I did in my <a href="https://bat.moe/getting-the-cakewalk-suite-to-work-again.html">Virtualized AI environment article.</a></p>
<p>First I did the usual song and dance of loading the vfio drivers</p>
<div class="gallery-wrapper"><div class="gallery" data-is-empty="false" data-translation="Add images" data-columns="3">
<figure class="gallery__item"><a href="https://bat.moe/media/posts/11/gallery/9.png" data-size="1280x720"><img loading="lazy" src="https://bat.moe/media/posts/11/gallery/9-thumbnail.png" alt="u1.1" width="768" height="432"></a>
<figcaption>Adding device to load vfio drivers in grub</figcaption>
</figure>
<figure class="gallery__item"><a href="https://bat.moe/media/posts/11/gallery/10.png" data-size="1280x720"><img loading="lazy" src="https://bat.moe/media/posts/11/gallery/10-thumbnail.png" alt="u1.2" width="768" height="432"></a>
<figcaption>Adding the device to load vfio drivers in modprobe</figcaption>
</figure>
<figure class="gallery__item"><a href="https://bat.moe/media/posts/11/gallery/11.png" data-size="1280x720"><img loading="lazy" src="https://bat.moe/media/posts/11/gallery/11-thumbnail.png" alt="u1.3" width="768" height="432"></a>
<figcaption>updating GRUB and initramfs</figcaption>
</figure>
</div></div>
<p>Afterwards I rebooted and upon checking the correct kernel modules were loaded I made an Ubuntu 24 VM. It has nothing special other than using most of my resources and leaving me only with 2 cores and 4GB of RAM for my base system. I also tried to keep the install as lightweight as possible installing DWM.</p>
<figure class="post__image align-center"><img loading="lazy"  src="https://bat.moe/media/posts/11/12.png" alt="Making an Ubuntu 24 VM" width="351" height="370" sizes="(min-width: 760px) 660px, calc(93.18vw - 30px)" srcset="https://bat.moe/media/posts/11/responsive/12-xs.png 320w ,https://bat.moe/media/posts/11/responsive/12-sm.png 480w ,https://bat.moe/media/posts/11/responsive/12-md.png 768w ,https://bat.moe/media/posts/11/responsive/12-xl.png 1024w"></figure>
<p>Then I attached the P4, followed Nvidia's instructions for installing CUDA 12.6 and to my shock it went without a hitch.</p>
<div class="gallery-wrapper"><div class="gallery" data-is-empty="false" data-translation="Add images" data-columns="2">
<figure class="gallery__item"><a href="https://bat.moe/media/posts/11/gallery/13.png" data-size="865x611"><img loading="lazy" src="https://bat.moe/media/posts/11/gallery/13-thumbnail.png" alt="u1.4" width="768" height="542"></a>
<figcaption>Installing CUDA toolkit</figcaption>
</figure>
<figure class="gallery__item"><a href="https://bat.moe/media/posts/11/gallery/14.png" data-size="871x615"><img loading="lazy" src="https://bat.moe/media/posts/11/gallery/14-thumbnail.png" alt="u1.5" width="768" height="542"></a>
<figcaption>Installing CUDA drivers</figcaption>
</figure>
</div></div>
<p>I rebooted and ran lspci -knn nvidia-smi to verify the card was loaded properly</p>
<figure class="post__image"><img loading="lazy" src="https://bat.moe/media/posts/11/15.png" alt="cudaworking" width="869" height="617" sizes="(min-width: 760px) 660px, calc(93.18vw - 30px)" srcset="https://bat.moe/media/posts/11/responsive/15-xs.png 320w ,https://bat.moe/media/posts/11/responsive/15-sm.png 480w ,https://bat.moe/media/posts/11/responsive/15-md.png 768w ,https://bat.moe/media/posts/11/responsive/15-xl.png 1024w">
<figcaption>Words cannot express my shock at how easy this was compared to the P40</figcaption>
</figure>
<p>Once that was done I cloned sdnext and set the variables as I did previously. Once it passed past Pytorch without errors I was basically done. I just opened the webui and downloaded a model.</p>
<div class="gallery-wrapper"><div class="gallery" data-is-empty="false" data-translation="Add images" data-columns="2">
<figure class="gallery__item"><a href="https://bat.moe/media/posts/11/gallery/16.png" data-size="865x601"><img loading="lazy" src="https://bat.moe/media/posts/11/gallery/16-thumbnail.png" alt="u1.7" width="768" height="534"></a>
<figcaption>Setting environment variables</figcaption>
</figure>
<figure class="gallery__item"><a href="https://bat.moe/media/posts/11/gallery/17.png" data-size="1028x641"><img loading="lazy" src="https://bat.moe/media/posts/11/gallery/17-thumbnail.png" alt="u1.8" width="768" height="479"></a>
<figcaption>Pytorch installed without issues</figcaption>
</figure>
</div></div>
<p>At this point I decided on installing Badwolf for my browser because it's very lightweight, loads SDNext without issues and most importantly, doesn't come in a snap like everything in ubuntu these days and wastes resources running snapd in the background. However I ran into an issue where I kept running out of VRAM because it was trying to generate a 1024 x 1024 image and I couldn't change that because the window was too small and Badwolf doesn't handle zoom very well. So, I installed arandr and changed the resolution.</p>
<div class="gallery-wrapper"><div class="gallery" data-is-empty="false" data-translation="Add images" data-columns="2">
<figure class="gallery__item"><a href="https://bat.moe/media/posts/11/gallery/18.png" data-size="1280x720"><img loading="lazy" src="https://bat.moe/media/posts/11/gallery/18-thumbnail.png" alt="u1.9" width="768" height="432"></a>
<figcaption>Badwolf loading the website without options to modify the image size</figcaption>
</figure>
<figure class="gallery__item"><a href="https://bat.moe/media/posts/11/gallery/19.png" data-size="1280x720"><img loading="lazy" src="https://bat.moe/media/posts/11/gallery/19-thumbnail.png" alt="u.110" width="768" height="432"></a>
<figcaption>Changing the resolution with arandr</figcaption>
</figure>
</div></div>
<p>Then everything worked as intended after I adjusted the image size to 512 x 512</p>
<div class="gallery-wrapper"><div class="gallery" data-is-empty="false" data-translation="Add images" data-columns="2">
<figure class="gallery__item"><a href="https://bat.moe/media/posts/11/gallery/20.png" data-size="1280x720"><img loading="lazy" src="https://bat.moe/media/posts/11/gallery/20-thumbnail.png" alt="u1.11" width="768" height="432"></a>
<figcaption>Making a 512x512 image</figcaption>
</figure>
<figure class="gallery__item"><a href="https://bat.moe/media/posts/11/gallery/21.png" data-size="1280x720"><img loading="lazy" src="https://bat.moe/media/posts/11/gallery/21-thumbnail.png" alt="u1.12" width="768" height="432"></a>
<figcaption>Final result, system working as intended</figcaption>
</figure>
</div></div>
<p>I still have to get this running on my P40 but given I have a functional VM it will be easier to troubleshoot. For the moment I'm happy I preserved this before pytorch pulls the plug.</p>
<h3><span style="color: #3598db;">Addendum 1: Cooling a Tesla card</span></h3>
<p> </p>
<p>Used Tesla cards normally sell for cheap in the second hand market and usually come with nice features for Cuda tasks but the problem is that they are meant to run on special server chasis that incorporate high-pressure fans to cool them and that I assume most people don't have, this means if you want to stick one in a home PC you need to mod.</p>
<p>If you buy a passive-power low profile (A P4 or a T4 for instance). You really don't have a whole lot of problems cooling it, here is my ghetto cooling solution for a P4 for instance:</p>
<figure class="post__image align-center"><img loading="lazy" src="https://bat.moe/media/posts/11/P4_mod.jpg" alt="p4ghetto" width="564" height="423" sizes="(min-width: 760px) 660px, calc(93.18vw - 30px)" srcset="https://bat.moe/media/posts/11/responsive/P4_mod-xs.jpg 320w ,https://bat.moe/media/posts/11/responsive/P4_mod-sm.jpg 480w ,https://bat.moe/media/posts/11/responsive/P4_mod-md.jpg 768w ,https://bat.moe/media/posts/11/responsive/P4_mod-xl.jpg 1024w">
<figcaption>Absolutely ghetto-tastic!</figcaption>
</figure>
<p>It's not the prettiest mod I've ever done but honestly it just gets the job done, the card never over-heats, there really isn't much to cooling a small Tesla.</p>
<p>The big ones though? Those a re a problem. The small passive-energy Teslas pull between 50 and 75w. The big ones? They pull 250w and while performing any task they usually run at 100% speed and power consumption, cooling them can be a legitimate headache.</p>
<p>Most people use a blower style fan and a 3D printed funnel, I tried a solution like this first but to be honest I found the cooling to be lacking if I left the card running for hours (Which I imagine is what most people want), I was letting my PC cool down every 4 hours like a vintage car or something and honestly that didn't sit well with me.</p>
<p>So, I decided to go the full Water cooling route, here is my card as of June 2026:</p>
<figure class="post__image"><figure class="align-center"><img loading="lazy"  src="https://bat.moe/media/posts/11/P40_mod.jpg" alt="ModifiedP40" width="671" height="504" sizes="(min-width: 760px) 660px, calc(93.18vw - 30px)" srcset="https://bat.moe/media/posts/11/responsive/P40_mod-xs.jpg 320w ,https://bat.moe/media/posts/11/responsive/P40_mod-sm.jpg 480w ,https://bat.moe/media/posts/11/responsive/P40_mod-md.jpg 768w ,https://bat.moe/media/posts/11/responsive/P40_mod-xl.jpg 1024w"></figure>
<figcaption>Isn't it cute? :3</figcaption>
</figure>
<p>Tacky choices of aesthetics aside, I don't think anyone that looks at the thermals of it can argue with the results, I don't think I've ever seen it go over ~60°C after running it for hours.</p>
<p>What I did and what I used:</p>
<p>I think I was rather lucky when I got mine as I got an NZXT Kraken G12 for very cheap that fits perfectly with the card (The Kraken was designed for high-end gaming pascal cards, Specifically the GTX 1080 and the Titan, and really what is the P40 but a 1080/Titan without HDMI output?), from there it was just a matter of finding a cheap water cooling solution that had the same manufacturing process as the kraken intended to use in 2017 and while NZXT keeps using it their coolers were a bit too expensive for this project. On the other hand XPG and Asus also used the same manufacturing process and were on my price range.</p>
<p>I used thermal glue with copper heatsinks (Not aluminium) for the vram modules and along with the fan of the Kraken and a few aluminum heatsinks I managed to cool down the rest of the components. The thermal glue (Not paste) was necessary as the copper heatsinks would fall off with nothing but gravity regardless of anything else I used (E.g. thermal pads or the glue they came pre-applied with); Due to the use of thermal glue I had to let the card curate overnight and it added about 10 hours to the project.</p>
<p>Overall this whole thing added about 80 dollars to my budget so if you're thinking of doing this have a cooling solution already in your possession or already on your way  before-hand. Also, bear in mind this basically kills all after-market value of the card, nobody buys modified Teslas so bear in mind if you modify one you're keeping it forever or trashing it afterwards.</p>
<p> </p>
<h3><figure class="post__image"><img loading="lazy"  src="file:///C:/Users/Admin/Documents/Publii/sites/the-bat-blog-of-the-batlog/input/media/posts/16/logowhite.png" alt="" width="200" height="200" sizes="(min-width: 760px) 660px, calc(93.18vw - 30px)" srcset="file:///C:/Users/Admin/Documents/Publii/sites/the-bat-blog-of-the-batlog/input/media/posts/16/responsive/logowhite-xs.png 320w ,file:///C:/Users/Admin/Documents/Publii/sites/the-bat-blog-of-the-batlog/input/media/posts/16/responsive/logowhite-sm.png 480w ,file:///C:/Users/Admin/Documents/Publii/sites/the-bat-blog-of-the-batlog/input/media/posts/16/responsive/logowhite-md.png 768w ,file:///C:/Users/Admin/Documents/Publii/sites/the-bat-blog-of-the-batlog/input/media/posts/16/responsive/logowhite-xl.png 1024w"></figure> <span style="color: #ecf0f1;"> <a href="https://bat.moe/about-me.html" style="color: #ecf0f1;">-Batlog</a></span></h3>
<p> </p>
<p> </p>
<hr>
<pre>If you enjoyed this article or if it was of any use to you, please consider donating some crypto. All funds go towards paying for the hosting.<br><br>Monero/XMR:<br>88MC6ksaVyLbtH9fT4owLSPX16vYD9cf6YELmXjaNWWd71R6iwfFV6DJtp7BXR5c6vWnxLEEGyu1tfwXwTqDM1CUCqDGeRY<br><br>Bitcoin/BTC: <br>bc1qzw9g97ffhllwukhagkvn5g0u9d8rhjv86xhf8h<br><br>Ethereum/ETH:<br>0xf948ab59E492865Fb5200A97F0F4F2f31F7b443f<br><br>Litecoin/LTC:<br>ltc1qqfv05jpyh8yvzyetmf7n5ve500jl656yxpc8y4<br><br>Doge:<br>DT5iG6GxoyZtHSSmaZHHV63NpEoH5yuixg</pre>
            ]]>
        </content>
    </entry>
    <entry>
        <title>Mining Monero with P2Pool</title>
        <author>
            <name>Batlog</name>
        </author>
        <link href="https://bat.moe/mining-monero-with-p2pool.html"/>
        <id>https://bat.moe/mining-monero-with-p2pool.html</id>
        <media:content url="https://bat.moe/media/posts/10/monerominingbg.png" medium="image" />
            <category term="Blockchain"/>

        <updated>2026-06-13T14:04:00-06:00</updated>
            <summary type="html">
                <![CDATA[
                        <img src="https://bat.moe/media/posts/10/monerominingbg.png" alt="" />
                    Unlike most Crypto currencies Monero seems to have retained its' value over&hellip;
                ]]>
            </summary>
        <content type="html">
            <![CDATA[
                    <p><img src="https://bat.moe/media/posts/10/monerominingbg.png" class="type:primaryImage" alt="" /></p>
                <p>Unlike most Crypto currencies Monero seems to have retained its' value over the years but due to the criminality associated with it not a whole lot is said about it. I therefore want to make a guide on how to configure it to mine via P2Pool because to be honest it's by far the best way to mine it if you wanna do it solo and without breaking any laws (At least in my opinion). You get a payout immediately whenever you get credit for a mined block without requiring a minimal payout and if you don't then at the very least you're contributing to the network by keeping a legitimate non-malicious node running.</p>
<p><strong>A fair warning</strong>: As of June 2026 the monero blockchain is 250+GB in size, so if you want to do this consider using a 500+GB drive. </p>
<h3><span style="color: #3598db;">Step 1: Install and run Monerod (Monero node)</span></h3>
<p>Before starting I recommend you do this in an environment as minimalistic as possible so your CPU gets used the most, I'm using a minimal Ubuntu 24.04 install with nothing but dwm installed in order to save as many resources as possible and be able to see and run the node, p2pool and xmrig at the same time, however it's 100% doable with a terminal multiplexer like tmux if you want to use even less resources. </p>
<p>Once you get your environment all you have to do is: download the last version of monero available, extract it and run the node (Please note I'm using the --data-dir argument in order to have the blockchain downloaded to another disk).</p>
<div class="gallery-wrapper"><div class="gallery" data-is-empty="false" data-translation="Add images" data-columns="3">
<figure class="gallery__item"><a href="https://bat.moe/media/posts/10/gallery/1.png" data-size="473x120"><img loading="lazy" src="https://bat.moe/media/posts/10/gallery/1-thumbnail.png" alt="1.1" width="473" height="120"></a>
<figcaption>Downloading Monero</figcaption>
</figure>
<figure class="gallery__item"><a href="https://bat.moe/media/posts/10/gallery/2.png" data-size="437x266"><img loading="lazy" src="https://bat.moe/media/posts/10/gallery/2-thumbnail.png" alt="1.2" width="437" height="266"></a>
<figcaption>Extracting and entering the directory where the node is</figcaption>
</figure>
<figure class="gallery__item"><a href="https://bat.moe/media/posts/10/gallery/3.png" data-size="799x411"><img loading="lazy" src="https://bat.moe/media/posts/10/gallery/3-thumbnail.png" alt="1.3" width="768" height="395"></a>
<figcaption>Running the monero node</figcaption>
</figure>
</div></div>
<p>Now just let the Node sync with the network, please note this may take <span style="text-decoration: underline;"><strong>HOURS </strong></span>(In my case it took a <span style="text-decoration: underline;"><strong>WHOLE DAY</strong></span>). </p>
<h3><span style="color: #3598db;">Update 01/JUL/2026: OPTIONAL: Run the node over TOR.</span></h3>
<p>It hit me that it may be better to run this through TOR since these days doing anything with monero is more risky than it was a few years ago.</p>
<p>First, you want to install TOR but bear in mind <strong>you should always install TOR through their official ppa</strong>, the reason for this is because the versions in most distro repositories are several versions behind and as such lack security updates, which are critical when running a TOR server of any kind.</p>
<p>Add their PPA to sources:</p>
<figure class="post__image"><img loading="lazy"  src="https://bat.moe/media/posts/10/12.png" alt="torppa" width="439" height="89" sizes="(min-width: 760px) 660px, calc(93.18vw - 30px)" srcset="https://bat.moe/media/posts/10/responsive/12-xs.png 320w ,https://bat.moe/media/posts/10/responsive/12-sm.png 480w ,https://bat.moe/media/posts/10/responsive/12-md.png 768w ,https://bat.moe/media/posts/10/responsive/12-xl.png 1024w"></figure>
<p>Add their gpg key (Bear in mind the long as hell string below changes every once in a while so you may need to go to their website to get it)</p>
<figure class="post__image"><img loading="lazy"  src="https://bat.moe/media/posts/10/13.png" alt="gpgkey" width="589" height="45" sizes="(min-width: 760px) 660px, calc(93.18vw - 30px)" srcset="https://bat.moe/media/posts/10/responsive/13-xs.png 320w ,https://bat.moe/media/posts/10/responsive/13-sm.png 480w ,https://bat.moe/media/posts/10/responsive/13-md.png 768w ,https://bat.moe/media/posts/10/responsive/13-xl.png 1024w"></figure>
<p>Update apt and install tor and the tor keyring</p>
<figure class="post__image"><img loading="lazy"  src="https://bat.moe/media/posts/10/14.png" alt="" width="509" height="372" sizes="(min-width: 760px) 660px, calc(93.18vw - 30px)" srcset="https://bat.moe/media/posts/10/responsive/14-xs.png 320w ,https://bat.moe/media/posts/10/responsive/14-sm.png 480w ,https://bat.moe/media/posts/10/responsive/14-md.png 768w ,https://bat.moe/media/posts/10/responsive/14-xl.png 1024w"></figure>
<p>Afterwards you want to configure a hidden service in torrc, add the following lines.</p>
<p><code>/etc/tor/torrc</code></p>
<figure class="post__image"><img loading="lazy"  src="https://bat.moe/media/posts/10/15.png" alt="torrc" width="367" height="110" sizes="(min-width: 760px) 660px, calc(93.18vw - 30px)" srcset="https://bat.moe/media/posts/10/responsive/15-xs.png 320w ,https://bat.moe/media/posts/10/responsive/15-sm.png 480w ,https://bat.moe/media/posts/10/responsive/15-md.png 768w ,https://bat.moe/media/posts/10/responsive/15-xl.png 1024w"></figure>
<p>Afterwards, restart TOR and check on your new onion link</p>
<figure class="post__image"><img loading="lazy"  src="https://bat.moe/media/posts/10/16.png" alt="TorLink" width="509" height="88" sizes="(min-width: 760px) 660px, calc(93.18vw - 30px)" srcset="https://bat.moe/media/posts/10/responsive/16-xs.png 320w ,https://bat.moe/media/posts/10/responsive/16-sm.png 480w ,https://bat.moe/media/posts/10/responsive/16-md.png 768w ,https://bat.moe/media/posts/10/responsive/16-xl.png 1024w"></figure>
<p>Finally, to run it on your node, add the service link to your node in the monerod.conf file where your node executable is (Create the file if it doesn't exist), then fire up the node again.</p>
<div class="gallery-wrapper"><div class="gallery" data-is-empty="false" data-translation="Add images" data-columns="2">
<figure class="gallery__item"><a href="https://bat.moe/media/posts/10/gallery/17.png" data-size="701x105"><img loading="lazy" src="https://bat.moe/media/posts/10/gallery/17-thumbnail.png" alt="U1.1" width="701" height="105"></a>
<figcaption>Adding tor to the node</figcaption>
</figure>
<figure class="gallery__item"><a href="https://bat.moe/media/posts/10/gallery/18.png" data-size="705x349"><img loading="lazy" src="https://bat.moe/media/posts/10/gallery/18-thumbnail.png" alt="U1.2" width="705" height="349"></a>
<figcaption>Firing up the node again.</figcaption>
</figure>
</div></div>
<h3><span style="color: #3598db;">Step 2: Making a Wallet</span></h3>
<p>Once your node ends syncing next you'll need a<strong> wallet to use for this and ONLY for this</strong>. On P2Pool the addresses are primary, public and all users in the network can see whenever you pull Monero out of the wallet you're using so make sure to avoid using your main wallet to maintain your anonymity. On that note, <span style="text-decoration: underline;"><strong>ONLY MAKE A WALLET WHEN YOU'RE RUNNING YOUR OWN NODE</strong></span>. I'm not kidding with the whole 'malicious node' thing, even if you don't risk having your funds stolen you risk your IP and your wallet address leaking together which can lead to easy identification.</p>
<p>You can create a wallet using the tools you downloaded that came with the daemon but honestly I like the gui wallet, it's very intuitive and just as secure as the command line wallet, not to mention Xorg is already installed so I may as well make use of it. Just download the gui wallet and execute it (Don't execute the AppImage, that format is a bit of a PITA to run these days). You may need to resolve some dependencies.</p>
<div class="gallery-wrapper"><div class="gallery" data-is-empty="false" data-translation="Add images" data-columns="2">
<figure class="gallery__item"><a href="https://bat.moe/media/posts/10/gallery/4.png" data-size="486x163"><img loading="lazy" src="https://bat.moe/media/posts/10/gallery/4-thumbnail.png" alt="2.1" width="486" height="163"></a>
<figcaption>Downloading GUI Wallet</figcaption>
</figure>
<figure class="gallery__item"><a href="https://bat.moe/media/posts/10/gallery/5.png" data-size="1280x720"><img loading="lazy" src="https://bat.moe/media/posts/10/gallery/5-thumbnail.png" alt="2.2" width="768" height="432"></a>
<figcaption>Executing the monero wallet gui</figcaption>
</figure>
</div></div>
<p>After successfully executing the wallet select create a new wallet, the process is very straight forward up until the part where it asks you to connect the wallet to a node (Daemon Settings). Fill the field below the location of the wallet with the localhost (127.0.0.1) and the port your node is currently running on (18080 by default if you didn't specify one) .</p>
<div class="gallery-wrapper"><div class="gallery" data-is-empty="false" data-translation="Add images" data-columns="3">
<figure class="gallery__item"><a href="https://bat.moe/media/posts/10/gallery/6.png" data-size="700x720"><img loading="lazy" src="https://bat.moe/media/posts/10/gallery/6-thumbnail.png" alt="2.3" width="700" height="720"></a>
<figcaption>Creating a new wallet</figcaption>
</figure>
<figure class="gallery__item"><a href="https://bat.moe/media/posts/10/gallery/7.png" data-size="703x718"><img loading="lazy" src="https://bat.moe/media/posts/10/gallery/7-thumbnail.png" alt="2.4" width="703" height="718"></a>
<figcaption>Selecting the localhostrunning the node</figcaption>
</figure>
</div></div>
<p>Afterwards head to account and copy the address of your primary wallet (Wallet 0). Please bear in mind no other address will work with p2pool, so don't even bother making more addresses your payouts will just be rejected.</p>
<figure class="post__image"><img loading="lazy"  src="https://bat.moe/media/posts/10/8.png" alt="primary-address" width="702" height="719" sizes="(min-width: 760px) 660px, calc(93.18vw - 30px)" srcset="https://bat.moe/media/posts/10/responsive/8-xs.png 320w ,https://bat.moe/media/posts/10/responsive/8-sm.png 480w ,https://bat.moe/media/posts/10/responsive/8-md.png 768w ,https://bat.moe/media/posts/10/responsive/8-xl.png 1024w"></figure>
<p>Keep the wallet address and all information related to it safe, you can now move to the next step.</p>
<h3><span style="color: #3598db;">Step 3: Installing and running p2pool</span></h3>
<p>Stop your node, then fire it up again with the following arguments:</p>
<pre><code> ./monerod --zmq-pub tcp://127.0.0.1:18083 --out-peers 32 --in-peers 64 --add-priority-node=p2pmd.xmrvsbeast.com:18080 --add-priority-node=nodes.hashvault.pro:18080 --enforce-dns-checkpointing --enable-dns-blocklist</code></pre>
<p>While that is synchronising again I recommend you download and extract the latest release of P2Pool.</p>
<figure class="post__image"><img loading="lazy"  src="https://bat.moe/media/posts/10/9-2.png" alt="downloadingp2pool" width="1280" height="720" sizes="(min-width: 760px) 660px, calc(93.18vw - 30px)" srcset="https://bat.moe/media/posts/10/responsive/9-2-xs.png 320w ,https://bat.moe/media/posts/10/responsive/9-2-sm.png 480w ,https://bat.moe/media/posts/10/responsive/9-2-md.png 768w ,https://bat.moe/media/posts/10/responsive/9-2-xl.png 1024w"></figure>
<p>When the node finishes synchronising again, it's time to start up P2Pool, run one of the folowing commands depending on your scenario (It will connect you to different chains):</p>
<table style="border-collapse: collapse; width: 100%;" border="1">
<tbody>
<tr>
<td style="width: 33.2563%;">Command</td>
<td style="width: 66.7437%;">Scenario</td>
</tr>
<tr>
<td style="width: 33.2563%;">./p2pool --host 127.0.0.1 --wallet &lt;Your wallet address here&gt;</td>
<td style="width: 66.7437%;">
<p>You're chad Mr fancy pants and you have a datacenter with the latest enterprise-grade CPU's at your disposal for mining.</p>
<p>Serious talk here don't fire p2pool without chain arguments, the ~50 top miners that use this chain are impossible to compete with and you will get no rewards. </p>
</td>
</tr>
<tr>
<td style="width: 33.2563%;">./p2pool --host 127.0.0.1 --mini --wallet &lt;Your wallet address here&gt;</td>
<td style="width: 66.7437%;">
<p>--mini:</p>
<p>You have a CPU that came out recently or you're planning on mining with several old PC's, payouts happen almost daily.</p>
</td>
</tr>
<tr>
<td style="width: 33.2563%;">./p2pool --host 127.0.0.1 --nano --wallet &lt;Your wallet address here&gt;</td>
<td style="width: 66.7437%;">
<p>--nano:</p>
<p>You have a single old PC or Mini PC that you intend to run 24/7 and are just playing around because hey you gotta keep that toaster running anyways, may as well try your luck right? </p>
<p>Payouts are inconsistent, there are many miners but you may get a small payout weekly.</p>
</td>
</tr>
</tbody>
</table>
<p>Let P2Pool synchronize (It can take a few hours again)</p>
<figure class="post__image"><img loading="lazy"  src="https://bat.moe/media/posts/10/10.png" alt="p2pool-synchronized" width="1280" height="720" sizes="(min-width: 760px) 660px, calc(93.18vw - 30px)" srcset="https://bat.moe/media/posts/10/responsive/10-xs.png 320w ,https://bat.moe/media/posts/10/responsive/10-sm.png 480w ,https://bat.moe/media/posts/10/responsive/10-md.png 768w ,https://bat.moe/media/posts/10/responsive/10-xl.png 1024w"></figure>
<p>Never stop running the node and with both services still running proceed to the next step.</p>
<h3><span style="color: #3598db;">Step 4: Mine with p2pool active</span></h3>
<p>You're almost done,  with the node and p2pool running download decompress and execute xmrig with the next argument: <em>./xmrig -o 127.0.0.1:3333 . </em>The end result should look something like this:</p>
<figure class="post__image"><img loading="lazy"  src="https://bat.moe/media/posts/10/11.png" alt="p2pool" width="1280" height="720" sizes="(min-width: 760px) 660px, calc(93.18vw - 30px)" srcset="https://bat.moe/media/posts/10/responsive/11-xs.png 320w ,https://bat.moe/media/posts/10/responsive/11-sm.png 480w ,https://bat.moe/media/posts/10/responsive/11-md.png 768w ,https://bat.moe/media/posts/10/responsive/11-xl.png 1024w"></figure><br><br>Run it for a couple of hours, if you notice there's a noticeable delay between getting new jobs and accepting them (Or not getting any new jobs at all) Adjust the difficulty altering the '10000' number until you're constantly getting and accepting jobs. Also do this if you feel mining is pushing your computer too hard and it may crash.</p>
<p><code>./xmrig -u x+100000 -o 127.0.0.1:3333</code></p>
<p>You want for your system to accept jobs every 30 seconds or so, so don't be afraid to crank that number up in increments or decrements of 10,000 until you hit a sweet spot (As a general rule multiply your hashrate by about 30 and decrease the strength by 10,000 until you get a job accepted every 30 seconds or so). You may also want to run</p>
<p><code>xmrig with sudo and enable huge pages with sysctl -w vm.nr_hugepages=1280</code></p>
<p class="align-center">(See the addendum of Nvidia for a better example of running this with enhancements and how to make the huge pages change more permanent)</p>
<p>After that's done you're done, you can now relax and leave this running in the background for hours/days/whatever, just check on it sporadically, if you earn anything it will be sent to your wallet immediately but it may take a few days to a week to clear.</p>
<h3><span style="color: #3598db;">Addendum 1:  Running this on multiple computers in the same network for a bigger hash rate</span></h3>
<p>I think this is rather obvious but in order to run this on multiple computers all you have to do is start p2pool with the same wallet address on all computers you're using to mine, this will let the network know your hashrate is the combined result of all your computers instead of just one.</p>
<p>You can also setup xmrig and point it to the address of your p2pool side-chain, even remotely (This is how I believe the miners on the main p2pool chain have achieved their insane hashrates by hijacking computers and just pointing in the direction of a server they pay for, you can see an example on the Nvidia addendum). </p>
<h3><span style="color: #3598db;">Addendum 2:  Don't use a mechanical hard drive</span></h3>
<p>This didn't register with my dumbass the second time I did this and I spent an entire day synchronizing my node again.  Basically since the price of SSD's is terrible at the moment I'm trying to save the ones I have and using HDD's where I can, but that was a mistake for this particular project.</p>
<p>Under normal circumstances mining monero on a mechanical hard drive has very little impact in performance, however this changes when you have to mine while running your node, the system struggles to keep up with the blockchain while also managing the OS and everything else, causing you to lose performance or even worse, to stutter.</p>
<p>Use an SSD, even if it's a cheap one.</p>
<h3><span style="color: #3598db;">Addendum 3:  Running Xmrig Cuda-plugin on Linux </span></h3>
<p>I legitimately couldn't find information on this anywhere online and that's because under normal circumstances this is kind of dumb? Monero uses RandomX for the main algorithm and it uses threads in order to mine, which for a GPU means a single thread and therefore you're kind of wasting electricity for very little payoff. However as I have shown in other articles  I have an RTX 1000 which only pulls 50w from the socket so it's not that big of a deal and it is better than running a second smaller PC for me.</p>
<p>I'll take it slower than usual and step-by-step due to the lack of info on this subject.</p>
<p>Here are a few things to know:</p>
<ol>
<li>You need a 6GB+ VRAM GPU, I tested this both on my Tesla P40 and my RTX 1000 and in both it went a bit over 4GB of VRAM while mining. Oddly enough it never went over 5GB on either card, so I'd recommend looking for a 6GB+ card that's <strong>very</strong> power efficient rather than powerful like my T1000. The P40 pulled 150W if you're curious.</li>
<li><strong>You NEED to install a Cuda toolkit from Nvidia with a version lower than 12.9</strong>, otherwise this will not work, I believe this is due to the devs of Monero abandoning this plugin a year ago. <strong>You can mix-and-match a Nvidia Toolkit version and a different driver version </strong>(This addendum is indeed an example of that), you only need the Nvidia toolkit in order to compile the plugin since the devs of Xmrig don't compile binaries in order to avoid people filling pull requests and because unlike their main miner they don't really profit from it.  See an example of what happens if you install a driver without a toolkit below.</li>
<li>Use Ubuntu Noble (Or a version of Linux Mint derived from it like I did, I used version 22.3), This is optional but Debian Trixie kept failing me when trying to mix-and-match drivers, I ended up resorting to Mint which handled everything without a fuss.</li>
</ol>
<figure class="post__image"><img loading="lazy" src="https://bat.moe/media/posts/10/A3-1.png" alt="driverinstallednotoolkit" width="801" height="458" sizes="(min-width: 760px) 660px, calc(93.18vw - 30px)" srcset="https://bat.moe/media/posts/10/responsive/A3-1-xs.png 320w ,https://bat.moe/media/posts/10/responsive/A3-1-sm.png 480w ,https://bat.moe/media/posts/10/responsive/A3-1-md.png 768w ,https://bat.moe/media/posts/10/responsive/A3-1-xl.png 1024w">
<figcaption>Example of compilation failure if you have the Nvidia drivers installed but you didn't previously install the toolkit</figcaption>
</figure>
<p>First you need to install the dependencies, honestly there aren't that many, you just need the linux headers, build-essential and cmake.</p>
<figure class="post__image"><img loading="lazy" src="https://bat.moe/media/posts/10/A3-2.png" alt="dependencies" width="439" height="117" sizes="(min-width: 760px) 660px, calc(93.18vw - 30px)" srcset="https://bat.moe/media/posts/10/responsive/A3-2-xs.png 320w ,https://bat.moe/media/posts/10/responsive/A3-2-sm.png 480w ,https://bat.moe/media/posts/10/responsive/A3-2-md.png 768w ,https://bat.moe/media/posts/10/responsive/A3-2-xl.png 1024w">
<figcaption>Installing dependencies</figcaption>
</figure>
<p>After that's done you need to install the CUDA Toolkit according to Nvidia's website, the toolkit that worked flawlessly for me was 12.6 (Version 12.9 gave me the above toolkit error), this toolkit worked for both my Tesla P40 and my T1000. Here are the commands by Nvidia to install it on Ubuntu 24.04:</p>
<p><code>$ wget https://developer.download.nvidia.com/compute/cuda/repos/ubuntu2404/x86_64/cuda-ubuntu2404.pin</code><br><code>$ sudo mv cuda-ubuntu2404.pin /etc/apt/preferences.d/cuda-repository-pin-600</code><br><code>$ wget https://developer.download.nvidia.com/compute/cuda/12.6.0/local_installers/cuda-repo-ubuntu2404-12-6-local_12.6.0-560.28.03-1_amd64.deb</code><br><code>$ sudo dpkg -i cuda-repo-ubuntu2404-12-6-local_12.6.0-560.28.03-1_amd64.deb</code><br><code>$ sudo cp /var/cuda-repo-ubuntu2404-12-6-local/cuda-*-keyring.gpg /usr/share/keyrings/</code><br><code>$ sudo apt-get update</code><br><code>$ sudo apt-get -y install cuda-toolkit-12-6</code></p>
<figure class="post__image"><img loading="lazy" src="https://bat.moe/media/posts/10/A3-3.png" alt="installingtoolkit" width="908" height="560" sizes="(min-width: 760px) 660px, calc(93.18vw - 30px)" srcset="https://bat.moe/media/posts/10/responsive/A3-3-xs.png 320w ,https://bat.moe/media/posts/10/responsive/A3-3-sm.png 480w ,https://bat.moe/media/posts/10/responsive/A3-3-md.png 768w ,https://bat.moe/media/posts/10/responsive/A3-3-xl.png 1024w">
<figcaption>installing toolkit</figcaption>
</figure>
<p>Once you're done you have to install an nvidia driver, for my P40 the 560 drivers worked flawlessly but my T1000 rejected them, forcing me to mix-and match using the Mint driver manager (Below you can see the failed installation of the 560 drivers and success at installing the 580 open drivers). Afterwards, just reboot and verify the nvidia driver is installed and in use using lspci -knn and nvidia-settings.</p>
<div class="gallery-wrapper"><div class="gallery" data-is-empty="false" data-translation="Add images" data-columns="3">
<figure class="gallery__item"><a href="https://bat.moe/media/posts/10/gallery/A3-4png-2.png" data-size="1280x720"><img loading="lazy" src="https://bat.moe/media/posts/10/gallery/A3-4png-2-thumbnail.png" alt="A3-1" width="768" height="432"></a>
<figcaption>Installing the Nvidia driver via Linux Mint's driver utility</figcaption>
</figure>
<figure class="gallery__item"><a href="https://bat.moe/media/posts/10/gallery/A3-5.png" data-size="882x392"><img loading="lazy" src="https://bat.moe/media/posts/10/gallery/A3-5-thumbnail.png" alt="A3-2" width="768" height="341"></a>
<figcaption>Nvidia Kernel in use</figcaption>
</figure>
<figure class="gallery__item"><a href="https://bat.moe/media/posts/10/gallery/A3-6.png" data-size="988x478"><img loading="lazy" src="https://bat.moe/media/posts/10/gallery/A3-6-thumbnail.png" alt="A-3" width="768" height="372"></a>
<figcaption>Nvidia-settings displays the correct info</figcaption>
</figure>
</div></div>
<p>Once this is done, download and extract the latest versions of Xmrig and the Cuda plugin.</p>
<figure class="post__image"><img loading="lazy" src="https://bat.moe/media/posts/10/A3-7.png" alt="downloadingandextracting" width="1269" height="562" sizes="(min-width: 760px) 660px, calc(93.18vw - 30px)" srcset="https://bat.moe/media/posts/10/responsive/A3-7-xs.png 320w ,https://bat.moe/media/posts/10/responsive/A3-7-sm.png 480w ,https://bat.moe/media/posts/10/responsive/A3-7-md.png 768w ,https://bat.moe/media/posts/10/responsive/A3-7-xl.png 1024w">
<figcaption>Downloading and extracting XMrig and the Plugin</figcaption>
</figure>
<p>Afterwards open the cuda directory and make a directory called 'build', open it. Run cmake .. and if you don't get any errors run 'cmake --build .' DO NOT USE 'make', it will fail and do mind the dot in the build command. You may get a lot of warnings on both parts of the process but as long as you don't get an error and you get an executable called 'libxmrig-cuda.so' then there are no problems. Move the executable to the xmrig folder.</p>
<p> </p>
<div class="gallery-wrapper"><div class="gallery" data-is-empty="false" data-translation="Add images" data-columns="2">
<figure class="gallery__item"><a href="https://bat.moe/media/posts/10/gallery/A3-8.png" data-size="967x427"><img loading="lazy" src="https://bat.moe/media/posts/10/gallery/A3-8-thumbnail.png" alt="A3-4" width="768" height="339"></a>
<figcaption>Running the cmake commands for compilation</figcaption>
</figure>
<figure class="gallery__item"><a href="https://bat.moe/media/posts/10/gallery/A3-9-2.png" data-size="741x610"><img loading="lazy" src="https://bat.moe/media/posts/10/gallery/A3-9-2-thumbnail.png" alt="A3-5" width="741" height="610"></a>
<figcaption>Executable compiled and moved to the xmrig folder, do note the many warnings.</figcaption>
</figure>
</div></div>
<p>Afterwards move to the xmrig folder, you'll only find 3 aside from the cuda plugin here files here, the executable, a shasum and a config file, open up the config file in any text editor and change the cuda value to 'true' and the path of the cuda plugin (It must be the full path and don't leave it like 'null', it works fine if you leave it as 'null' on windows but it always failed me on Linux). </p>
<figure class="post__image"><img loading="lazy" src="https://bat.moe/media/posts/10/A3-10.png" alt="editconfig" width="769" height="597" sizes="(min-width: 760px) 660px, calc(93.18vw - 30px)" srcset="https://bat.moe/media/posts/10/responsive/A3-10-xs.png 320w ,https://bat.moe/media/posts/10/responsive/A3-10-sm.png 480w ,https://bat.moe/media/posts/10/responsive/A3-10-md.png 768w ,https://bat.moe/media/posts/10/responsive/A3-10-xl.png 1024w">
<figcaption>Editing config.json and changing the values to true and the path to the cuda plugin executable</figcaption>
</figure>
<p>Afterwards all that's left is running xmrig, remember to enable huge pages and running it as sudo if possible, this is optional but it does have huge performance boosts. In this example I connected to the p2pool node on my intranet which was 192.168.1.130 on the port 3333. Remember to add the --cuda flag, otherwise xmrig will ignore it.</p>
<figure class="post__image"><img loading="lazy" src="https://bat.moe/media/posts/10/A3-11.png" alt="Executingxmrig" width="769" height="461" sizes="(min-width: 760px) 660px, calc(93.18vw - 30px)" srcset="https://bat.moe/media/posts/10/responsive/A3-11-xs.png 320w ,https://bat.moe/media/posts/10/responsive/A3-11-sm.png 480w ,https://bat.moe/media/posts/10/responsive/A3-11-md.png 768w ,https://bat.moe/media/posts/10/responsive/A3-11-xl.png 1024w">
<figcaption>Enabling huge pages, running xmrig with the cuda flag</figcaption>
</figure>
<p>Afterwards it all comes down to monitoring, check if CUDA does send some shares every once in a while and I also like to run nvidia-smi -l 1 on a different terminal to check if the GPU is being used. Don't mind the power not being shown below, that's just a quirk of the T1000 but it cannot go over 50w anyways.</p>
<div class="gallery-wrapper"><div class="gallery" data-is-empty="false" data-translation="Add images" data-columns="2">
<figure class="gallery__item"><a href="https://bat.moe/media/posts/10/gallery/A3-12.png" data-size="700x623"><img loading="lazy" src="https://bat.moe/media/posts/10/gallery/A3-12-thumbnail.png" alt="A3-6" width="700" height="623"></a>
<figcaption>GPU accepting jobs</figcaption>
</figure>
<figure class="gallery__item"><a href="https://bat.moe/media/posts/10/gallery/A3-13.png" data-size="503x245"><img loading="lazy" src="https://bat.moe/media/posts/10/gallery/A3-13-thumbnail.png" alt="A3-7" width="503" height="245"></a>
<figcaption>nvidia-smi reporting that CUDA is actually being used to mine</figcaption>
</figure>
</div></div>
<h3><figure class="post__image"><img loading="lazy"  src="file:///C:/Users/Admin/Documents/Publii/sites/the-bat-blog-of-the-batlog/input/media/posts/16/logowhite.png" alt="" width="200" height="200" sizes="(min-width: 760px) 660px, calc(93.18vw - 30px)" srcset="file:///C:/Users/Admin/Documents/Publii/sites/the-bat-blog-of-the-batlog/input/media/posts/16/responsive/logowhite-xs.png 320w ,file:///C:/Users/Admin/Documents/Publii/sites/the-bat-blog-of-the-batlog/input/media/posts/16/responsive/logowhite-sm.png 480w ,file:///C:/Users/Admin/Documents/Publii/sites/the-bat-blog-of-the-batlog/input/media/posts/16/responsive/logowhite-md.png 768w ,file:///C:/Users/Admin/Documents/Publii/sites/the-bat-blog-of-the-batlog/input/media/posts/16/responsive/logowhite-xl.png 1024w"></figure> <span style="color: #ecf0f1;"> <a href="https://bat.moe/about-me.html" style="color: #ecf0f1;">-Batlog</a></span></h3>
<p> </p>
<p> </p>
<hr>
<pre>If you enjoyed this article or if i</pre>
<p> </p>
<pre>t was of any use to you, please consider donating some crypto. All funds go towards paying for the hosting.<br><br>Monero/XMR:<br>88MC6ksaVyLbtH9fT4owLSPX16vYD9cf6YELmXjaNWWd71R6iwfFV6DJtp7BXR5c6vWnxLEEGyu1tfwXwTqDM1CUCqDGeRY<br><br>Bitcoin/BTC: <br>bc1qzw9g97ffhllwukhagkvn5g0u9d8rhjv86xhf8h<br><br>Ethereum/ETH:<br>0xf948ab59E492865Fb5200A97F0F4F2f31F7b443f<br><br>Litecoin/LTC:<br>ltc1qqfv05jpyh8yvzyetmf7n5ve500jl656yxpc8y4<br><br>Doge:<br>DT5iG6GxoyZtHSSmaZHHV63NpEoH5yuixg</pre>
            ]]>
        </content>
    </entry>
    <entry>
        <title>Making FMV cutscenes in Smile Game Builder</title>
        <author>
            <name>Batlog</name>
        </author>
        <link href="https://bat.moe/making-fmv-cutscenes-in-sgb.html"/>
        <id>https://bat.moe/making-fmv-cutscenes-in-sgb.html</id>
        <media:content url="https://bat.moe/media/posts/9/sfbfmv.png" medium="image" />
            <category term="GameDev"/>

        <updated>2026-06-12T13:59:00-06:00</updated>
            <summary type="html">
                <![CDATA[
                        <img src="https://bat.moe/media/posts/9/sfbfmv.png" alt="" />
                    Smile Game Builder is a curious case of a game engine that&hellip;
                ]]>
            </summary>
        <content type="html">
            <![CDATA[
                    <p><img src="https://bat.moe/media/posts/9/sfbfmv.png" class="type:primaryImage" alt="" /></p>
                <p>Smile Game Builder is a curious case of a game engine that I really like but I feel was heavily held back by the developer in charge of it. As of June 2026 The project has been more-or-less abandoned by the developers and to be honest I don't think many people would look into getting it or the immediate substitute the developers placed down for it (RPG Developer Bakin) simply because it lacks on features that RPG in a Box has (Even more so now that indie game devs are moving towards offering their games on Linux due to the small market of SteamOS while some developers continue to drag their heels and offer Windows-only engines).</p>
<p>SGB does have a couple of tricks up its' sleeve though, but I feel since the community is so small and isolated from... everything, more often than not not that knowledge is lost. So, today I want to document what I believe to be a very simple secret shared between a few, how to get SGB to play fully animated video cut-scenes.</p>
<h3><span style="color: #3598db;">What is/was Smile Game Builder?</span></h3>
<p>Smile Game BUilder is/was (I have no idea anymore) a game engine for 3D RPGs that is notable due to how easy to use it is, most of the time all you have to do is drop blocks or objects into the map and everything just works.</p>
<p>I feel the reason why it wasn't an immediate hit however (And neither is its' successor Bakin) is because it has some serious limitations. For starters using pre-made assets or 2D sprites (Which get pleaced in the world Xenogears-style) or even blocks for maps (Which only require the texture of a cube) is easy. But getting custom 3D characters in the game? That's a legitimate pain, you need to have a model with very specific parameters and the animation for it has to be a completely separate file, it's just a mess.</p>
<p>The battle system is also severely lacking and cannot be customised, which leads to the development of very.... simple games, it's weird the games are fully 3D but most of the time they feel like generic RPG Maker games due to the limitations they have built into them.</p>
<p>There's also the lack of export for systems other than Windows but that is neither here or there, I know some people successfully pulled off exporting their games using third party tools usually developed by themselves so it's not that big of a deal [...]</p>
<p>[... Here was a rather long review/rant that is irrelevant to this article and I therefore deleted]</p>
<h3><span style="color: #3598db;">How to get the engine to play video cutscenes</span></h3>
<p>Anyways, the whole trick to getting this done is by using the browser function. </p>
<p>It's honestly very easy to do, first you add an object to the overworld and turn it into an advanced event.</p>
<div class="gallery-wrapper"><div class="gallery" data-is-empty="false" data-translation="Add images" data-columns="2">
<figure class="gallery__item"><a href="https://bat.moe/media/posts/9/gallery/1.png" data-size="1097x657"><img loading="lazy" src="https://bat.moe/media/posts/9/gallery/1-thumbnail.png" alt="1.1" width="768" height="460"></a>
<figcaption>Adding an object</figcaption>
</figure>
<figure class="gallery__item"><a href="https://bat.moe/media/posts/9/gallery/2.png" data-size="1144x667"><img loading="lazy" src="https://bat.moe/media/posts/9/gallery/2-thumbnail.png" alt="1.2" width="768" height="448"></a>
<figcaption>Turning the Object into an advanced event</figcaption>
</figure>
</div></div>
<p>Now edit the event manually and add a "Display Web Browser" event, then, instead of having it show an url point it to a local file. If you point it towards a video file it will fail immediately though, it will either display a downloand or outright crash.</p>
<div class="gallery-wrapper"><div class="gallery" data-is-empty="false" data-translation="Add images" data-columns="3">
<figure class="gallery__item"><a href="https://bat.moe/media/posts/9/gallery/2.5.png" data-size="1143x667"><img loading="lazy" src="https://bat.moe/media/posts/9/gallery/2.5-thumbnail.png" alt="1.3" width="768" height="448"></a>
<figcaption>Picking Display Browser</figcaption>
</figure>
<figure class="gallery__item"><a href="https://bat.moe/media/posts/9/gallery/3.png" data-size="1146x663"><img loading="lazy" src="https://bat.moe/media/posts/9/gallery/3-thumbnail.png" alt="1.4" width="768" height="444"></a>
<figcaption>Pointing to a local video file</figcaption>
</figure>
<figure class="gallery__item"><a href="https://bat.moe/media/posts/9/gallery/4.png" data-size="1147x669"><img loading="lazy" src="https://bat.moe/media/posts/9/gallery/4-thumbnail.png" alt="1.5" width="768" height="448"></a>
<figcaption>Video file fails to load</figcaption>
</figure>
</div></div>
<p>Therefore what you need is a local website.</p>
<p><span style="color: #3598db; font-family: -apple-system, BlinkMacSystemFont, 'Segoe UI', Roboto, Oxygen, Ubuntu, Cantarell, 'Fira Sans', 'Droid Sans', 'Helvetica Neue', sans-serif; font-size: 1.42383em; font-weight: bold; letter-spacing: -0.54px;">Creating an html with a player</span></p>
<p>Instead of having the game pointing to a video file, have it pointing to an html file like this:</p>
<div>
<div><figure class="post__image"><img loading="lazy"  src="https://bat.moe/media/posts/9/5.png" alt="localhtml" width="1260" height="727" sizes="(min-width: 760px) 660px, calc(93.18vw - 30px)" srcset="https://bat.moe/media/posts/9/responsive/5-xs.png 320w ,https://bat.moe/media/posts/9/responsive/5-sm.png 480w ,https://bat.moe/media/posts/9/responsive/5-md.png 768w ,https://bat.moe/media/posts/9/responsive/5-xl.png 1024w"></figure></div>
<div> </div>
<div> </div>
<div>What does the source.html file contain? After a few iterations the shortest and most efficient code I came up with was this:</div>
<div> </div>
<div> </div>
<div><code>File: source.html</code></div>
<div> </div>
<div><code>&lt;html&gt;</code></div>
<div> </div>
<div><code>&lt;head&gt;</code></div>
<div> </div>
<div><code>&lt;style&gt;</code></div>
<div><code>.fullscreen-bg {</code></div>
<div><code>  position: fixed;</code></div>
<div><code>  top: 0;</code></div>
<div><code>  left: 0;</code></div>
<div><code>  width: 100vw;  </code></div>
<div><code>  height: 100vh;  </code></div>
<div><code>  object-fit: cover; </code></div>
<div><code>  z-index: -1;    </code></div>
<div><code>}</code></div>
<div> </div>
<div><code>&lt;/style&gt;</code></div>
<div><code>&lt;/head&gt;</code></div>
<div> </div>
<div><code>&lt;body&gt;</code></div>
<div> </div>
<div><code>&lt;video class="fullscreen-bg" autoplay muted loop playsinline controls&gt;</code></div>
<div><code>  &lt;source src="movie.mp4" type="video/mp4"&gt;</code></div>
<div><code>&lt;/video&gt;</code></div>
<div><code>&lt;/body&gt;</code></div>
<div> </div>
<div><code>&lt;/html&gt;</code></div>
</div>
<div> </div>
<div>All it needs is for the video to be in the same directory as the html file. This will allow not only for the video to load but will also give users video controls and if the players desire to watch the video full-screen, it will resize with the frame.</div>
<div> </div>
<div>
<div class="gallery-wrapper"><div class="gallery" data-is-empty="false" data-translation="Add images" data-columns="2">
<figure class="gallery__item"><a href="https://bat.moe/media/posts/9/gallery/6.png" data-size="846x477"><img loading="lazy" src="https://bat.moe/media/posts/9/gallery/6-thumbnail.png" alt="2.1" width="768" height="433"></a>
<figcaption>Video with controls</figcaption>
</figure>
<figure class="gallery__item"><a href="https://bat.moe/media/posts/9/gallery/7.png" data-size="1253x686"><img loading="lazy" src="https://bat.moe/media/posts/9/gallery/7-thumbnail.png" alt="2.2" width="768" height="420"></a>
<figcaption>Video resizing with frame</figcaption>
</figure>
</div></div>
</div>
<div> </div>
<div> </div>
<div> </div>
<div>It's very important you use the video class and not iframe, otherwise this will not work, it may work for you but for other users it may cause the video to pop up as a download as shown in the failure above.</div>
<div> </div>
<div>When packaging the game make sure to use an installer that handles placing all of the project files in a non-user directory (E.g. C\Program Files\My game) as otherwise the path will break and there really is no solution for it due to how limited the engine is.</div>
<div> </div>
<h3><span style="color: #3598db;">Other applications?</span></h3>
<div> </div>
<div>Honestly since it's a browser function there's a lot of things that you can do with this, and idea I saw was using it for books in a library and another one for games in an arcade, just keep in mind whatever you do will be completely isolated to the game and the game has no method of reacting to whatever you do in the browser due to how limited it is.</div>
<div> </div>
<div>Above all though, always remember to have fun.</div>
<div> </div>
<div> </div>
<div> </div>
<div>
<p> </p>
<h3><figure class="post__image"><img loading="lazy"  src="file:///C:/Users/Admin/Documents/Publii/sites/the-bat-blog-of-the-batlog/input/media/posts/16/logowhite.png" alt="" width="200" height="200" sizes="(min-width: 760px) 660px, calc(93.18vw - 30px)" srcset="file:///C:/Users/Admin/Documents/Publii/sites/the-bat-blog-of-the-batlog/input/media/posts/16/responsive/logowhite-xs.png 320w ,file:///C:/Users/Admin/Documents/Publii/sites/the-bat-blog-of-the-batlog/input/media/posts/16/responsive/logowhite-sm.png 480w ,file:///C:/Users/Admin/Documents/Publii/sites/the-bat-blog-of-the-batlog/input/media/posts/16/responsive/logowhite-md.png 768w ,file:///C:/Users/Admin/Documents/Publii/sites/the-bat-blog-of-the-batlog/input/media/posts/16/responsive/logowhite-xl.png 1024w"></figure> <span style="color: #ecf0f1;"> <a href="https://bat.moe/about-me.html" style="color: #ecf0f1;">-Batlog</a></span></h3>
<p> </p>
<p> </p>
<hr>
<pre>If you enjoyed this article or if it was of any use to you, please consider donating some crypto. All funds go towards paying for the hosting.<br><br>Monero/XMR:<br>88MC6ksaVyLbtH9fT4owLSPX16vYD9cf6YELmXjaNWWd71R6iwfFV6DJtp7BXR5c6vWnxLEEGyu1tfwXwTqDM1CUCqDGeRY<br><br>Bitcoin/BTC: <br>bc1qzw9g97ffhllwukhagkvn5g0u9d8rhjv86xhf8h<br><br>Ethereum/ETH:<br>0xf948ab59E492865Fb5200A97F0F4F2f31F7b443f<br><br>Litecoin/LTC:<br>ltc1qqfv05jpyh8yvzyetmf7n5ve500jl656yxpc8y4<br><br>Doge:<br>DT5iG6GxoyZtHSSmaZHHV63NpEoH5yuixg</pre>
</div>
<div> </div>
            ]]>
        </content>
    </entry>
    <entry>
        <title>Using a Whonix gateway to anonymize all traffic of a VM through TOR</title>
        <author>
            <name>Batlog</name>
        </author>
        <link href="https://bat.moe/using-a-whonix-gateway-to-anomize-all-vm-traffic-through-tor.html"/>
        <id>https://bat.moe/using-a-whonix-gateway-to-anomize-all-vm-traffic-through-tor.html</id>
        <media:content url="https://bat.moe/media/posts/8/whonixgatewaybg.png" medium="image" />
            <category term="Virtualization"/>
            <category term="Privacy"/>
            <category term="Linux"/>

        <updated>2026-06-10T13:56:00-06:00</updated>
            <summary type="html">
                <![CDATA[
                        <img src="https://bat.moe/media/posts/8/whonixgatewaybg.png" alt="" />
                    In this guide I'm gonna do something the Whonix Community™ would look&hellip;
                ]]>
            </summary>
        <content type="html">
            <![CDATA[
                    <p><img src="https://bat.moe/media/posts/8/whonixgatewaybg.png" class="type:primaryImage" alt="" /></p>
                <p>In this guide I'm gonna do something the Whonix Community<strong class="Yjhzub" data-sfc-root="ep" data-sfc-cb="" data-copy-service-computed-style="font-family: Google Sans, Arial, sans-serif; font-size: 16px; font-weight: 600; margin: 0px; text-decoration: none; border-bottom: 0px rgb(10, 10, 10);">™</strong> would look heavily down on and wag their finger but honestly who gives a shit they're redditors anyways.</p>
<p>Basically what I'm gonna do is make a normal Virtual machine and connect it to a Whonix Gateway in order to anonymize all internet traffic that goes through it, I've added an addendum near the bottom as to why someone may want to do this.</p>
<h3><span style="color: #3598db;">Step 1: Installing Whonix</span></h3>
<p>I would skip this step but hot damn all guides I've read on this subject matter (<strong>INCLUDING THE OFFICIAL GUIDE</strong>) are full of useless fluff that doesn't really add anything?. Getting Whonix installed is not that hard or impressive guys, seriously.</p>
<p>The first hurdle is... downloading the qcow images from the official website (Seriously, this took forever, why even throttle the download at 300 KBPS, what if someone is on a life or death situation, whatever, just download it).</p>
<figure class="post__image"><img loading="lazy"  src="https://bat.moe/media/posts/8/1.png" alt="It took 3 and a half hours" width="1072" height="254" sizes="(min-width: 760px) 660px, calc(93.18vw - 30px)" srcset="https://bat.moe/media/posts/8/responsive/1-xs.png 320w ,https://bat.moe/media/posts/8/responsive/1-sm.png 480w ,https://bat.moe/media/posts/8/responsive/1-md.png 768w ,https://bat.moe/media/posts/8/responsive/1-xl.png 1024w"></figure>
<p>Then just...</p>
<p>Extract it</p>
<figure class="post__image"><img loading="lazy"  src="https://bat.moe/media/posts/8/2.png" alt="" width="763" height="308" sizes="(min-width: 760px) 660px, calc(93.18vw - 30px)" srcset="https://bat.moe/media/posts/8/responsive/2-xs.png 320w ,https://bat.moe/media/posts/8/responsive/2-sm.png 480w ,https://bat.moe/media/posts/8/responsive/2-md.png 768w ,https://bat.moe/media/posts/8/responsive/2-xl.png 1024w"></figure>
<p>Import the configuration files and move the qcow2 files wheile you're on the same directory.</p>
<div class="gallery-wrapper"><div class="gallery" data-is-empty="false" data-translation="Add images" data-columns="2">
<figure class="gallery__item"><a href="https://bat.moe/media/posts/8/gallery/3.png" data-size="626x390"><img loading="lazy" src="https://bat.moe/media/posts/8/gallery/3-thumbnail.png" alt="" width="626" height="390"></a>
<figcaption>commands to Import xml config files to the system</figcaption>
</figure>
<figure class="gallery__item"><a href="https://bat.moe/media/posts/8/gallery/4.png" data-size="1163x292"><img loading="lazy" src="https://bat.moe/media/posts/8/gallery/4-thumbnail.png" alt="" width="768" height="193"></a>
<figcaption>Moving qcow files</figcaption>
</figure>
</div></div>
<p>....And that's it, Whonix is now installed (Jesus Christ why does everyone make such a big fuss of this).</p>
<p>After that I just entered the reduced the memory of the gateway to 512 MB in order to force it into terminal mode, upgraded the gateway using the sysmaint user and the upgrade-nonroot command and just checked the workstation was working as intended.</p>
<div class="gallery-wrapper"><div class="gallery" data-is-empty="false" data-translation="Add images" data-columns="3">
<figure class="gallery__item"><a href="https://bat.moe/media/posts/8/gallery/4.5.png" data-size="850x564"><img loading="lazy" src="https://bat.moe/media/posts/8/gallery/4.5-thumbnail.png" alt="1.1" width="768" height="510"></a>
<figcaption>Reducing ram of the gateway</figcaption>
</figure>
<figure class="gallery__item"><a href="https://bat.moe/media/posts/8/gallery/5.png" data-size="852x103"><img loading="lazy" src="https://bat.moe/media/posts/8/gallery/5-thumbnail.png" alt="1.2" width="768" height="93"></a>
<figcaption>Upgrading the Gateway</figcaption>
</figure>
<figure class="gallery__item"><a href="https://bat.moe/media/posts/8/gallery/6.png" data-size="992x531"><img loading="lazy" src="https://bat.moe/media/posts/8/gallery/6-thumbnail.png" alt="1.3" width="768" height="411"></a>
<figcaption>Checking the workstation works correctly</figcaption>
</figure>
</div></div>
<p>There is no further configuration required on the Whonix side except maybe adding passwords to the gateway, there is a non-zero chance a malicious bot may find the gateway, try 'user' with no password on it and get in. Honestly while there is very little they can do when they're inside they are still a waste of bandwith.</p>
<h3><span style="color: #3598db;">Step 2: Making a (Non-Whonix) Virtual machine and connecting it to the gateway</span></h3>
<p>For this you'll need a debian VM, the latest stable version will do and there really isn't anything special I did to mine other than skip ALL optional software(This includes the standard system utilities which has things like wget), you <strong>want</strong> a virtual machine as minimal as possible.</p>
<figure class="post__image"><img loading="lazy"  src="https://bat.moe/media/posts/8/7.png" alt="Debian no additional software" width="851" height="525" sizes="(min-width: 760px) 660px, calc(93.18vw - 30px)" srcset="https://bat.moe/media/posts/8/responsive/7-xs.png 320w ,https://bat.moe/media/posts/8/responsive/7-sm.png 480w ,https://bat.moe/media/posts/8/responsive/7-md.png 768w ,https://bat.moe/media/posts/8/responsive/7-xl.png 1024w"></figure>
<p>(<em>Optional</em>) Once that's done you can do some customization, all I did was install sudo, add my user to sudoers and install DWM for a graphic interface. If you ARE planning on running an user interface I recommend you use a Window Manager and avoid desktop environments altogether (If you don't want to bother compiling DWM or other Window Manager you can install something like jwm or i3). The reason for this is because Desktop environments often come with utilities to make handling of the network more easy and they interfere with the files I'm modifying in a bit. On that note, if you run into issues with the network after everything is configured, install nmtui, <strong>DO NOT </strong>install an applet to handle your internet.</p>
<div class="gallery-wrapper"><div class="gallery" data-is-empty="false" data-translation="Add images" data-columns="2">
<figure class="gallery__item"><a href="https://bat.moe/media/posts/8/gallery/8.png" data-size="1046x203"><img loading="lazy" src="https://bat.moe/media/posts/8/gallery/8-thumbnail.png" alt="2.1" width="768" height="149"></a>
<figcaption>Sudoer user installing DWM</figcaption>
</figure>
<figure class="gallery__item"><a href="https://bat.moe/media/posts/8/gallery/9.png" data-size="1276x263"><img loading="lazy" src="https://bat.moe/media/posts/8/gallery/9-thumbnail.png" alt="2.2" width="768" height="158"></a>
<figcaption>DWM installed</figcaption>
</figure>
</div></div>
<h3><span style="color: #3598db;">Step 3: Connecting the VM to the Whonix gateway</span></h3>
<p>At this point you want to remove the network the VM you want to connect to the gateway is using and use the one that the whonix Workstation uses (Labeled 'Whonix Internal') with the gateway running in the background.</p>
<figure class="post__image"><img loading="lazy"  src="https://bat.moe/media/posts/8/10.png" alt="" width="445" height="357" sizes="(min-width: 760px) 660px, calc(93.18vw - 30px)" srcset="https://bat.moe/media/posts/8/responsive/10-xs.png 320w ,https://bat.moe/media/posts/8/responsive/10-sm.png 480w ,https://bat.moe/media/posts/8/responsive/10-md.png 768w ,https://bat.moe/media/posts/8/responsive/10-xl.png 1024w"></figure>
<p>Fire up the VM again. You're after two specific files /etc/resolve.conf and /etc/network/interfaces. You want to add the whonix gateway as your name server and default gateway, as well as add a static ip within the same range (10.152.152.* except .10).</p>
<p>A few pointers: the domain and search in resolv.conf should be the same domain as your virtual machine and the network interface in interfaces should match the name of the interface shown by ip -br address show, for me it was epn1s0 but sometimes it can also be eth0 or other interface name.</p>
<figure class="post__image"><img loading="lazy"  src="https://bat.moe/media/posts/8/11.png" alt="Files to modify" width="400" height="392" sizes="(min-width: 760px) 660px, calc(93.18vw - 30px)" srcset="https://bat.moe/media/posts/8/responsive/11-xs.png 320w ,https://bat.moe/media/posts/8/responsive/11-sm.png 480w ,https://bat.moe/media/posts/8/responsive/11-md.png 768w ,https://bat.moe/media/posts/8/responsive/11-xl.png 1024w"></figure>
<p>Once this is done you should reboot your machine. If apt update (Or the equivalent of whatever distro you're using) clears then that means you're most likely in the green but just to make sure I installed Firefox and visited TOR check (Bear in mind this is vanilla firefox with no special rules or security features, Librewolf or Badwolf are significantly better alternatives but I was just testing out things).</p>
<div class="gallery-wrapper"><div class="gallery" data-is-empty="false" data-translation="Add images" data-columns="3">
<figure class="gallery__item"><a href="https://bat.moe/media/posts/8/gallery/12-2.png" data-size="378x97"><img loading="lazy" src="https://bat.moe/media/posts/8/gallery/12-2-thumbnail.png" alt="3.1" width="378" height="97"></a>
<figcaption>An update resolves correctly</figcaption>
</figure>
<figure class="gallery__item"><a href="https://bat.moe/media/posts/8/gallery/13-2.png" data-size="855x536"><img loading="lazy" src="https://bat.moe/media/posts/8/gallery/13-2-thumbnail.png" alt="3.2" width="768" height="481"></a>
<figcaption>Normal Firefox shows it's connecting with a TOR exit node</figcaption>
</figure>
</div></div>
<p>Finally if you're sure everything is working as intended I recommend making the files immutable with chattr, Happy browsing!</p>
<p><code>sudo chatter -i /etc/resolve.conf  </code><br><code>sudo chattr -i /etc/network/interfaces.</code></p>
<h3><span style="color: #3598db;">Addendum 1: Why do this</span></h3>
<p>I can think of a couple of reasons to do so.</p>
<p>The first one is running services that you want to run but you don't want exposed on clearnet without major headaches. This is the easiest way that I know to host a Monero node that I don't intend to use for mining with P2Pool for instance as I can just do a normal install of the node and it just works without any headaches, fanfare or having to worry about my IP leaking.</p>
<p>The second reason is bypassing basic internet censorship or age checks (The UK in particular seems to be a rather hot topic about this lately as of June 2026), most computers these days are under-utilised as far as resources are concerned and I think this can provide some level of normalcy to browising the internet on a censored network. Aside from running a few select services and programs, this is also the easiest way I know to run a VPN over TOR, which I feel is a subject privacy users often jeer at but c'mon man sometimes you just want to browse the internet normally and major DNS providers more often than not will block TOR exit nodes (See below where google and quad nine failing to ping).</p>
<figure class="post__image align-center"><img loading="lazy"  src="https://bat.moe/media/posts/8/googleandquadninefail.png" alt="google and quad nine don't like TOR" width="334" height="121" sizes="(min-width: 760px) 660px, calc(93.18vw - 30px)" srcset="https://bat.moe/media/posts/8/responsive/googleandquadninefail-xs.png 320w ,https://bat.moe/media/posts/8/responsive/googleandquadninefail-sm.png 480w ,https://bat.moe/media/posts/8/responsive/googleandquadninefail-md.png 768w ,https://bat.moe/media/posts/8/responsive/googleandquadninefail-xl.png 1024w"></figure>
<p>I can hear arguments of using x or y service provider but that will only carry you so far in countries where said provider isn't allowed to operate (Bear in mind some 'privacy-respecting' service providers are not completely truthful about their commitment to privacy, Quad nine claims to respect privacy and yet as shown above has some TOR nodes blocked).</p>
<h3><span style="color: #3598db;">Addendum 2 How to extract files from a Virtual machine anonymously</span></h3>
<p>Finally I feel like talking about the matter of transferring things you've downloaded from your guest to your host anonymously. I have tried a few ways but I believe the most 'Clean' (As it leaves no fingerprints in the guest) is by mounting the virtual disk as a normal drive and then just copy the files from the mounted drive as shown below.</p>
<div class="gallery-wrapper"><div class="gallery" data-is-empty="false" data-translation="Add images" data-columns="3">
<figure class="gallery__item"><a href="https://bat.moe/media/posts/8/gallery/14.png" data-size="756x31"><img loading="lazy" src="https://bat.moe/media/posts/8/gallery/14-thumbnail.png" alt="A2.1" width="756" height="31"></a>
<figcaption>Mounting the qcow disk with guestmount,</figcaption>
</figure>
<figure class="gallery__item"><a href="https://bat.moe/media/posts/8/gallery/15.png" data-size="747x215"><img loading="lazy" src="https://bat.moe/media/posts/8/gallery/15-thumbnail.png" alt="A2.2" width="747" height="215"></a>
<figcaption>Copying information from the mounted disk to the home directory</figcaption>
</figure>
</div></div>
<p> </p>
<h3><figure class="post__image"><img loading="lazy"  src="file:///C:/Users/Admin/Documents/Publii/sites/the-bat-blog-of-the-batlog/input/media/posts/16/logowhite.png" alt="" width="200" height="200" sizes="(min-width: 760px) 660px, calc(93.18vw - 30px)" srcset="file:///C:/Users/Admin/Documents/Publii/sites/the-bat-blog-of-the-batlog/input/media/posts/16/responsive/logowhite-xs.png 320w ,file:///C:/Users/Admin/Documents/Publii/sites/the-bat-blog-of-the-batlog/input/media/posts/16/responsive/logowhite-sm.png 480w ,file:///C:/Users/Admin/Documents/Publii/sites/the-bat-blog-of-the-batlog/input/media/posts/16/responsive/logowhite-md.png 768w ,file:///C:/Users/Admin/Documents/Publii/sites/the-bat-blog-of-the-batlog/input/media/posts/16/responsive/logowhite-xl.png 1024w"></figure> <span style="color: #ecf0f1;"> <a href="https://bat.moe/about-me.html" style="color: #ecf0f1;">-Batlog</a></span></h3>
<p> </p>
<p> </p>
<hr>
<pre>If you enjoyed this article or if it was of any use to you, please consider donating some crypto. All funds go towards paying for the hosting.<br><br>Monero/XMR:<br>88MC6ksaVyLbtH9fT4owLSPX16vYD9cf6YELmXjaNWWd71R6iwfFV6DJtp7BXR5c6vWnxLEEGyu1tfwXwTqDM1CUCqDGeRY<br><br>Bitcoin/BTC: <br>bc1qzw9g97ffhllwukhagkvn5g0u9d8rhjv86xhf8h<br><br>Ethereum/ETH:<br>0xf948ab59E492865Fb5200A97F0F4F2f31F7b443f<br><br>Litecoin/LTC:<br>ltc1qqfv05jpyh8yvzyetmf7n5ve500jl656yxpc8y4<br><br>Doge:<br>DT5iG6GxoyZtHSSmaZHHV63NpEoH5yuixg</pre>
<p> </p>
<div class="gallery-wrapper"><div class="gallery" data-is-empty="false" data-translation="Add images" data-columns="3"> </div></div>
            ]]>
        </content>
    </entry>
    <entry>
        <title>Optimising a Windows 11 VM for gaming</title>
        <author>
            <name>Batlog</name>
        </author>
        <link href="https://bat.moe/optimizations-for-a-windows-11-gaming-vm.html"/>
        <id>https://bat.moe/optimizations-for-a-windows-11-gaming-vm.html</id>
        <media:content url="https://bat.moe/media/posts/7/w11-gamingbg.png" medium="image" />
            <category term="Windows"/>
            <category term="Virtualization"/>
            <category term="Linux"/>

        <updated>2026-06-02T13:53:00-06:00</updated>
            <summary type="html">
                <![CDATA[
                        <img src="https://bat.moe/media/posts/7/w11-gamingbg.png" alt="" />
                    Let me preface this article by saying that I've seen guides for&hellip;
                ]]>
            </summary>
        <content type="html">
            <![CDATA[
                    <p><img src="https://bat.moe/media/posts/7/w11-gamingbg.png" class="type:primaryImage" alt="" /></p>
                <p>Let me preface this article by saying that I've seen guides for this in quite a few places but I still feel the need to document them as none of them replicate all the exact steps I follow (Usually skipping things like installing the virtio drivers hard drive or fixing the clock). The most complete guide I've seen is by Bryan Steiner on github and even then there are a couple of issues with his approach that I disagree with such as using hooks and using a whole volume instead of a disk image or LVM.</p>
<p>I am therefore making this guide more to myself than anyone else, I'm fairly certain I missed a couple of things but I get a good balance of security and performance doing that I'm rather happy with and have used for over two years now (My main PC notes the installation date as April 1st 2024).</p>
<hr>
<h3><span style="color: #3598db;">Step 0. Things to know before-hand</span></h3>
<p>First of all before you jump right in there are a couple of things to consider, what you have at hand and what you want to do regarding storage. Do you want security or performance? Here are the basic pointers.</p>
<p>What you'll need:</p>
<ul>
<li>A computer with two GPU's (One of them can be an igpu), both of them with a video output. I heavily recommend you use an Nvidia card for the card you're intending to passthrough (See addendum 2).</li>
<li>A Motherboard that actually supports IOMMU without major issues (See step 1)</li>
<li>An EDID Dummy plug (See addendum 1).</li>
</ul>
<p>Select your approach regarding storage:</p>
<ul>
<li>Disk image (Qcow2, img, etc): Slowest speed (Although admittedly not that much compared to using an LVM) but the most portable, effectively you can backup your whole windows system in an external hard drive and replicate it several times. You could toss your entire computer out and still continue to be able to replicate your VM endlessly as long as you have the image really. I recommend this one if you're more concerned with security and availability than performance</li>
<li>LVM (This guide): The in-between middle-of-the-road fence-sitting approach, you can take external snaps, can take the disk out of a system place it on a new system, load the LVM as a VM on the new system and keep going. I recommend it if you're looking for a balance between security and performance as the disk doesn't touch your host system.</li>
<li>Disk passthrough: The best performance but honestly you lose all portability and snaps plus some security as the disk is in direct contact with the hardware and if you watch ransomeware or something on windows it can easily be game over, I wouldn't do this one unless I was using a laptop. use this one if you're preoccupied only with performance and just want to be able to dual boot Linux and windows.</li>
</ul>
<p>As stated above I'm going with the LVM approach but honestly it doesn't make that much of a difference in regards to setup. I'm also not doing a method known as 'hooks'  for this guide (See addendum 2) if you want to do hooks check out Bryan Steiner's guide on Github.</p>
<p>Finally you need to ensure your motherboard supports IOMMU and enable IOMMU in the bios, most modern motherboards support this but depending on your model you may have to look for it under advanced PCI or advanced CPU settings. (Sorry about the green tint, my capture card doesn't like VESA graphics). It's usually labeled as 'intel VT-D' for intel motherboards and as AMD IOMMU for AMD motherboards, however the names aren't completely standardised and may vary, check your motherboard manual or support forum.</p>
<figure class="post__image"><img loading="lazy"  src="https://bat.moe/media/posts/7/0.png" alt="iommu" width="761" height="502" sizes="(min-width: 760px) 660px, calc(93.18vw - 30px)" srcset="https://bat.moe/media/posts/7/responsive/0-xs.png 320w ,https://bat.moe/media/posts/7/responsive/0-sm.png 480w ,https://bat.moe/media/posts/7/responsive/0-md.png 768w ,https://bat.moe/media/posts/7/responsive/0-xl.png 1024w"></figure>
<h3><span style="color: #3598db;">Step 1: Check the motherboard compatibility, </span></h3>
<p>Assuming you already have a computer or can test it before buying it, you'll want to run the following bash script :</p>
<p><code>#!/bin/bash</code><br><code>for d in $(find /sys/kernel/iommu_groups/ -type l | sort -n -k5 -t/); do </code><br><code>    n=${d#*/iommu_groups/*}; n=${n%%/*}</code><br><code>    printf 'IOMMU Group %s ' "$n"</code><br><code>    lspci -nns "${d##*/}"</code><br><code>done;</code></p>
<p class="align-center">(Script taken from flungo at github)</p>
<p>What this does is list the IOMMU groups of your PC, which allows you to check if there are any conflicts.</p>
<figure class="post__image"><img loading="lazy"  src="https://bat.moe/media/posts/7/1.png" alt="IOMMU groups" width="1268" height="521" sizes="(min-width: 760px) 660px, calc(93.18vw - 30px)" srcset="https://bat.moe/media/posts/7/responsive/1-xs.png 320w ,https://bat.moe/media/posts/7/responsive/1-sm.png 480w ,https://bat.moe/media/posts/7/responsive/1-md.png 768w ,https://bat.moe/media/posts/7/responsive/1-xl.png 1024w"></figure>
<p>If the video card you're trying to pass through is not part of some other group (Eg your usb ports or your sound card or something else) Then you're in the green. Otherwise I don't recommend you follow up with this, there is a method around it by using a modified kernel called  linux-vfio which can be found in the Arch AUR repository but honestly It's outside the scope of this article.</p>
<h3><span style="color: #3598db;">Step 2: Creating an LVM and making the windows virtual machine.</span></h3>
<p>Before you can even begin installing you need an LVM to live in, it has to be completely unfatted and I recommend using a second drive as it makes it easier to handle if you have to re-install your host, change distros or something else of that nature (For the record this LVM can exist  alongside your host if you made an OS install making use of LVM's and left some space left in your disk).</p>
<p>For this example I'm targeting the Volume group VGSSD created in the physical volume sdd1 (Previously formatted as an ext4).  The exact commands I used it for create the LVM were:</p>
<p><code>sudo pvcreate /dev/sdd1</code><br><code>sudo vgcreate VGSSD /dev/sdd1</code></p>
<p>And then I just added the LVM to the VG</p>
<figure class="post__image"><img loading="lazy"  src="https://bat.moe/media/posts/7/2.png" alt="Creating an LVM" width="665" height="75" sizes="(min-width: 760px) 660px, calc(93.18vw - 30px)" srcset="https://bat.moe/media/posts/7/responsive/2-xs.png 320w ,https://bat.moe/media/posts/7/responsive/2-sm.png 480w ,https://bat.moe/media/posts/7/responsive/2-md.png 768w ,https://bat.moe/media/posts/7/responsive/2-xl.png 1024w"></figure>
<p>Now you can use virt manager and make a normal virtual machine but when prompted with picking a storage for it you have to select Volume group and then select the LVM you just made.</p>
<div class="gallery-wrapper"><div class="gallery" data-is-empty="false" data-translation="Add images" data-columns="2">
<figure class="gallery__item"><a href="https://bat.moe/media/posts/7/gallery/3.png" data-size="1228x637"><img loading="lazy" src="https://bat.moe/media/posts/7/gallery/3-thumbnail.png" alt="2.1" width="768" height="398"></a>
<figcaption>Adding the volume group to the storage pools</figcaption>
</figure>
<figure class="gallery__item"><a href="https://bat.moe/media/posts/7/gallery/4.png" data-size="510x365"><img loading="lazy" src="https://bat.moe/media/posts/7/gallery/4-thumbnail.png" alt="2.2" width="510" height="365"></a>
<figcaption>Selecting the Logical volume from the pool</figcaption>
</figure>
</div></div>
<p>After you're done and everything looks good, before you begin the installation remove the network card, change the main storage device to virtio and add the virtio iso, then fire up the virtual machine.</p>
<div class="gallery-wrapper"><div class="gallery" data-is-empty="false" data-translation="Add images" data-columns="2">
<figure class="gallery__item"><a href="https://bat.moe/media/posts/7/gallery/5.png" data-size="851x578"><img loading="lazy" src="https://bat.moe/media/posts/7/gallery/5-thumbnail.png" alt="2.3" width="768" height="522"></a>
<figcaption>Deleting the network Card</figcaption>
</figure>
<figure class="gallery__item"><a href="https://bat.moe/media/posts/7/gallery/6.png" data-size="934x583"><img loading="lazy" src="https://bat.moe/media/posts/7/gallery/6-thumbnail.png" alt="2.4" width="768" height="479"></a>
<figcaption>Inserting the Virtio guest tools disc before starting the install</figcaption>
</figure>
</div></div>
<p>Follow the Windows 11 installation normally (<strong>DO NOT ENTER A LICENSE AT ANY POINT AS YOU'LL BE MAKING A LOT OF CHANGES TO THE HARDWARE AND WINDOWS WILL MAKE THE LICENSE INVALID, LOAD A LICENSE ONLY AFTER YOU'RE DONE DOING EVERYTHING</strong>) until you reach selecting a storage device, at that point the system will claim you don't have any. Select the option to load drivers and pick the disk drivers from the W11 folder on the virtio guest tools disc. After this the installation should proceed and complete normally.</p>
<div class="gallery-wrapper"><div class="gallery" data-is-empty="false" data-translation="Add images" data-columns="3">
<figure class="gallery__item"><a href="https://bat.moe/media/posts/7/gallery/7.png" data-size="535x417"><img loading="lazy" src="https://bat.moe/media/posts/7/gallery/7-thumbnail.png" alt="2.5" width="535" height="417"></a>
<figcaption>Select manual driver loading</figcaption>
</figure>
<figure class="gallery__item"><a href="https://bat.moe/media/posts/7/gallery/8.png" data-size="518x406"><img loading="lazy" src="https://bat.moe/media/posts/7/gallery/8-thumbnail.png" alt="2.6" width="518" height="406"></a>
<figcaption>Select the driver according to the windows version you're using</figcaption>
</figure>
</div></div>
<p>After the system reboots, proceed with the installation as normal.</p>
<p>When windows asks you to connect press Shift + F10 , this will open a cmd window, enter OOBE\BYPASSNRO . This will reboot the virtual machine in a mode where you are no longer asked for a microsoft account and can setup a local account. I've heard from other people that the ability to open cmd during install was removed in later ISOs you download from Microsoft, so if you  encounter this issue you may need to ask someone you trust for an old ISO try and avoid the wayback machine as I've encountered tampered discs there in the past. </p>
<div class="gallery-wrapper"><div class="gallery" data-is-empty="false" data-translation="Add images" data-columns="2">
<figure class="gallery__item"><a href="https://bat.moe/media/posts/7/gallery/9.png" data-size="1060x667"><img loading="lazy" src="https://bat.moe/media/posts/7/gallery/9-thumbnail.png" alt="2.5" width="768" height="483"></a>
<figcaption>Opening a DOS window during install</figcaption>
</figure>
<figure class="gallery__item"><a href="https://bat.moe/media/posts/7/gallery/10.png" data-size="1060x669"><img loading="lazy" src="https://bat.moe/media/posts/7/gallery/10-thumbnail.png" alt="2.6" width="768" height="485"></a>
<figcaption>The system allows for an offline account after install</figcaption>
</figure>
</div></div>
<p>I heavily recommend using a local account by the way, there is a non-zero chance you'll encounter a piece of hardware that looking glass (A vital program for this guide) does not support and if that happens to you then you're toast and must use freeRDP, which is very easy to use with a local account but extremely annoying to work with using an online account. If you insist on having your data stolen by Microsoft at all times at least make sure to make a second account that works locally.</p>
<h3><span style="color: #3598db;">Step 3: Installing the virtio drivers and CPU Pinning</span></h3>
<p>Once you're inside open the virtio guest tools disc and install all the virtio drivers. The process is very straight-forward and once you change your video output to virtio after a reboot you'll immediately notice your first performance boost.</p>
<figure class="post__image align-center"><img loading="lazy"  src="https://bat.moe/media/posts/7/11.png" alt="Virtio drivers windows" width="616" height="437" sizes="(min-width: 760px) 660px, calc(93.18vw - 30px)" srcset="https://bat.moe/media/posts/7/responsive/11-xs.png 320w ,https://bat.moe/media/posts/7/responsive/11-sm.png 480w ,https://bat.moe/media/posts/7/responsive/11-md.png 768w ,https://bat.moe/media/posts/7/responsive/11-xl.png 1024w"></figure>
<p>Chances are you'll encounter your first hurdle when you notice windows is only using 2 cores at all time.</p>
<figure class="post__image"><img loading="lazy" src="https://bat.moe/media/posts/7/12.png" alt="CPU usage" width="632" height="486" sizes="(min-width: 760px) 660px, calc(93.18vw - 30px)" srcset="https://bat.moe/media/posts/7/responsive/12-xs.png 320w ,https://bat.moe/media/posts/7/responsive/12-sm.png 480w ,https://bat.moe/media/posts/7/responsive/12-md.png 768w ,https://bat.moe/media/posts/7/responsive/12-xl.png 1024w">
<figcaption>This is such bull that has never been addressed or fixed in at least 4 versions of Windows</figcaption>
</figure>
<p>To solve this you must add the topology in the XML on virt manager under the cpu tag manually like this for 14 threads:</p>
<p><code>&lt;topology sockets="1" dies="1" cores="7" threads="2"/&gt; </code></p>
<figure class="post__image align-center"><img loading="lazy"  src="https://bat.moe/media/posts/7/13.png" alt="Topology" width="704" height="213" sizes="(min-width: 760px) 660px, calc(93.18vw - 30px)" srcset="https://bat.moe/media/posts/7/responsive/13-xs.png 320w ,https://bat.moe/media/posts/7/responsive/13-sm.png 480w ,https://bat.moe/media/posts/7/responsive/13-md.png 768w ,https://bat.moe/media/posts/7/responsive/13-xl.png 1024w"></figure>
<p>After a reboot it now does display the correct number of vCPU's</p>
<figure class="post__image align-center"><img loading="lazy"  src="https://bat.moe/media/posts/7/14.png" alt="correctvcpu number" width="613" height="467" sizes="(min-width: 760px) 660px, calc(93.18vw - 30px)" srcset="https://bat.moe/media/posts/7/responsive/14-xs.png 320w ,https://bat.moe/media/posts/7/responsive/14-sm.png 480w ,https://bat.moe/media/posts/7/responsive/14-md.png 768w ,https://bat.moe/media/posts/7/responsive/14-xl.png 1024w"></figure>
<p><strong>This will effectively bring you into 'workable' performance levels</strong>, if all you want is to run some program or use windows for office work then you can just stop here.</p>
<p>If you want to use the machine for gaming however, there are still quite a number of steps. FIrst you'll have to pin your CPU cores,  list all your CPUs with lscpu -- extend (I do recommend using lscpu extend and not something else, don't bloat the host, you'll need the resources later on). </p>
<figure class="post__image"><img loading="lazy"  src="https://bat.moe/media/posts/7/15.png" alt="lscpu extend" width="673" height="223" sizes="(min-width: 760px) 660px, calc(93.18vw - 30px)" srcset="https://bat.moe/media/posts/7/responsive/15-xs.png 320w ,https://bat.moe/media/posts/7/responsive/15-sm.png 480w ,https://bat.moe/media/posts/7/responsive/15-md.png 768w ,https://bat.moe/media/posts/7/responsive/15-xl.png 1024w"></figure>
<p>This tells you the exact order of your threads and which physical core they are attached to, which is important when pinning as you must pair the threads that belong to the same core (In my case for instance I must pair 0 with 8, 1 with 9, 2 with 10, etc.).</p>
<p>Now, as I only have 16 threads I'll be reducing the amount of vcpus on the virtual machine to 10 in a move that may seem rather counter-intuitive. The reason for this is because I want to keep two for my linux host, to threads for emulation pining and two for iothread pining. My config looks like this:</p>
<figure class="post__image"><img loading="lazy"  src="https://bat.moe/media/posts/7/16.png" alt="Cpus pinned" width="548" height="312" sizes="(min-width: 760px) 660px, calc(93.18vw - 30px)" srcset="https://bat.moe/media/posts/7/responsive/16-xs.png 320w ,https://bat.moe/media/posts/7/responsive/16-sm.png 480w ,https://bat.moe/media/posts/7/responsive/16-md.png 768w ,https://bat.moe/media/posts/7/responsive/16-xl.png 1024w"></figure>
<p>Now what do the threads I reserved and left out of the VM do?</p>
<p>emulatorpin handles tasks by the hypervisor rather than the virtual machine itself, basically it handles tasks that would normally be assigned to your virtual machine CPUs and isolates them so your virtual cpus can handle what's going on in the virtual machine itself.</p>
<p>iothreadpin: Handles storage and network management, depending on your setup I recommend allocating two full cores (4 threads) to this, poor disk speed in virtual machines is an issue I encounter very often.</p>
<p>If you boot your machine and the task manager says you're using the amount of threads you pinned down, then you're in the green and can finally move towards the next step.</p>
<h3><span style="color: #3598db;">Step 4: Passing through the Nvidia GPU and installing the Nvidia drivers</span></h3>
<p>It is at this point you should <strong>add back the network card you deleted</strong> (Ensure it's using virtio drivers) but most importantly it's at this point you need to start working in passing the GPU to your windows guest.</p>
<p>The process is rather simple, first identify your GPU with lspci -nn and write down ALL the devices IDs that share the same group as the GPU, In my case I only had to write two devices down, the graphics card itself and the sound card that comes with the GPU.</p>
<p>Then open edit /etc/default/grub with your favorite text editor (In my case nano) and under 'CMDLINE-LINUX-DEFAULT' add:</p>
<ol>
<li>intel_iommu=on (Or amd_iommu=on if you're on an amd motherboard) and;</li>
<li>vfio-pci.ids=&lt;the values you wrote down separated by commas&gt; </li>
</ol>
<figure class="post__image"><img loading="lazy"  src="https://bat.moe/media/posts/7/17.png" alt="Grub devices" width="1280" height="720" sizes="(min-width: 760px) 660px, calc(93.18vw - 30px)" srcset="https://bat.moe/media/posts/7/responsive/17-xs.png 320w ,https://bat.moe/media/posts/7/responsive/17-sm.png 480w ,https://bat.moe/media/posts/7/responsive/17-md.png 768w ,https://bat.moe/media/posts/7/responsive/17-xl.png 1024w"></figure>
<p>Afterwards update grub, if you get no errors you're in the clear</p>
<figure class="post__image align-center"><img loading="lazy"  src="https://bat.moe/media/posts/7/18.png" alt="updating grub" width="729" height="166" sizes="(min-width: 760px) 660px, calc(93.18vw - 30px)" srcset="https://bat.moe/media/posts/7/responsive/18-xs.png 320w ,https://bat.moe/media/posts/7/responsive/18-sm.png 480w ,https://bat.moe/media/posts/7/responsive/18-md.png 768w ,https://bat.moe/media/posts/7/responsive/18-xl.png 1024w"></figure>
<p>Afterwards, execute lspci -knn to check the driver currently loaded in the kernel for your graphics card and other devices. Then, create a new file on /etc/modprobe.d/virtio.conf and add to it:</p>
<ol>
<li>options vfio-pci ids=&lt;same device values you added on grub&gt;</li>
<li>softdep &lt;kernel module currently loaded&gt; pre: vfio-pci (You must do this for all the devices individually)</li>
</ol>
<figure class="post__image"><img loading="lazy"  src="https://bat.moe/media/posts/7/19.png" alt="modprobed" width="1280" height="720" sizes="(min-width: 760px) 660px, calc(93.18vw - 30px)" srcset="https://bat.moe/media/posts/7/responsive/19-xs.png 320w ,https://bat.moe/media/posts/7/responsive/19-sm.png 480w ,https://bat.moe/media/posts/7/responsive/19-md.png 768w ,https://bat.moe/media/posts/7/responsive/19-xl.png 1024w"></figure>
<p>Afterwards, upgrade your initramfs (Please note this command varies greatly from distro to distro). If you get no errors, you <em>may </em>be in the green.</p>
<figure class="post__image"><img loading="lazy"  src="https://bat.moe/media/posts/7/20.png" alt="updating initramfs" width="664" height="41" sizes="(min-width: 760px) 660px, calc(93.18vw - 30px)" srcset="https://bat.moe/media/posts/7/responsive/20-xs.png 320w ,https://bat.moe/media/posts/7/responsive/20-sm.png 480w ,https://bat.moe/media/posts/7/responsive/20-md.png 768w ,https://bat.moe/media/posts/7/responsive/20-xl.png 1024w"></figure>
<p>Afterwards reboot your system and run lspci -knn if the command shows that your devices are using vfio-pci drivers then you're golden, if not go back and check that you configured the file in modprobe.d correctly (It's <em>very </em>sensitive to spaces).</p>
<figure class="post__image"><img loading="lazy"  src="https://bat.moe/media/posts/7/21.png" alt="vfio drivers" width="1218" height="204" sizes="(min-width: 760px) 660px, calc(93.18vw - 30px)" srcset="https://bat.moe/media/posts/7/responsive/21-xs.png 320w ,https://bat.moe/media/posts/7/responsive/21-sm.png 480w ,https://bat.moe/media/posts/7/responsive/21-md.png 768w ,https://bat.moe/media/posts/7/responsive/21-xl.png 1024w"></figure>
<p>Attach the GPU and attached devices (In my case just the unlabelled sound card) to the virtual machine and fire it up.</p>
<figure class="post__image align-center"><img loading="lazy"  src="https://bat.moe/media/posts/7/22.png" alt="attaching gpu" width="540" height="555" sizes="(min-width: 760px) 660px, calc(93.18vw - 30px)" srcset="https://bat.moe/media/posts/7/responsive/22-xs.png 320w ,https://bat.moe/media/posts/7/responsive/22-sm.png 480w ,https://bat.moe/media/posts/7/responsive/22-md.png 768w ,https://bat.moe/media/posts/7/responsive/22-xl.png 1024w"></figure>
<p>Once inside the virtual machine download the Nvidia drivers, install them and check the system is detecting the correct card using the Nvidia panel.</p>
<div class="gallery-wrapper"><div class="gallery" data-is-empty="false" data-translation="Add images" data-columns="3">
<figure class="gallery__item"><a href="https://bat.moe/media/posts/7/gallery/23.png" data-size="1016x565"><img loading="lazy" src="https://bat.moe/media/posts/7/gallery/23-thumbnail.png" alt="4.1" width="768" height="427"></a>
<figcaption>Downloading the drivers</figcaption>
</figure>
<figure class="gallery__item"><a href="https://bat.moe/media/posts/7/gallery/24.png" data-size="787x533"><img loading="lazy" src="https://bat.moe/media/posts/7/gallery/24-thumbnail.png" alt="4.2" width="768" height="520"></a>
<figcaption>Installing the drivers</figcaption>
</figure>
<figure class="gallery__item"><a href="https://bat.moe/media/posts/7/gallery/25.png" data-size="775x576"><img loading="lazy" src="https://bat.moe/media/posts/7/gallery/25-thumbnail.png" alt="4.3" width="768" height="571"></a>
<figcaption>Checking the Drivers are running properly</figcaption>
</figure>
</div></div>
<p>If you reach this part you can pretty much use the card for anything related to cuda tasks (Handbreak, sfx, Ai, etc.) but gaming performance is piss-poor, this is because the display driver isn't actually being used as it doesn't have a screen attached, keep on reading on how to fix it.</p>
<blockquote>
<p>Side note: On my main rig I also passthrough a wifi card that came with my motherboard because I have no use for it and honestly would rather avoid any windows shit on my Linux environment, including my virtual networks. I didn't include that in this article as the motherboard I'm using doesn't have a wireless card.</p>
</blockquote>
<h3><span style="color: #3598db;">Step 5: Looking glass and Scream (Correcting Video and Sound)</span></h3>
<p>Now you need to get an application called looking-glass in order to act as your display and interface between your Linux host and Windows guest. To install it just go to their website and download the latest stable version (V7 as of June 2026) then just install it as you would any program.</p>
<div class="gallery-wrapper"><div class="gallery" data-is-empty="false" data-translation="Add images" data-columns="2">
<figure class="gallery__item"><a href="https://bat.moe/media/posts/7/gallery/26.png" data-size="960x553"><img loading="lazy" src="https://bat.moe/media/posts/7/gallery/26-thumbnail.png" alt="5.1" width="768" height="442"></a>
<figcaption>Downloading Looking Glass</figcaption>
</figure>
<figure class="gallery__item"><a href="https://bat.moe/media/posts/7/gallery/27.png" data-size="860x562"><img loading="lazy" src="https://bat.moe/media/posts/7/gallery/27-thumbnail.png" alt="5.2" width="768" height="502"></a>
<figcaption>Installing Looking Glass</figcaption>
</figure>
</div></div>
<p>Next you need for looking glass to load at boot, this is accomplished by creating a new task using the task scheduler, just open the aforementioned task scheduler, create a new task and make it launch looking glass at boot.</p>
<div class="gallery-wrapper"><div class="gallery" data-is-empty="false" data-translation="Add images" data-columns="3">
<figure class="gallery__item"><a href="https://bat.moe/media/posts/7/gallery/28.png" data-size="642x498"><img loading="lazy" src="https://bat.moe/media/posts/7/gallery/28-thumbnail.png" alt="5.3" width="642" height="498"></a>
<figcaption>Creating a new task called looking-glass</figcaption>
</figure>
<figure class="gallery__item"><a href="https://bat.moe/media/posts/7/gallery/29.png" data-size="728x499"><img loading="lazy" src="https://bat.moe/media/posts/7/gallery/29-thumbnail.png" alt="5.4" width="728" height="499"></a>
<figcaption>Have the task at startup</figcaption>
</figure>
<figure class="gallery__item"><a href="https://bat.moe/media/posts/7/gallery/30.png" data-size="610x479"><img loading="lazy" src="https://bat.moe/media/posts/7/gallery/30-thumbnail.png" alt="5.5" width="610" height="479"></a>
<figcaption>Making it trigger running the looking glass executable</figcaption>
</figure>
</div></div>
<p>After you install looking glass and setting up the task, shut down and fire up the VM again and if your tray shows looking glass is running then shut down the machine and disable virtio display, just set your display to 'none'.</p>
<div class="gallery-wrapper"><div class="gallery" data-is-empty="false" data-translation="Add images" data-columns="2">
<figure class="gallery__item"><a href="https://bat.moe/media/posts/7/gallery/31.png" data-size="618x372"><img loading="lazy" src="https://bat.moe/media/posts/7/gallery/31-thumbnail.png" alt="5.6" width="618" height="372"></a>
<figcaption>Looking Glass is running</figcaption>
</figure>
<figure class="gallery__item"><a href="https://bat.moe/media/posts/7/gallery/32.png" data-size="455x572"><img loading="lazy" src="https://bat.moe/media/posts/7/gallery/32-thumbnail.png" alt="5.7" width="455" height="572"></a>
<figcaption>Setting the VM display to None</figcaption>
</figure>
</div></div>
<p>You're done with the Windows guest for a bit, the last thing you want to do is <strong>CONNECT YOUR EDID Dummy Plug TO YOUR GPU.</strong></p>
<p>Now jump to the Linux host and download the source code for looking glass. Then just extract it.</p>
<div class="gallery-wrapper"><div class="gallery" data-is-empty="false" data-translation="Add images" data-columns="3">
<figure class="gallery__item"><a href="https://bat.moe/media/posts/7/gallery/33.png" data-size="997x376"><img loading="lazy" src="https://bat.moe/media/posts/7/gallery/33-thumbnail.png" alt="5.8" width="768" height="290"></a>
<figcaption>Downloading source code on Linux</figcaption>
</figure>
<figure class="gallery__item"><a href="https://bat.moe/media/posts/7/gallery/34.png" data-size="441x343"><img loading="lazy" src="https://bat.moe/media/posts/7/gallery/34-thumbnail.png" alt="5.9" width="441" height="343"></a>
<figcaption>Extracting the source</figcaption>
</figure>
</div></div>
<p><strong>IMPORTANT</strong>: DOWNLOAD AND USE USE THE 'SOURCE' COMPRESSED FILE FROM THE SAME WEBSITE WHERE YOU DOWNLOADED THE WINDOWS VERSION, <strong>DO NOT CLONE THE GITHUB REPO</strong> AS DETAILED IN THEIR DOCUMENTATION, IT WILL NOT WORK AND YOU'LL SPEND HOURS TROUBLE-SHOOTING WONDERING WHAT YOU'RE DOING WRONG.</p>
<p>You need to build the binary next, open the directory in a terminal and create a new directory under /client/build, then change directory into it.</p>
<figure class="post__image"><img loading="lazy"  src="https://bat.moe/media/posts/7/35.png" alt="creating a build directory" width="748" height="56" sizes="(min-width: 760px) 660px, calc(93.18vw - 30px)" srcset="https://bat.moe/media/posts/7/responsive/35-xs.png 320w ,https://bat.moe/media/posts/7/responsive/35-sm.png 480w ,https://bat.moe/media/posts/7/responsive/35-md.png 768w ,https://bat.moe/media/posts/7/responsive/35-xl.png 1024w"></figure>
<p>The Looking Glass guide tells you to install the following dependencies for debian...</p>
<pre><code>apt-get install binutils-dev cmake fonts-dejavu-core libfontconfig-dev \</code><br><code>gcc g++ pkg-config libegl-dev libgl-dev libgles-dev libspice-protocol-dev \</code><br><code>nettle-dev libx11-dev libxcursor-dev libxi-dev libxinerama-dev \</code><br><code>libxpresent-dev libxss-dev libxkbcommon-dev libwayland-dev wayland-protocols \</code><br><code>libpipewire-0.3-dev libpulse-dev libsamplerate0-dev</code></pre>
<p>... But I'll be honest, whenever I try to compile the application I'm usually missing a dependency or two, so this is a process that may take you a bit as you must try to compile the app, come across the missing dependency, install it (Make sure it's the devel version) and keep going until you get a clean binary without warnings.</p>
<p>use <strong>cmake ../</strong> and if you don't get any warnings or errors regarding missing dependencies use <strong>make</strong>, and if you get no error or warnings again you're done</p>
<div class="gallery-wrapper"><div class="gallery" data-is-empty="false" data-translation="Add images" data-columns="2">
<figure class="gallery__item"><a href="https://bat.moe/media/posts/7/gallery/36.png" data-size="740x378"><img loading="lazy" src="https://bat.moe/media/posts/7/gallery/36-thumbnail.png" alt="6.3" width="740" height="378"></a>
<figcaption>cmake resolving successfully</figcaption>
</figure>
<figure class="gallery__item"><a href="https://bat.moe/media/posts/7/gallery/37.png" data-size="761x608"><img loading="lazy" src="https://bat.moe/media/posts/7/gallery/37-thumbnail.png" alt="6.4" width="761" height="608"></a>
<figcaption>make resolving successfully</figcaption>
</figure>
</div></div>
<p>This will give you a binary called 'looking-glass-client' as detailed in the make logs, hold on to it (In my case I made a copy and placed it on my home directory).</p>
<p>Now that you have finished building the client you have to make it connect to the host on the windows machine, for this you'll need to add a shem into the bottom of your xml of your VM as shown below. (Also set the memballoon value to 'none', I forgot to do it here)</p>
<figure class="post__image"><img loading="lazy"  src="https://bat.moe/media/posts/7/38.png" alt="" width="744" height="665" sizes="(min-width: 760px) 660px, calc(93.18vw - 30px)" srcset="https://bat.moe/media/posts/7/responsive/38-xs.png 320w ,https://bat.moe/media/posts/7/responsive/38-sm.png 480w ,https://bat.moe/media/posts/7/responsive/38-md.png 768w ,https://bat.moe/media/posts/7/responsive/38-xl.png 1024w"></figure>
<p>Don't worry about the PCI values, those get auto-filled when you fill the other info and click apply.</p>
<p>Depending on the model of your EDID you may need to change the value based on the max resolution it supports, here is a table on which value to use (Please make sure to use the <em>max</em> resolution supported, not the <em>native</em> resolution).</p>
<table style="border-collapse: collapse; width: 100%; height: 483.922px;" border="1">
<tbody>
<tr style="height: 77.3594px;">
<th class="head" style="width: 50.0713%; height: 77.3594px;">
<p>Resolution</p>
</th>
<th class="head" style="width: 49.9287%; height: 77.3594px;">
<p>ivshem size</p>
</th>
</tr>
<tr style="height: 48.5625px;">
<td style="width: 50.0713%; height: 48.5625px;">800x600 (600p)</td>
<td style="width: 49.9287%; height: 48.5625px;">16</td>
</tr>
<tr style="height: 48.5625px;">
<td style="width: 50.0713%; height: 48.5625px;">1280x720 (720p)</td>
<td style="width: 49.9287%; height: 48.5625px;">32</td>
</tr>
<tr style="height: 77.3594px;">
<td style="width: 50.0713%; height: 77.3594px;">
<p>1920x1080 (1080p)</p>
</td>
<td style="width: 49.9287%; height: 77.3594px;">
<p>32</p>
</td>
</tr>
<tr style="height: 77.3594px;">
<td style="width: 50.0713%; height: 77.3594px;">
<p>1920x1200 (1200p)</p>
</td>
<td style="width: 49.9287%; height: 77.3594px;">
<p>32</p>
</td>
</tr>
<tr style="height: 77.3594px;">
<td style="width: 50.0713%; height: 77.3594px;">
<p>1920x1440 (1440p)</p>
</td>
<td style="width: 49.9287%; height: 77.3594px;">
<p>32</p>
</td>
</tr>
<tr style="height: 77.3594px;">
<td style="width: 50.0713%; height: 77.3594px;">
<p>3840x2160 (2160p/4K)</p>
</td>
<td style="width: 49.9287%; height: 77.3594px;">
<p>128</p>
</td>
</tr>
</tbody>
</table>
<p>Now create a file at /etc/tmpfiles.d/10-looking-glass.conf (Yes, it has to be tmpfiles) with the following information:</p>
<address><code># Type Path               Mode UID  GID Age Argument</code><br><br><code>f /dev/shm/looking-glass 0660 &lt;your username&gt; kvm -</code></address>
<figure class="post__image"><img loading="lazy"  src="https://bat.moe/media/posts/7/39.png" alt="permissions to run shem" width="880" height="92" sizes="(min-width: 760px) 660px, calc(93.18vw - 30px)" srcset="https://bat.moe/media/posts/7/responsive/39-xs.png 320w ,https://bat.moe/media/posts/7/responsive/39-sm.png 480w ,https://bat.moe/media/posts/7/responsive/39-md.png 768w ,https://bat.moe/media/posts/7/responsive/39-xl.png 1024w"></figure>
<p>Reboot your whole system, after the reboot fire up the windows VM and execute the looking-glass-client binary, if everything goes according to plan you should see something like this:</p>
<figure class="post__image"><img loading="lazy"  src="https://bat.moe/media/posts/7/40.png" alt="looking glass working" width="959" height="649" sizes="(min-width: 760px) 660px, calc(93.18vw - 30px)" srcset="https://bat.moe/media/posts/7/responsive/40-xs.png 320w ,https://bat.moe/media/posts/7/responsive/40-sm.png 480w ,https://bat.moe/media/posts/7/responsive/40-md.png 768w ,https://bat.moe/media/posts/7/responsive/40-xl.png 1024w"></figure>
<p>You should now be running the display with your GPU instead of a virtuall display, you will see a <em><strong>massive </strong></em>performance boost with this, to the point where you can actually game without issues on low-performance titles or even do some work in taxing tasks like CAD programs.</p>
<p>But... You'll notice the next problem almost immediately, there is a 90% chance that your sound is completely gone because your EDID didn't come with speakers. There are a few ways to remedy this but I'll use a hard one by installing a program called 'scream' on the linux host and the windows client, simply because I find this solution to be the one that has the best audio quality output with little to no delays and it still allows you to run everything on a single pc without a second set of speakers or additional gizmos.</p>
<p>To start you just need to download Scream on your Windows guest (Don't decompress it yet).</p>
<figure class="post__image"><img loading="lazy"  src="https://bat.moe/media/posts/7/41.png" alt="downloading scream" width="975" height="561" sizes="(min-width: 760px) 660px, calc(93.18vw - 30px)" srcset="https://bat.moe/media/posts/7/responsive/41-xs.png 320w ,https://bat.moe/media/posts/7/responsive/41-sm.png 480w ,https://bat.moe/media/posts/7/responsive/41-md.png 768w ,https://bat.moe/media/posts/7/responsive/41-xl.png 1024w"></figure>
<p>Next you need to disable driver enforcement. The way I like to do this is by killing your VM forcefully a few times until the recovery menu pops up, then select Troubleshoot -&gt; Advanced settings -&gt; Startup settings and rebooting, then pressing F7 to disable driver enforcement</p>
<div class="gallery-wrapper"><div class="gallery" data-is-empty="false" data-translation="Add images" data-columns="2">
<figure class="gallery__item"><a href="https://bat.moe/media/posts/7/gallery/42.png" data-size="1020x623"><img loading="lazy" src="https://bat.moe/media/posts/7/gallery/42-thumbnail.png" alt="6.5" width="768" height="469"></a>
<figcaption>Select Startup options at recovery</figcaption>
</figure>
<figure class="gallery__item"><a href="https://bat.moe/media/posts/7/gallery/43.png" data-size="1016x580"><img loading="lazy" src="https://bat.moe/media/posts/7/gallery/43-thumbnail.png" alt="6.6" width="768" height="438"></a>
<figcaption>Press F7 when prompted</figcaption>
</figure>
</div></div>
<p>Once inside windows again decompress the archive and select 'run as administrator' in the bat script provided, the script will tell you if the install was successful.</p>
<div class="gallery-wrapper"><div class="gallery" data-is-empty="false" data-translation="Add images" data-columns="2">
<figure class="gallery__item"><a href="https://bat.moe/media/posts/7/gallery/44.png" data-size="636x501"><img loading="lazy" src="https://bat.moe/media/posts/7/gallery/44-thumbnail.png" alt="6.7" width="636" height="501"></a>
<figcaption>Running the provided bat as admin</figcaption>
</figure>
<figure class="gallery__item"><a href="https://bat.moe/media/posts/7/gallery/45.png" data-size="822x556"><img loading="lazy" src="https://bat.moe/media/posts/7/gallery/45-thumbnail.png" alt="6.8 " width="768" height="519"></a>
<figcaption>A successful scream install</figcaption>
</figure>
</div></div>
<p>Next you'll have to build Scream, the process is pretty similar to looking glass, download the source code, make a directory under /Receivers/unix/build, run cmake, make sure you don't have any unresolved dependencies and if you do resolve them, then run make.</p>
<figure class="post__image"><img loading="lazy" src="https://bat.moe/media/posts/7/46.png" alt="Building scream" width="770" height="504" sizes="(min-width: 760px) 660px, calc(93.18vw - 30px)" srcset="https://bat.moe/media/posts/7/responsive/46-xs.png 320w ,https://bat.moe/media/posts/7/responsive/46-sm.png 480w ,https://bat.moe/media/posts/7/responsive/46-md.png 768w ,https://bat.moe/media/posts/7/responsive/46-xl.png 1024w">
<figcaption>If you don't have any dependency problems the cmake and make commands should resolve in short commands like this</figcaption>
</figure>
<p>Afterwards move the resulting binary to /usr/bin</p>
<figure class="post__image"><img loading="lazy"  src="https://bat.moe/media/posts/7/47.png" alt="scream to bin" width="763" height="44" sizes="(min-width: 760px) 660px, calc(93.18vw - 30px)" srcset="https://bat.moe/media/posts/7/responsive/47-xs.png 320w ,https://bat.moe/media/posts/7/responsive/47-sm.png 480w ,https://bat.moe/media/posts/7/responsive/47-md.png 768w ,https://bat.moe/media/posts/7/responsive/47-xl.png 1024w"></figure>
<p>At this point I ran into an issue where I ran into an undeclared dependency for pulse audio, after installing and rebooting it worked normally.</p>
<p>To use scream what you have to do is execute it pointing to one of your virtual machine's virtual networks (In my case and I assume most people's virbr0, therefore I must execute /usr/bin/scream -i virbr0, the VM doesn't even need to be running), while running it won't appear to be doing anything, not even when it establishes a connection successfully. </p>
<p>Fire up your VM, run scream in one terminal and looking glass in another. The end result should look something like this:</p>
<figure class="post__image"><img loading="lazy" src="https://bat.moe/media/posts/7/48.png" alt="scream and looking glass running" width="1280" height="481" sizes="(min-width: 760px) 660px, calc(93.18vw - 30px)" srcset="https://bat.moe/media/posts/7/responsive/48-xs.png 320w ,https://bat.moe/media/posts/7/responsive/48-sm.png 480w ,https://bat.moe/media/posts/7/responsive/48-md.png 768w ,https://bat.moe/media/posts/7/responsive/48-xl.png 1024w">
<figcaption>(I know you can't hear it but I swear it has sound)</figcaption>
</figure>
<p>If you can't hear any audio make sure to switch the sound option in your VM to CH9.</p>
<p>If you want a script to tie it all up and have the computer, looking glass and scream to start with a single command or .sh in the desktop it's as simple as  something like this:</p>
<p><code>#!/bin/bash</code><br><code>virsh start win11gaming</code><br><code>sleep 30</code><br><code>/usr/bin/scream_audio.sh &amp; /home/&lt;youruserhere&gt;/looking-glass-client</code></p>
<p>(Do mind the single ampersand operand, running two will run one service and close the other)</p>
<p>You may think you're done here but you'll likely notice an odd behaviour on high-performance games like cyberpunk, any unreal 5 game or really anything that makes use of the card, this behaviour is caused mainly due to two issues, a new and very useful and wonderful feature in Windows that throttles your CPU and the fact that the clock of the host and the guest aren't running synchronously to one another. If everything looks fine except for the crappy frame rate move to the next section, we're almost done.</p>
<blockquote>
<p>Side note: I recommend creating a new virtual network and use it for scream and only scream, it doesn't use a lot of bandwith that's shared with the rest of  the data your Window guests uses but it uses enough to be noticeable. Ultimately though, this really doesn't make that much of a difference so I decided to skip it in this guide.</p>
</blockquote>
<h3><span style="color: #3598db;">Step 6: Correcting the clock, some performance enhancements and disabling the Windows option throttling performance (Core isolation)</span></h3>
<p>The first thing that you wan't to do (Because really it's the easiest) is disable core isolation/memory integrity, just look in settings for it and un-toggle the switch, then turn off your VM.</p>
<figure class="post__image"><img loading="lazy"  src="https://bat.moe/media/posts/7/49.png" alt="coreisolationfu" width="761" height="592" sizes="(min-width: 760px) 660px, calc(93.18vw - 30px)" srcset="https://bat.moe/media/posts/7/responsive/49-xs.png 320w ,https://bat.moe/media/posts/7/responsive/49-sm.png 480w ,https://bat.moe/media/posts/7/responsive/49-md.png 768w ,https://bat.moe/media/posts/7/responsive/49-xl.png 1024w"></figure>
<p>Next you need to correct the clock by setting it to utc, correct the following lines in your VM XML (While you're at it also add the missing enhancement  lines to the cpu and hyperv segments, keep in mind evmcs is an intel-only feature): </p>
<figure class="post__image align-center"><img loading="lazy"  src="https://bat.moe/media/posts/7/50.png" alt="utc and enhancements" width="628" height="616" sizes="(min-width: 760px) 660px, calc(93.18vw - 30px)" srcset="https://bat.moe/media/posts/7/responsive/50-xs.png 320w ,https://bat.moe/media/posts/7/responsive/50-sm.png 480w ,https://bat.moe/media/posts/7/responsive/50-md.png 768w ,https://bat.moe/media/posts/7/responsive/50-xl.png 1024w"></figure>
<p>Fire up the VM again and you'll immediately notice the clock is now several hours off. to fix it go to the sysreg and add a new QWORD under HKEY_LOCAL_MACHINE\SYSTEM\CurrentControlSet\Control\TimeZoneInformation called 'RealTimeIsUniversal', edit the QWORD to 1 as shown below</p>
<div class="gallery-wrapper"><div class="gallery" data-is-empty="false" data-translation="Add images" data-columns="2">
<figure class="gallery__item"><a href="https://bat.moe/media/posts/7/gallery/52.png" data-size="913x501"><img loading="lazy" src="https://bat.moe/media/posts/7/gallery/52-thumbnail.png" alt="6.5" width="768" height="421"></a>
<figcaption>Creating a new QWORD</figcaption>
</figure>
<figure class="gallery__item"><a href="https://bat.moe/media/posts/7/gallery/53.png" data-size="922x489"><img loading="lazy" src="https://bat.moe/media/posts/7/gallery/53-thumbnail.png" alt="6.6" width="768" height="407"></a>
<figcaption>Setting RealTimeIsUniversal to 1</figcaption>
</figure>
</div></div>
<p>Aaand... that's it! No, really. <strong>You're finally done</strong>. Turn off the VM, turn it on again and if you see the hour is the same as your Linux Host then it's time for you to install some games.</p>
<p>optional: You can turn off all visual effects on performance options, honestly I haven't seen this making any difference because of how bloated Windows 11 is but hey maybe it raises the FPS by 1.</p>
<figure class="post__image align-center"><img loading="lazy"  src="https://bat.moe/media/posts/7/54.png" alt="" width="309" height="430" sizes="(min-width: 760px) 660px, calc(93.18vw - 30px)" srcset="https://bat.moe/media/posts/7/responsive/54-xs.png 320w ,https://bat.moe/media/posts/7/responsive/54-sm.png 480w ,https://bat.moe/media/posts/7/responsive/54-md.png 768w ,https://bat.moe/media/posts/7/responsive/54-xl.png 1024w"></figure>
<h3><span style="color: #3598db;">Step 7: Time for some gaming!</span></h3>
<p>For this I picked two games, QUAKE 2 RTX and Gori: Cuddly carnage. The reason for this is because Quake2 RTX is actually extremely demanding and in my opinion underrated for RTX benchmarks and Gori just because it's an unreal engine 5 game that doesn't take 50+ Gigs to install and it's choke-full of particle effects (It also has an intro cutscene rendered in-game that works as a good benchmark). I knocked down the resolution to 1080p because to be honest my poor RTX 1000 (Equivalent to a cut-down GTX 1650) cannot handle the Neutron Style.</p>
<p>Gori ended up with an average framerate of 50fps and 1% lows of 29 at both cutscenes and gameplay with very little drops.</p>
<div class="gallery-wrapper"><div class="gallery" data-is-empty="false" data-translation="Add images" data-columns="2">
<figure class="gallery__item"><a href="https://bat.moe/media/posts/7/gallery/vlcsnap-2026-06-24-22h09m33s100.png" data-size="1280x720"><img loading="lazy" src="https://bat.moe/media/posts/7/gallery/vlcsnap-2026-06-24-22h09m33s100-thumbnail.png" alt="7.1" width="768" height="432"></a>
<figcaption>Gori during cutscenes</figcaption>
</figure>
<figure class="gallery__item"><a href="https://bat.moe/media/posts/7/gallery/vlcsnap-2026-06-24-22h10m09s245.png" data-size="1280x720"><img loading="lazy" src="https://bat.moe/media/posts/7/gallery/vlcsnap-2026-06-24-22h10m09s245-thumbnail.png" alt="7.2" width="768" height="432"></a>
<figcaption>Gori during gameplay</figcaption>
</figure>
</div></div>
<p>As for Quake 2 RTX... Well.. I ended up with 6 FPS (lol). Even funnier I got 1000+ FPS if I turned RTX off.</p>
<div class="gallery-wrapper"><div class="gallery" data-is-empty="false" data-translation="Add images" data-columns="2">
<figure class="gallery__item"><a href="https://bat.moe/media/posts/7/gallery/vlcsnap-2026-06-24-22h15m18s534.png" data-size="1280x720"><img loading="lazy" src="https://bat.moe/media/posts/7/gallery/vlcsnap-2026-06-24-22h15m18s534-thumbnail.png" alt="7.1" width="768" height="432"></a>
<figcaption>RTX ON</figcaption>
</figure>
<figure class="gallery__item"><a href="https://bat.moe/media/posts/7/gallery/vlcsnap-2026-06-24-22h15m30s629.png" data-size="1280x720"><img loading="lazy" src="https://bat.moe/media/posts/7/gallery/vlcsnap-2026-06-24-22h15m30s629-thumbnail.png" alt="7.2" width="768" height="432"></a>
<figcaption>RTX OFF</figcaption>
</figure>
</div></div>
<p>I completely forgot about it while configuring all this but the RTX 1000 is in fact, not an RTX card. It has 0 RTX cores so these results are completely normal. </p>
<p>Still, I wanted to check if I hadn't screwed up so I went back to step 4 and swapped my RTX 1000 for an RTX A2000. This time the mighty 30 crtx cores of the A2000 gave me the mighty impressive result of 30 FPS on Quake 2 RTX. So yes, this is in fact working properly.</p>
<div class="gallery-wrapper"><div class="gallery" data-is-empty="false" data-translation="Add images" data-columns="3">
<figure class="gallery__item"><a href="https://bat.moe/media/posts/7/gallery/vlcsnap-2026-06-24-22h20m17s718.png" data-size="1280x720"><img loading="lazy" src="https://bat.moe/media/posts/7/gallery/vlcsnap-2026-06-24-22h20m17s718-thumbnail.png" alt="7.5" width="768" height="432"></a>
<figcaption>RTX A200 Loaded</figcaption>
</figure>
<figure class="gallery__item"><a href="https://bat.moe/media/posts/7/gallery/vlcsnap-2026-06-24-22h20m37s292.png" data-size="1280x720"><img loading="lazy" src="https://bat.moe/media/posts/7/gallery/vlcsnap-2026-06-24-22h20m37s292-thumbnail.png" alt="7.6" width="768" height="432"></a>
<figcaption>RTX ON in a card with actual RTX cores</figcaption>
</figure>
</div></div>
<p>If you like the results all you have left is to activate your license and relax.</p>
<h3><span style="color: #3598db;">Addendum 1: EDID Dummy plugs</span></h3>
<p>I want to make a quick comment on EDID Dummy plugs because I feel there isn't a whole lot of info about them online and their operation, while simple, is a bit more nuanced than one may think.  If you've never heard of them EDID stands for "Extended Display Identification Data" In other words they're the chips inside monitors that tell the GPU what kind of monitor you're using but since they're dummies there's no actual monitor attached to them, basically they serve the purpose of fooling GPU's into thinking there's a monitor attached.</p>
<figure class="post__image post__image--center"><img loading="lazy" src="https://bat.moe/media/posts/7/EDID_dummies.jpg" alt="An assortment of EDID Dummy Plugs" width="800" height="600" sizes="(min-width: 760px) 660px, calc(93.18vw - 30px)" srcset="https://bat.moe/media/posts/7/responsive/EDID_dummies-xs.jpg 320w ,https://bat.moe/media/posts/7/responsive/EDID_dummies-sm.jpg 480w ,https://bat.moe/media/posts/7/responsive/EDID_dummies-md.jpg 768w ,https://bat.moe/media/posts/7/responsive/EDID_dummies-xl.jpg 1024w">
<figcaption>An assortment of EDID Dummy plugs</figcaption>
</figure>
<p>First of all, try and get an HDMI plug (And by extension a graphics card with HDMI output) I used a DP dummy plug for this guide and yeah, they work great if you're doing remote work, but they're rather trash for gaming, refer to the screen tearing below (Which I swear is 100% on the dummy plug as evidenced by the fact the framerates are solid). I haven't come across a good DP EDID but who knows you may have better luck finding one than I did.</p>
<figure class="post__image"><img loading="lazy" src="https://bat.moe/media/posts/7/adendumDPEdid.png" alt="DP screen tearing" width="1280" height="720" sizes="(min-width: 760px) 660px, calc(93.18vw - 30px)" srcset="https://bat.moe/media/posts/7/responsive/adendumDPEdid-xs.png 320w ,https://bat.moe/media/posts/7/responsive/adendumDPEdid-sm.png 480w ,https://bat.moe/media/posts/7/responsive/adendumDPEdid-md.png 768w ,https://bat.moe/media/posts/7/responsive/adendumDPEdid-xl.png 1024w">
<figcaption>DP dummy plug screen tearing</figcaption>
</figure>
<p>Now that you've discarded the DP dummy plugs, which Dummy plug should you pick? I'll be honest here they're completely luck of the drawer. Fueran and Evanlak respect the specs they advertise but they're expensive and don't ship everywhere, the kicker though? I don't use either of those, instead I use the shitty gold one on the far-right that has Adwits written on it (A company that I'm not fully convinced actually exists) and I bought on Amazon in a package of 3 units for 10 USD. Why? Because it was ripped from a monitor that had integrated speakers, which in turns means it has integrated speakers (Despite having no output), which means I don't have to use scream or any other method to get audio out of it, I just run looking glass and the audio works, it's great. Honestly for this reason alone where you may luck out and the fact there really isn't much difference between an expensive edid dummy and a cheap one (Other than refresh speeds at higher resolutions) I recommend you buy the cheapest one that can give you 120hz at 1080p or whatever refresh rate you're looking for.</p>
<p>On the subject of the black Evanlak don't get a dummy plug that looks like it (With a male and female end. They're great at what they do but what they do it's not gaming, rather, what they do is fool a device to think there's a monitor or TV plugged in and send a clean signal to the monitor or TV on the other end. Why do this? I think it's rather obvious for some people but I'll just spell it out: these are mostly used to bypass HDCP and record footage from a device with a capture card. Personally though? I use them to patch video signals for wacky monitors and GPU's, refer to the image below of an imagination GPU sending a signal to a repurposed crypto-miner picked up from the literal garbage being used as a controller for an e-ink display to better understand the kind of wacky video signal nonsense I'm talking about.</p>
<figure class="post__image"><img loading="lazy"  src="https://bat.moe/media/posts/7/edideink-2.jpg" alt="EDID-EInk" width="2325" height="1463" sizes="(min-width: 760px) 660px, calc(93.18vw - 30px)" srcset="https://bat.moe/media/posts/7/responsive/edideink-2-xs.jpg 320w ,https://bat.moe/media/posts/7/responsive/edideink-2-sm.jpg 480w ,https://bat.moe/media/posts/7/responsive/edideink-2-md.jpg 768w ,https://bat.moe/media/posts/7/responsive/edideink-2-xl.jpg 1024w"></figure>
<h3><span style="color: #3598db;">Addendum 2: Why I don't use hooks and a note regarding other cards</span></h3>
<p>I feel like someone may read other guides and wonder why I don't use hooks, and the reason for it is because if you have a monitor or EDID dummy plugged into your computer and your motherboard isn't from a server or professional workstation... chances are it will crash the moment you fire up the VM. The reason for this is because Xorg tends to generate a new display (Even if hidden) whenever a monitor is plugged in and the moment you fire up the VM the display server has no idea what the hell just happened to that display and goes kaput.</p>
<p>There are ways around it by scripting and I don't recall if this also happens on Wayland but regardless it's out of my use-case and the less trouble-shooting I have to do the better, so I just don't do it. As I stated in the beginning I've been using a Windows VM regularly for over 2 years now and I'd rather not have to fix it every boot.</p>
<p>Hooks are great when working with workstation cards that have no video output (E.g. Nvidia Tesla cards) but for gaming? They're not worth the hassle, sometimes I've found it's necessary to do both loadiong the vfio drivers AND using hooks (Arc cards in particular gave me a lot of grief with this).</p>
<p>And while we're on this subject: Don't use Arc cards, just don't. I love them but the moment they detach from the VM (Even for a second before the virtio drivers kick in) they're loaded into the kernel and your host computer will just crash, moreover last time I used one with looking glass they weren't supported so it's not like you can even make proper use of them anyways (For the record if you want to give it a shot what I ended up using as a replacement was freerdp).</p>
<p>As much as I don't like Nvidia I have to admit they're the easiest solution for a virtual gaming PC, even AMD (Which is the best at bare-metal Linux) gave me a headache once as it wouldn't load without further modifications to the xml (long story short I had to dump the BIOS of the card with GPU Z and then load the BIOS into the VM manually with something similar to the lines below).</p>
<p><code>&lt;hostdev mode='subsystem' type='pci' managed='yes'&gt;</code><br><code>  &lt;driver name='vfio'/&gt;</code><br><code>  &lt;source&gt;</code><br><code>    &lt;address domain='0x0000' bus='0x01' slot='0x00' function='0x0'/&gt;</code><br><code>  &lt;/source&gt;</code><br><code>  &lt;rom file='/var/lib/libvirt/vbios/my_vbios.rom'/&gt;</code><br><code>  &lt;address type='pci' domain='0x0000' bus='0x03' slot='0x00' function='0x0'/&gt;</code><br><code>&lt;/hostdev&gt;</code></p>
<p>Happy gaming.</p>
<p> </p>
<p> </p>
<h3><figure class="post__image"><img loading="lazy"  src="file:///C:/Users/Admin/Documents/Publii/sites/the-bat-blog-of-the-batlog/input/media/posts/16/logowhite.png" alt="" width="200" height="200" sizes="(min-width: 760px) 660px, calc(93.18vw - 30px)" srcset="file:///C:/Users/Admin/Documents/Publii/sites/the-bat-blog-of-the-batlog/input/media/posts/16/responsive/logowhite-xs.png 320w ,file:///C:/Users/Admin/Documents/Publii/sites/the-bat-blog-of-the-batlog/input/media/posts/16/responsive/logowhite-sm.png 480w ,file:///C:/Users/Admin/Documents/Publii/sites/the-bat-blog-of-the-batlog/input/media/posts/16/responsive/logowhite-md.png 768w ,file:///C:/Users/Admin/Documents/Publii/sites/the-bat-blog-of-the-batlog/input/media/posts/16/responsive/logowhite-xl.png 1024w"></figure> <span style="color: #ecf0f1;"> <a href="https://bat.moe/about-me.html" style="color: #ecf0f1;">-Batlog</a></span></h3>
<p> </p>
<p> </p>
<hr>
<pre>If you enjoyed this article or if it was of any use to you, please consider donating some crypto. All funds go towards paying for the hosting.<br><br>Monero/XMR:<br>88MC6ksaVyLbtH9fT4owLSPX16vYD9cf6YELmXjaNWWd71R6iwfFV6DJtp7BXR5c6vWnxLEEGyu1tfwXwTqDM1CUCqDGeRY<br><br>Bitcoin/BTC: <br>bc1qzw9g97ffhllwukhagkvn5g0u9d8rhjv86xhf8h<br><br>Ethereum/ETH:<br>0xf948ab59E492865Fb5200A97F0F4F2f31F7b443f<br><br>Litecoin/LTC:<br>ltc1qqfv05jpyh8yvzyetmf7n5ve500jl656yxpc8y4<br><br>Doge:<br>DT5iG6GxoyZtHSSmaZHHV63NpEoH5yuixg</pre>
            ]]>
        </content>
    </entry>
</feed>